How to DIY Faux Stained Glass Windows
Turn a plain window into a showstopping DIY privacy window with this easy faux stained glass window tutorial. No fancy tools required, just inexpensive supplies you can find at the craft store!
Ingredients
- Window leading strips
- Liquid leading black
- Crystal clear window paint or colored Gallery Glass paint
Instructions
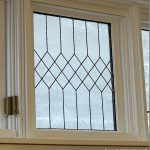
Step 1: Draw the glass design
- I started out drawing my faux stained glass design on a piece of paper the exact dimensions of the window opening. Needless to say, there was a lot of erasing and redrawing to get the perfect fit.

- My window design is all straight lines, which made it easy to draw and easy to create using primarily the peel and stick DIY stained glass leading lines.
- For more organic shapes, you could use stencils or cups, bowls, etc to make nice even curves and simple designs.
Step 2: Transfer the design to the window
- Now, if I could easily reach the outside of the window, I would just tape that drawing to it with painters tape and trace the pattern right onto the glass. But that wasn’t an option. So I put my drawing up against the window and, using a pencil, lightly marked off my lead line starting points on the edges of the window frame.

- PS: Be sure to clean your glass well with glass cleaner before transferring the faux stained glass black outlines!
Step 3: Apply leaded glass lines
- Then it was time to grab my Gallery Glass supplies, which I found at the craft store. These supplies are also available on Amazon. I used window leading strips, liquid leading, and crystal clear window color (and there's a combo kit).
- I used the clear window coloring to add a frosted glass look to my stained glass window. If you'd like a more colorful stained glass window, use the colored Gallery Glass paints instead. There are also colorful window films you could use.
- Those leading strips are pure genius. You can easily cut them. Easily reposition them to follow the lines of your pattern. I just used a level to keep my vertical lines straight. Press firmly on the edge of the lead strips to ensure good adhesion.

- Then I added some liquid leading “solder” to clean up the leaded areas where pieces didn’t quite connect. This is basically fancy black acrylic paint.

- I let that dry for 8-10 hours, per the instructions on the bottle.
- For curved lines, circles, or other organic shapes that aren't straight lines, Gallery Glass recommends creating a DIY stained glass window cling. You'll use a spare piece of glass (like from a picture frame), place the pattern underneath, apply the liquid leading and the stained glass paint, then let it dry and peel it from the glass to place on the window.
Step 4: Apply stained glass color paint
- Phase two was the application of the Crystal Clear glass color. Which, obviously, is colorless. After it dries, that is. During application it was milky white.

- The colorful DIY stained glass window paint applies the same way -- opaque during application and translucent after it dries (kind of like Mod Podge or Elmer's glue).
- I was a bit heavy handed. Squeezing it out directly from the bottle onto the window. Completely forgetting about the effects of gravity. There was some revisiting throughout the day to wipe away the Crystal Clear from the lead lines and the bottom of the window pane.
- My recommendation is to skip my heavy-handed method and use some type of applicator. Like a paintbrush. And painting on multiple light coats until you reach your desired look.
- Gallery Glass recommends applying the DIY stained glass window paint directly to the window from the bottle, then using this pick tool to brush/stir to spread and blend the paint. This also helps remove air bubbles trapped beneath the paint.
- Let it dry and enjoy your new stained glass window!