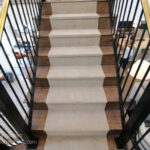
How to Install a Stair Runner
Give your stairs a whole new look when you learn how to install a stair runner! It's easier than you think to add a carpeted DIY stair runner, and a stair runner rug will make your stairs quieter and more comfortable to walk on. In just four simple steps, you can transform your wooden stairs into a safe and stylish feature in your home. By measuring your stairs, choosing your runner, installing the gripper, and installing the runner, you can create a beautiful accent that enhances both form and function.
Equipment
- Floor Chisel Welding Tool (for tightening up corners while you staple)
- Cordless Pneumatic Stapler Gun
- Measuring Tape (plus Sewing Measuring Tape)
- Carpet Scissors or Box Cutter
- Cutting Matte (if using box Cutter)
- T-Square for Straight Cut Lines
Ingredients
- Carpet Runner of Choice
- Anti Slip Rug Cushion Pad
- Double Sided Carpet Tape
- Carpet Seam Tape if you have a landing that has a mitered corner
- Carpet Binder Tape if you'll need to trim the runner
- Narrow Crown Staples (that fit your stapler at least 1/2 long or more depending on the carpet thickness
- Painters Tape
Instructions
STEP 1: MEASURE YOUR STAIRS
- Before you start choosing a runner, you need to measure your stairs. Measuring correctly is crucial to ensure that your runner fits perfectly and looks great. For this first step gather your simple tools: a measuring tape (or bendable sewing measuring tape, see my note below), a pen, and paper.

Figure Out Runner Width
- Start by measuring the width of your stairs, so you know what width of runner will fit. You want to find the thinnest point of width of your stair overall so that the runner fits the whole way up the staircase.
- Measure from wall to wall, or railing to railing. If you have a larger newel post, then measure from newel post to newel post (or wall) as this may be the narrowest point. Be sure to take a few measurements, if your stairs change in width even just a few inches.
- Keep in mind that it is nice to have about 3"-6" inches of wood showing on either side of your runner. If you prefer less of a wood reveal, you can put the runner all the way to one edge against a wall.
Measure the Length of Your Runner
- Now you need to figure out the length of your stair runner. Measure the riser (the part that lifts the stair higher) and tread (where you step) of the stair. Note these measurements down on a paper.
- Count all your stairs (not the top landing or bottom floor). Keeping in mind that you may have 1 extra riser since you will likely not start the runner in the top walkway but rather on the riser of that stair ending again on the bottom most riser. (see image below)
- Multiply your (Riser + Tread) measurement by how many stairs you have plus one extra riser and about 3 inches per end, for excess fold over. This will give you the length of the runner you need.
- Most runners can be cut to length, or you can fold over an extra inch or so on each end, so you don't need to stress about getting a runner the exact length you need -- just a runner longer than your minimum length needed.
Calculate Landings
- If you have a landing or turn in your stairs you need to decide how you want to handle this seam. I suggest a miter at a 45° degree angle, from the corner of the turn. (Note that you will need more runner length to get this look, but it will look the best without requiring a custom stair runner.) This is what that would look like below.
- You need to add length A (plus 2") and Length B (plus 2") to know the total length you will need. I add the extra inches just to be safe when cutting etc because depending on the runner you choose you may need to fold over the mitered edge to make this design work. Matching a pattern may also require additional inches.

- If your landing is just a straight stretch of space, then feel free to measure it as you would a tread, just the full length and add that to your total.
- Be sure to double check your measurements, because this part is crucial to make sure you get full coverage. Sometimes I find it helpful to draw a little sketch to double check I've covered all my bases... or stairs in this case.
STEP 2: CHOOSE YOUR RUNNER
- Before you start cutting your runner, you need to choose the perfect one that complements your home decor and style.
Features to Consider:
- Durable construction and material to withstand heavy foot traffic and regular cleaning.
- Non-slip backing can add extra stability, but is not absolutely necessary (since the runner will be stapled in place). You can also separately install non-slip rug pad for extra cushion beneath the runner.
- Thinner rugs will be easier to manipulate and bend when installing, while rugs with a little longer pile will hide the staples better.
- You can choose from a variety of materials including wool, nylon, polypropylene, or sisal, depending on your preference and budget.
- The pattern and color of the runner can match or contrast with the surrounding aesthetic depending on your style.
- If your stairs are long and you are going to need multiple runners, then you need to do a bit of figuring. Just make sure you have enough runner to overlap some with a bit to spare. It is much better to have an extra foot than to be short a foot.
- If you've chosen a runner that has an end pattern that needs to be cut off, don't forget to subtract that cut from the total length you need.
- Once you have decided on the perfect runner, placed the order, and your rug(s) have arrived -- hooray! Gather all the supplies and tools. It's time to move on to the next step of the project: the stair runner install.
STEP 3: INSTALLING THE ANTI-SLIP PAD
- Now comes the DIY fun part. Anti-slip pad isn't required for a stair runner but will make for a softer foot pad on hardwood stairs, as well as lessening noise. Even if you aren't installing the extra carpet pad, you'll want to mark the stair runner location.
Mark the Location of the Runner with Painters Tape
- First, mark where your runner will sit on the stairs using painters tape.
- In order to make sure your runner is installed straight down your staircase and doesn't meander around, you need to determine the placement of your runner, and mark the outside edge with painters tape.
- Find the center point of your stair, then measure from the center point of the stair half the width of the runner out on both sides, and tape on the *outside edge* of where the runner will sit. (This way the tape can stay there while you install and you won't have any problems removing it later- meaning it won't be taped UNDER the runner- but rather on the outside edge of the runner.)
Prep and Install The Anti Slip Padding.
- Decide if you would like the anti slip rug padding to run the whole length of the staircase or if you would like to cut them into individual squares and just place them on the tread.
- My personal thought is this: I have noticed that over the years these carpet stair pads tend to bunch up. So I would suggest you attach the padding as a full runner itself, the whole length, wrapping the stairs where the rug will go entirely to help keep the pad tight and from bunching up in little segments.
- Taping in three locations (top, bottom, and sides) on each tread as shown keeps the cushion from moving around.

- This carpet padding may need to be trimmed so it doesn't poke out of the edges of the runner. Thankfully, the inexpensive rug pad is easy to cut with scissors. Measure your carpet runner width (in real life - because sometimes these widths will vary slightly). Once you are sure of the width, cut the padding to be 3-4 inches narrower than the carpet itself.
- To attach the rug pad to the stairs, heavy duty double sided tape is quick and easy. Cut the double sided tape for each step as you go. Start at the top and work your way down, making sure to stay centered within your painters tape lines. I'd suggest you place tape like shown in the figure above on each and every step. If you are working with padding the full length of the stairs, I would roll it up in advance of starting, so that it is easier to work with and just unroll a step at a time as you work your way down.
STEP 4: PREP & INSTALL RUNNER
- Depending on the style of runner you choose -- and how picky you are about the design -- you may need to lay out the runners, and decide where you want it to start and if you need to remove any patterning that doesn't make sense.
Prep The Runner
- For example, if your rug has a border, you may not want on the top of your riser (since none of the other risers will have it. So before beginning to install you may want to use your T-square, box cutter and healing cutting pad to get a nice straight edge to begin your runner. Don't be afraid! Carpet cuts pretty easily, especially with sharp blade.
- To secure that cut edge of the rug, take the double sided rug tape (that you used to attach the padding to the stairs) and place it along the entire edge of the cut (on the back side). Then fold back (back side to back side) to secure that new edge. This will help to avoid fraying. You can apply this easy carpet binder tape as well if you prefer.

Install The Runner
- Start installing at the top riser nose right under the top landing.
- Line up the rug straight with the stairs below. (Again, you may want to roll it up for ease of controlling it on the stairs while you work.) Secure a row of staples into the finished (or recently taped) edge.
- Then, use your floor chisel to hold the runner tight into the corner of the tread and riser, and staple securely on both the riser and the tread. I would add a staple about every 3". You can add a couple staples along the edge of the runner if you like as well.
- Continue your way down the stairs.
Joining Stair Runners
- If you have a long stairway and you need to add a second runner, continue the first runner either to the bottom of the stair nose (1-2" down the riser) or to the bottom of the riser (about 1" overhang onto the tread) -- see the diagram. Secure the corner and edge with staples.

- Cut any excess rug that is too long. You don't want a big bump in the middle of a stair tread! Tape/bind that that edge.
- Then, start installing the next runner in the corner, Either under the bullnose or at the back corner of the tread so that the seam is hidden in the corner.
- Overlap the cut inch or two of the last runner edge by attaching and stapling like you did on each step above, and work your way to the last step.
- Pull the runner to the point you want it to finish, add 1-2 inches to that length (for folding under and finishing the edge) and cut the excess.
- Use the double sided tape method to secure the end and then staple in place at the bottom of the last riser.
Installing a DIY Stair Runner on a Landing with a Corner
- If you have a landing, I would suggest you start on this mitered seam (angled cut edge of the rug) as the first point of installation. Then work your way up and down from this seam with the 2 joined runners.

- Depending on the space in your stairwell, you may want to create this seam on the floor in a more open space. If you decide to do this in place, be sure to mark the placement of the runners, with painters tape to keep things square and straight as you install.
- To determine the mitered seam, lay out the rugs face up in their proper place perpendicular to each other with a full square of overlap. (The shape will look like an L and the corner of the L will have two layers of runner overlapping.)
- Fold back the corners that are overlapping, and create the 45 degree fold down the center, like the diagram shows. You will be seeing 2 triangles of the back side of the runners, when you fold them back.
- These triangles will need to be trimmed off. How much you trim is determined by the thickness of the carpet itself or how much the runner will unravel after being cut.
- If you have a thick carpet you will not leave any excess but cut it exactly together along the 45 degree angle and use carpet joining seam tape to tape the carpets butted tight together at the seam.
- If you have a thinner runner, then I would leave an excess of 2 inches past the folded edge. Cut off the triangle of carpet that will not stay leaving 2 extra inches like shown in the diagram below. Fold the 2 inch piece back onto itself under the face of the runner. Secure that cut edge, by adding the double sided tape and folding the excess back edge to back edge (with the tape sandwiched between).
- This will give you two finished 45 degree angle cuts. Now you can use carpet seam tape on the back edge to secure the two pieces together.
- Once you have the two rugs in place on the stairs. square and ready, use the double sided carpet tape on the edges of the rug to secure this piece to the wood. Then staple along all edges and get the runner nice and secure. If necessary you could add some staples to the mitered seam, but these may be very visible or felt by bare feet, so be careful.
- To finish just work your way down the stairs or up the stairs from this seam, following the carpet runner installation directions above.
Notes
QUICK TIP: a bendable sewing measuring tape (that you use to take body measurements) is easy to wrap from the back of the tread, down to the bottom of that riser in one easy measurement. This ensures you can measure the curvature of the stair and still be highly accurate, so pull it out of your sewing box if you have one available.
Note : If you feel like the staples are too visible, you could spray the top of your staples with a similar color spray paint or color them with a permanent marker. You just may need to do this step 24 hours in advance of the install to give the paint time to dry if you do the spray paint option.