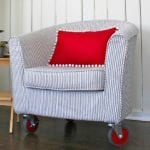
How to Reupholster a Tub Chair
Step by step guide
Equipment
- sewing machine
- scissors
- rotary cutter/box knife
- seam ripper
- self healing mat
- clear ruler
- 22" heavy duty zipper
- staple gun ( I find staples are easier than tack strips)
- staples
- pliers
- flat head screwdriver (staple remover)
Ingredients
- tub chair to reupholseter
- 4 yards home décor upholstery fabric @ 54" wide
- 10 yards cotton cording 1 package (for piping or welting)
- thread
- 4 5" swivel casters 2 with break (optional)
- Paint optional
Instructions
- Step 1: Unscrew the wood legs and begin removing staples using flat head screwdriver and pliers from the black base cover. Try to remove these pieces of fabric carefully without ripping so you can use some for pattern pieces in future steps. Like this black cover will be saved and replaced after the pieces is reupholstered.
- Step 2: Remove all the staples in order to loosen leather from frame.
- Step 3: Gently pull leather off of frame keeping big pieces in tact to use as a pattern.
- Step 4: Label all original fabric pieces. (You really only need one side of the leather pieces, just reverse to make the cuts for the other side other side.)
- Step 5: Begin with largest piece (center back typically). Place leather pattern on fold of new fabric and cut center back. I opted to make fewer seams than the original leather by combining two panels. Be sure to add any seam allowances that are necessary. A larger seam allowance will help keep the seams stable when some one sits on the seat.
- Note: before adding the fabric to the chair, check the existing padding. It might need a fresh layer of quilting fabric to help fill out the new fabric you are adding, since the original padding may be a bit squished. This will help your piece look full and new when you are done, rather than slightly squashed.
- Step 6: Begin sewing panels together. Sew both the interior paneled sections together. Then separately sew the exterior back pieces together - but don't sew those to each other just yet, we need to make the piping first.
- Step 7: To make the piping cut 2" strips on the bias (meaning on the diagonal to there is a bit of pull or stretch to the fabric).
- Step 8: To make the piping (or welting) sew binding strips together by lining up bias cut (A) then sew pieces at a 90 angle (B). Press seam open (C) and the final seam (D). Make 10 yards of piping for each chair.
- Step 9: Sew cotton cording into binding by placing cording in the middle and folding binding over. Use a zipper foot to get seam as tight as possible.
- Step 10: Pin the piping to top raw edge of interior back.
- Step 11: Place exterior panel on top of interior (right sides together) matching up center backs.
- Step 12: Sew panels together (still using zipper foot) with piping in between. Start at the center back and complete one side.
- Step 12 continued: Sew other half of main body.
- Step 13: Pin piping to raw edge of arm portion.
- Step 14: Pin front arm piece at center top to main body portion then sew in place.
- Step 15: Staple the excess fabric or raw edges of interior panels to crevice of frame at seat. If any staples don't fully set into the wood, just pound them in with a hammer.
- Step 16: Turn the chair upside down and staple the raw edges of exterior panels to underside of the chair or chair base. Trim the excess fabric if necessary to have a nice smooth base for the chair.
- Step 17: Staple the front panel cover into the inside of the seat crevice and under base. If desired you can stitch the seam of the front panel to the side pieces but it isn't necessary.
- Step 18: Replace black base cover (reserved when you removed it at the beginning) by using staples.
- Step 19: Cut seat cushion pieces - top, bottom, side panel, piping
- Step 20: Make zipper closure panel.
- Step 21: Sew side panel to top with piping in between. Repeat same process for bottom piece.
- Step 22: Sew zipper panel onto side panel at ends. Then pin piping in place and continue to finish sewing top and bottom panels. ** Be sure to leave zipper open in order to turn right side out after sewing.
- Note: Consider replacing the seat cushion with new foam if the chair seat is looking smashed. This will really help with the final look of the chair. If the original foam is still in good shape, you could consider wrapping the foam in a small layer of batting pad to help round out the cushion. This will help it to appear fresh, fluffy and new and fill out the new fabric well.
- Step 23: At this point you can add the original legs or opt for fun rolling caters like we did. we decided to add some color to the casters. Paint interior of wheels, first white then red acrylic. Seal red with clear gloss varnish to prevent chipping.
- Step 24: Attach wheels to base, pre-drill and use wood screws to fit.