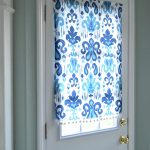
Super Easy No Sew DIY Magnetic Curtain for a Half Window Door
There are two ways to make this magnetic curtain. The easy way and the super easy way. With the super easy way, you are going to forego any hemming and cut out the fabric with pinking shears. These are special fabric scissors that have a serrated or zig-zag blade that lessens or even prevents fraying depending on the fabric used. With the pinking shears, you cut the fabric to the exact width, but still add the extra fabric at the top. Note that the zig-zag edge will be visible. With the easy way, you are going to use regular fabric scissors and add another half an inch or so on each side edge of the blind to account for the hem, while still adding the extra fabric at the top for the magnets. This edge looks more nicely finished so I did it this way. You can possibly finish the assembly of the Easy Blind (with the hemmed sides) within 20-30 minutes. And with the Super Easy Blind, you can be finished assembling it within 10-15 minutes or so. The time-consuming part is the glue drying. You will want to let it sit for a number of hours or overnight until ready to use.
Ingredients
- Fabric of your choice I found mine at Hobby Lobby. Heavier fabric like duck or outdoor fabric would work the best. I made a different blind with a thinner cotton fabric once and wasn't quite as happy with it.
- Fabric glue I used Aleene's Fabric Fusion from Wal-Mart. I'm sure other brands of fabric glue would work just fine
- Magnets I used 6 from a larger pack of nickel sized magnets from Hobby Lobby. There are smaller and larger magnets -- just be aware of the danger of smaller magnets around babies and toddlers!
- Fabric scissors or pinking shears
- Any additional trim or embellishments optional
- A plastic mat or wax paper to protect your work surface
Instructions
Step 1: Measure and Cut the Curtain Fabric
- To make your own version, start off by measuring the window and the space you want covered. (I like having a bit of light shining through the bottom, so I made my blind a bit shorter than the full window.)
- Then cut the fabric to the appropriate size, adding an additional inch and a half of extra fabric at the top of the blind and the appropriate extra fabric at the sides depending on whether you are using pinking shears (the super easy way) or regular scissors with extra fabric (the easy way).
- The magnets will go at the top so make sure you have enough space above the window with the fabric to do so.
- Important Tip: If you are using a bold pattern, make sure it is centered how you want it before you cut the fabric.
Step 2: Press (Iron) the Side Hem
- To hem the sides and hide the unfinished edges, lay the fabric pretty side down and fold the edge over about 1/4 an inch and iron it. Then fold it over again to make a smooth edge and iron it again. Do this on both sides.
Step 3: Determine Magnet Placement
- The next step is to determine how many magnets you are going to need to hang the blind. The simplest way to do this is to place the fabric piece over the window and start adding magnets along the top until the blind is in place and doesn't shift when the door is open and shut.
- The magnets need to be dispersed along the top for support. Start out with 6 nickel sized magnets and add more if needed.
Step 4: Glue the Side Hem
- Once you have determine the magnet count, it's time to pull out the fabric glue. You'll want to cover your work surface first with a plastic tablecloth or wax paper.
- Start gluing the sides first, if you are doing the easy blind.
- Important Tip: The glue is quite messy and a bit of a pain to use, but dries well. Be patient.
Step 5: Glue the Magnets in the Top Hem
- Next, position the magnets across the top and glue them down.
- Add a dot of glue to the top of each magnet and in between each one. Then fold over the top and smooth it down.
- So to recap: the magnet is glued to the fabric on bot sides, and the fabric is glued to itself in the spaces between the magnets.
- Now you just need to let it dry.
Step 6: Hem the Bottom or Embellish
- You can leave the blind as is, hem it with glue, or embellish it with trim or add fun pom poms.