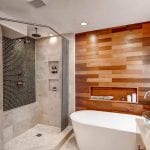
5 Step DIY wood Plank Walls Tutorial
Create this beautiful DIY wood plank wall in 5 easy steps.
Ingredients
- 4'x8' sheet Maple Veneer Plywood sheeting cut into 4" strips
- Finishing Nails Pin Nailer
- Stain and Sealant
- Liquid Nails
Instructions
1. Choose Material
- The first step is to choose your material. There are a ton of different types of wood and great options you can choose from, so it ultimately comes down to the look of the space you are wanting.
2. Finish wood (stain and seal)
- Once you have chosen the type of material and cut down your sheets, it's time to stain and seal. Again, choosing the color of the stain is dependent on the type of look you are going for.
3. Create Design
- Depending on the space of your room will depend on the length to cut your panels. The key is to just ensure that no piece ever lines up with the one above or below. Staggering end joints is important.
4. Measure and Cut
- Once you have created your design layout it's time to measure, cut and hang. We cut the boards as we were placing them up onto the walls, following our brick stacked pattern. To figure out our length to cut the boards, we measured the width of the wall and divided it by 3.
5. Install
- Our favorite part, watching your design and project all come together. We started just above the niche, gluing our first board into place with caulking, liquid nails. We then gradually moved up making sure each board was stalked half way over the board underneath.