DIY Peel and Stick Shiplap Kitchen Backsplash
Can you use shiplap as a kitchen backsplash? Yes you can, with no special tools and on a small budget! This vinyl flooring shiplap kitchen backsplash is an inexpensive way to update a farmhouse kitchen.
Equipment
- X-acto knife or box cutter
- Rolling Pin
Ingredients
- Peel and stick vinyl plank flooring
- Wood trim optional
- Paint and primer
- Kitchen and bath caulk
- Liquid sander / degreaser
Instructions
- I started on the bottom and simply lined my first plank up with the counter. I positioned the next plank directly beside the first until I reached a corner.
- For my next row up, I cut a piece in half so the boards would be staggered and spaced it above the first row using a penny. The vinyl is super easy to cut and only needs to be scored with an exacto knife.
- Press on each board, firmly as you go. Follow package instructions for specific pressure and timing. Some may recommend using a rolling pin.
- I did NOT use any added glue or nails however - I have heard some people run into problems with their planks staying on the wall. I think the success of your planks sticking depends on the cleanness of your wall and the quality of adhesive already on your planks. Be sure to clean really well with degreaser and use the rolling pin to press the planks firmly on the wall!
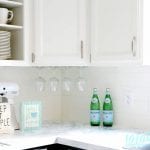
- I left a small space between the planks and the bottom of the cabinets. I chose not to spend time cutting any planks horizontally to fill that gap. I planned on painting my cabinets and shiplap all the same color, and figured it would blend together well.
- Use wood trim to finish off any exposed edges.
- Seal along the countertop and the edge of your plank with a clear, sink and tub grade sealant, to make sure no water creeps up under your planks.