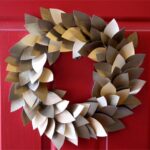
Easy Paper Christmas Decoration: DIY Paper Leaf Wreath
Learn how to make a modern paper leaf wreath that looks just like a magnolia wreath, for a fraction of the cost. This paper Christmas wreath is easy to make and a great decoration for the winter holidays and all year long! This step-by-step tutorial shows you how to make paper leaves and how to make your own paper wreath base.
Ingredients
- Cardboard sheet (16" or more square) or cardboard wreath ring
- 4-6 sheets of scrapbook paper or other paper
- Stapler
- Scissors and/or cutting machine
- 2 large bowls, large compass, or thumbtack and string (to make the cardboard wreath base)
Instructions
Make a cardboard wreath base (3 ways)
- Here are 3 ways to make a circular cardboard wreath base for your paper leaf wreath. My wreath is about 16 inches in outer diameter, and about 10 inches in diameter in the center, so the cardboard wreath form is about 3” wide.
- Option 1: Use 2 large bowls of different sizes. Center and trace each of the bowls, then cut out the circles using scissors, a box cutter, or a craft knife.
- Option 2: Use a large woodworking compass to trace 2 large circles, about 16” and about 10” in diameter (8” and 5” radius). Cut out the inner and outer circles using scissors, a box cutter, or a craft knife.
- Option 3: Make your own DIY string compass. Measure with a ruler to find the center of the piece of cardboard. Tie a loop for a pencil in a piece of string and then tack the other end of the string in the middle of the cardboard to create your own string compass. Adjust the length of the string to create a larger and then smaller circle (about 8” for the larger circle radius, and 5” for the center circle radius). Cut out the inner and outer circles using scissors, a box cutter, or a craft knife.
Cut out the paper leaves
- Download our free leaf template at Remodelaholic.com. The free download includes both PDF and SVG templates.
- Print the PDF leaf template and cut one from cardboard or thicker paper. Trace this template onto your desired paper and cut with scissors. You'll need 60-70 leaves about 3.5" long for a wreath like mine.
- Open the SVG template in Cricut Design Space or Silhouette Studio. Resize as desired, and duplicate to fill the page. You'll need 60-70 leaves about 3.5" long for a wreath like mine. Cut using your machine.
- Tip: When removing your cut paper leaves from the cutting mat, flip the mat over and peel the mat from the paper (so the mat is the part that is curving, not the paper). This keeps your paper as flat as possible rather than making it curl as you pull it from the mat.
Make the paper leaf wreath
- Roll the bottom of one paper leaf slightly to give the leaf some shape. (Trimming one pointy end of each leaf will make this easier, but as you can see, I did it with the full leaf shapes).
- If you'd like some additional definition and texture, you can fold the leaf in half and crease the center to make it look more like a real leaf. You can also lightly sand the edge of the leaf pieces or slightly singe with a candle if you prefer a less crisp edge and more realistic look, more like end of fall paper leaves :)
- Carefully staple the leaf in place on the cardboard wreath ring.
- Roll the next leaf and overlap the sides a little bit with the first rolled paper leaf and staple in place.
- Continue rolling and stapling leaves to fill the width of the wreath form and cover the cardboard base. Work one section of the wreath, then move to the next overlapping section.
- Continue rolling and stapling leaves around the ring until the entire wreath form is filled in! If there are gaps, use glue dots to attach the leaves to one another where you'd like them.
- If you'd like to add a little bit of sparkle to your paper Christmas wreath craft, use a paintbrush to brush a small amount of white glue or modpodge onto the tips of the leaves. Sprinkle with glitter and enjoy!
- You can also make this wreath extra festive by adding white berries or red holly berries (from Dollar Tree, or by making tight rolls of strips of paper) in clusters around the wreath.
- To hang the wreath, I stapled a looped twist tie on the back.