Cut 3/4" plywood to 18" wide and the length(s) needed for your stairs. We needed almost 9 feet in length. Plywood is only 8 feet long, so ours required a seam.
Attach the two lengths with 3 long metal mending plates. We placed the seam between two stairs, about a 1/4 of the way down, so that the plates didn't make the slide sit up on the stair edges - you want all of the slide bottom surface to sit on the stair edges to give it support all the way down the steps.
Sand the seam smooth, and also sand the beginning and end edges to get rid of any sharp edges (it also makes it lower-profile to prevent tripping). We also sanded the triangular supports smooth so it didn't cut into the carpet much.
Cut triangular supports to the depth and height of our stairs and attach in four places on each side by screws from the top and L brackets underneath. We chose to place the triangle supports at the top and bottom, then as equally spaced between as possible. This left us with a 2-stair gap between supports in the middle - since the weight is all resting on the edges of the steps, it hasn't been a problem.
Attach a low-profile handrail using screws from underneath, directly on the top of the right side of the slide, opposite the wall attachments.
Attach flush mounting brackets to the wall and the triangular supports. We ended up only using two sets to make it easier to align when taking on and off. They're really only needed to assure that the slide doesn't move forward as the kids go down (all the weight is on the stair edges and the supports.) These mountings allow for the slide to be right up to the wall, not leaving a gap where little fingers could be caught.
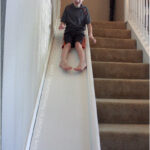
Finally, paint with a good enamel paint (I used Sherwin Williams) in a gloss finish and white to match our home's molding. The slide was super fast without the paint, so I'm glad the paint slowed it down. I still insist on a cushion at the bottom.
To install the slide, have 2 people to slide the top and bottom brackets into each other at the same time, and you're ready to slide!