Bi-fold to Paneled French Door Closet Makeover
Closets aren’t usually at the top of the DIY list — there are so many other things that we’d love to get our hands on and beautify first, right? But when it comes down to it, we all want a closet that functions well (like these great organized closets) and, hey, if it can look like something in a magazine too, we might just love our wardrobes a little bit more!
No matter what is lurking inside, the closet doors can be dressed up enough that everyone will just *think* that it’s beautiful inside, too — that’s the power of a closet makeover! I love what our guest did today: she took her boring builder grade bifold doors and applied a little DIY love to end up with a beautiful paneled french door closet!

There are so many ways to make over closet doors. You can opt to remove the doors entirely and add curtains:

or you can paint:

Left: Living Better Together
Right: Wispy House
or glaze:

or flex your do-it-yourselfer muscle and really pull out the big guns and add features like mirrors

or textured wallpaper panels

or, of course, do like our guest did and give the closet doors a facelift AND a functional update to french doors instead of bifold doors. Here’s Jenna with all the details for you!

Paneled French Doors from Bi-Fold Closet Doors
by Jenna of Wife in Progress
Hi everyone! Thank so much to Cassity for inviting me to share one of my favorite projects with you! My name is Jenna and I blog over at Wife in Progress. I’m a twenty-something teacher living in the Boston suburbs with my wonderful husband, Brian. My partner in crime says that I have a serious case of decorating ADD (I’m forever starting new projects only to not finish old ones) but I’m really enjoying the journey of decorating my first home and pushing the limits of DIY!
Before my hubby and I bought this home we had never done any DIY. We started by learning the basics (DIY 101: what’s the difference between satin and eggshell finish paint?) and have gradually become more adventurous over the past three years (hello glass tile backsplash!). I particularly love projects that add value to my home but that don’t cost an arm or a leg!
Today I’m sharing with you my favorite.project.ever – my bedroom closet makeover. You know those ugly bi-fold doors that older houses have? Well my bedroom has three sets of them! Unfortunately, because our upstairs is a converted attic, the doors were custom-made to fit the space so replacing them was going to be tricky. Initially I painted them white to cover up the orangish wood but I always dreamed of beautiful paneled doors.
 Panels you say? Yup, panels. Nothing a bit of wood lattice and some glue can’t recreate! Hang on – this is one of the easiest and most effective DIY projects around 🙂
DIY Paneled Closet Door Facelift
This post contains some affiliate links for your convenience. Click here to read our full disclosure policy.
Shopping List:
- Lattice trim (2 x 1/4 inch)
- Wood glue
- Caulk/spackle/wood filler
- Primer & white semi-gloss paint
**Preparation: Buy your wood a few days before you plan to use it. You must let it sit in the room to acclimate to the conditions. Otherwise it WILL warp!**
Step 1. Cut lengths of the trim to match the length of your door. Using wood glue and some finish nails, secure these vertical strips in place. If you have nail gun, that would be even quicker.

Step 2. Measure the distance between the two length-wise pieces. This is the measurement you’ll need for the horizontal pieces.

Step 3. Decide how many square/rectangle “panels” you want on each door. If you’re really smart, you would do some math here. I was too lazy and just eyeballed where I wanted them to go.
Step 4. Complete steps 1-3 for each door.

Step 5. Use wood filler or spackle to fill any gaps or nail holes. Caulk the seams so that the lattice strips look completely flush with the door. Prime and paint a semi-gloss white.


Step 6: As a final spruce-up, replace the door hardware with something a little snazzier!

So that is the basics behind the “face-lift”. I decided to take this makeover one step further. I didn’t just hate the look of the bi-fold doors, I also hated the fact that they were bi-fold doors. They never opened wide enough for me to see everything in my closet at once. Again, simple remedy…convert them to french doors!

How to Turn Bi-fold Doors into French Doors
Shopping List:
- 3 inch mending braces (You’ll need 6 of these in total)
- 2 magnetic catches
- I also needed some scrap 1×3 wood that I had hanging around the basement.
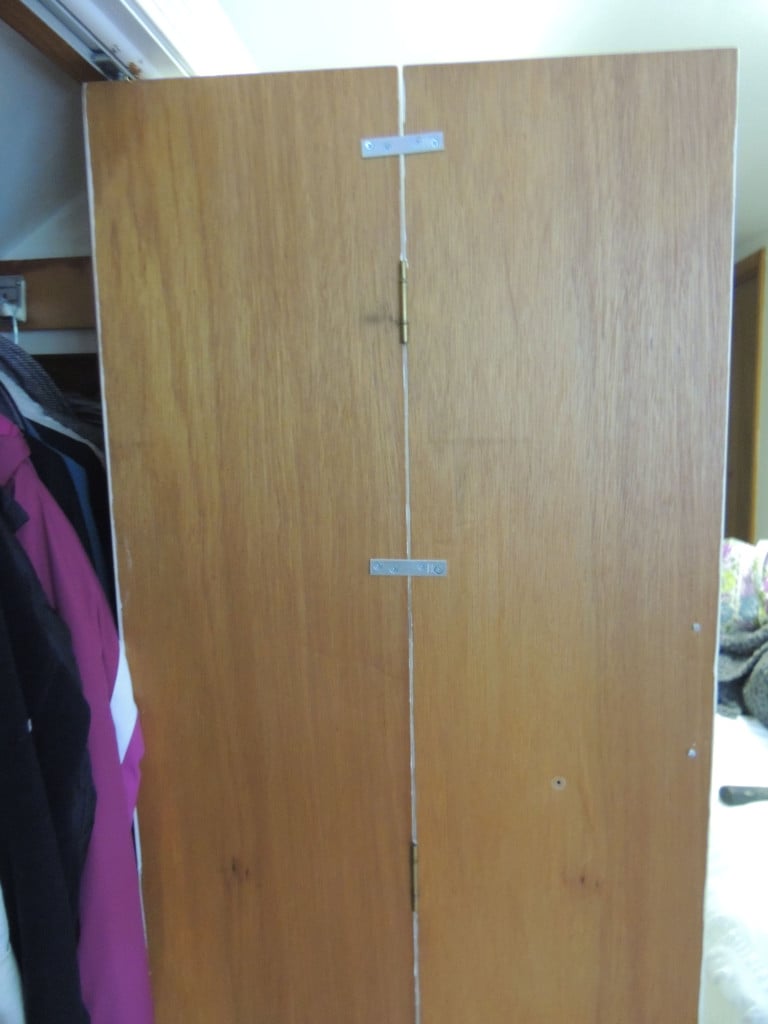
Step 1 : Remove the door from the inside of the bi-fold track. I just pulled mine out and unscrewed it from the door. The doors should still be attached in the corner so that they have a point to pivot from (because they don’t have hinges attached to a frame like a regular door)
Step 2: Stop the doors from folding. We straightened them out and screwed the braces to the back of the door.

I actually held the door while my husband screwed the braces in. It’s important to keep the door as straight as possible so that the braces screw in correctly. Our braces are a little crooked, but it doesn’t really matter.
You’ll notice that my closet didn’t get much of a makeover on this side, i.e. it was never painted. When they were still bi-fold doors, this didn’t matter…but now I have another painting job to add to my list! Anywho, I digress…
Step 3: Once we had all 6 braces screwed to the doors, we had to create a catch so that the door would close properly (otherwise it just swings and never closes).
Step 4: Depending on how the inside of your closet is, you may need to add a piece of wood so that you can screw the magnetic catch to something the door will hit when it closes.

Then, the metal plate gets attached to the door. When the door meets the magnet, it catches and stays closed. Depending on your closet, you could attach the magnetic catch to the door and the metal plate inside the closet….whatever works best for you!
When that’s all done….you’re left with a lovely closet door that swings out just like fancy french doors:
Source List:
- Primer – Benjamin Moore Fresh Start, $42
- Paint – Behr Semi-Gloss white paint (off the shelf) – Lowes
- Wood Lattice – Lowes, price varies depedending on wood type (I spent less than $30 in total)
- Hardware – Lowes, $5 a piece
Time Breakdown:
- “Facelift”: one weekend
- “French door conversion”: one hour
——————————-
Great job, Jenna! I love a stylish and functional update like this!
Visit Jenna over at Wife in Progress to see more of her DIYing, like her white-washed fireplace and her dining room board and batten.
(and don’t forget to show your closet some love!)


Thank you, thank you, thank you. I have been to multiple stores, determined to find pre-hung french doors for my closets, but without spending a fortune for them. I was literally laughed at at Home Depot yesterday by the elderly male associate in the door department when I asked if they had any pre-hung french closet doors. He said the bifold are the only option for closets. I hate bifold. Then listened as he retold my question to another employee as if I was some kind of idiot, and they both laughed. I took my toddlers hand and left swearing silently to never return.
You have made my day. I am a DIYer and I thank you for posting your genius. This will not only save me time but will give me the chance to create something beautiful…not to mention the chance to say “Ha!” to the Home Depot guy.
Sandy, thank you for sharing your story — we’d love to see pictures when you finish and YES, make sure those Home Depot guys know that you got what you wanted by doing it yourself! 🙂
Hi,
I’m looking to try converting a set of bifold closet doors into French doors and am wondering how this project held up for you over time. Are the not-really-hinges dealing well with daily use?
Also, I didn’t see you mention the use of any kind of anchor for your screws; were your doors not hallow? Mine are which makes me nervous!
If you could give a response it would be greatly appreciated! I really hope I can make this work to store shoes on the back of the doors and tidy up the closet floor, it needs something desperately.
Hi there! This is a project from one of our amazing guests, and I’m not sure if she’s monitoring the comments on this post or not — you can click over to her site (linked towards the top of the post) and ask there, or we also have a similar post that uses a different method that might answer some questions and ease some nerves! https://www.remodelaholic.com/2015/04/bifold-door-makeover-french-doors/
Was wondering where you purchased the lattice trim you mentioned here precut or if you had to cut it yourself. Have been searching all over the place for 1/4″ trim pieces and am having a hard time. Thanks so much for posting this. I have one of those fake wood grain hollow core doors that I am wanting to add panel trim on to give it a craftsman style look. Thanks
Perfect, exactly what I was looking for and didn’t know was a cool option!
I don’t have bi-folds but I had to read the post anyway just to see how you did this. I’m amazed. Wow. Well done
Same issue, here. Some doors are just one bi-fold and most are louvered. May need to talk hubby into this! Good job!
Love it! I have a track across the top of mine. Did you have a track? I can’t tell from the pictures?
Absolutely LOVE it!! I am going to do a similar project on plain doors but because of the door knobs over thicker wood. I plan on using the wood slats in old blinds. You can make in all kind of configurations. They are thin but you can stack them or side by side. Fill in areas with Plaster.. You can pick up really cheap at resale shops. I look for real wood blinds not plastic so I can sand it.
Stella, that is an amazing idea! I would love to see photos when you finish!
Very creative examples! Thanks so much!
OK, one suggestion, re the paneled doors with squares. I suggest you simply buy 72 (w/e) by 9 (w/e) veneer, and cut the squares out of it. The way you approached it, you’re doing a lot of cutting and fiddling and wood-filling.
Thanks for the tip, Curtis!
Great job Cassidy! You have given me inspiration for my laundry area- I have hollow core doors… so don’t know how the brackets will hold, but we will see!