Budget Makeover for a Boy’s Bedroom with Curtain Tutorial
When a reader sent in pictures of the incredible transformation she and her young son had given his bedroom, we couldn’t wait to share it with you. We invited her back to tell you all the details and give you the 4-1-1 on the super cool curtains that are in the bedroom. Spoiler alert: the fabric was designed by her son. We love it when parents get their kids involved in projects!

Maybe it’s because–so far–Justin and I only have a need for girls’ rooms, we get a kick out of looking at boys bedrooms. Sometimes it seems like a little more thought has to go into designing them, and the results are often really fun to see. Like these rooms, below, that really incorporate the personalities and design wishes of their young male owners.
Boys Bedrooms

Airplane room | Under the Sycamore
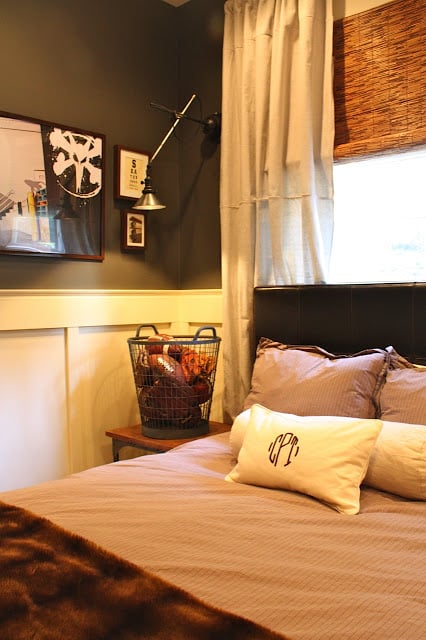
Room for a growing boy | My Sweet Savannah
![]()
Boy’s room with chevron reading nook | Balancing Home

Teen boy bedroom | The Idea Room

Chalkboard striped wall | House of Fifty featured at Emily A. Clark
Two things that I really like about the bedroom we’re featuring today are that creativity kept costs low, and that it truly is a space that this young man can be proud of, since he helped his mom so much with the entire makeover. You are going to be really impressed by this mother-son design team!
Submitted by: NellieBellie
Hi! I’m Janel, aka Nellie Bellie. That was my childhood nickname. Now, NellieBellie is a lifestyle blog that focuses on creating a loving, creative home. My goal is to empower others to practice creativity in their homes and relationships. I believe creativity teaches individuality and worth. Creativity doesn’t have to be shown in just crafts and DIY but is shown in very personal ways. I want to inspire this personal creativity in my home and yours. I love teaching, sharing, and gabbing about my projects, recipes, and life…with the goal that it encourages creativity in yours. And, my hope is that you and I become friends in our creative messes.

Now, onto my latest accomplishment…Levi’s bedroom!
My son, Levi, waited years for me to get around to “redoing” his bedroom. I finally took pity on him. Kind of. It went something like this…”Levi, you finish your schoolwork early for the semester and you and I will have time to tackle that bedroom.” Whoa…3 days early. Well, golly gee…I guess I had to do something about his room. On a budget. A boy’s bedroom on a budget of…$150 or so.

He asked for a pallet bed and a hideout. By reusing the slats from his bunk bed, creating a bed from pallets, repurposing the furniture already in his room, and making “custom” curtains I was able to give him a fabulous room with all the things he wanted within a budget I could afford! His room is chock full of creative, fun, and personal elements that we DIY’ed together! I’m excited to take you on a tour of this awesome bedroom and share a tutorial for Levi’s “custom” fabric curtains.
The first trick was to agree on a paint color. He desperately wanted a bright blue. I desperately wanted neutral knowing full well that his tastes would change again. Compromise…neutral on 3 walls with a very cool focal wall in bright colors. It helped greatly that Dutch Boy paints have cool titles like Stone Arrowhead. Oh yeah baby…I could kiss Dutch Boy! On top of which…that stuff (Dutch Boy paint) covered those dark green/orange walls in 2 coats. 2 coats!
I knew I needed to get rid of the giant bunk bed that was eating up the space in the bedroom but hesitated on what to replace it with. When I asked him what he wanted, he said a pallet bed. ?!? Well, okay! I can spend $8.00 on a couple of pallets. Worse case scenario is I need to buy a proper bed later on. And, the pallet bed looks fabulous with the wood on the wall! And it’s friendly on the budget!

Second trick was the budget. I had a bit of money in the blog budget, but not much. I needed to keep the costs under $150. So, we shopped the house and used as much as we could that was already in the room. We even used parts from the bunk bed. Creative lighting, inexpensive curtains, and creative storage ideas helped keep the budget at $120.00. I know…isn’t that great?
Custom made curtains that cost…$25.00. Tutorial down below…keep reading! We used curtain rods and hardware we already had.

Shopping the house found cubbies and various containers that fit in nicely into the squares . And that whale…oh golly, he’s cute!

Do you see that ladder on the wall? It is a piece from the old bunk bed. Another repurpose! Eventually it will be filled with knick knacks. Did you ever notice that boy’s knicky knacky things are more rock and frog oriented then girl’s? When cleaning his room I would find a rock, or twig, or piece of leg. He repeatedly could tell me what it was from and why he needed it. Oh boy.

The focal wall has the fabulous Fish Scale stencil from Cutting Edge Stencils. It looks fabulous and gives Levi some color that he desperately wanted! Thanks to them for letting me try out their stencils! This girl is scared of stenciling! Like, pee my pants scared! I am the one that globs, or doesn’t keep it straight, or…something. With the level and sponge roller it was easy and looks great!!! I might have to change my mind about stenciling!
The wood behind the pallet bed…look closely!…it’s the slats from the bunk bed! Yep, I just rubbed some black stain on them to age them a bit and attached them to the wall. So cool! It gives the bed importance and keeps the room looking “manly”. Yes, “manliness” is important when you are a 10 year old boy’s bedroom!

What you don’t see is, along with this closet turned reading nook Levi has a full closet (which we use for toys) and a third closet we turned into the Nerf “bunker”. The closet you see above was being used for linens. He was more then happy to have those linens stored out of his room and the closet turned into something “proper” for a boy. I took the advice and turned it into a reading/DS nook.
The cushion in it is a dog bed. Seriously…if you need a cushion for something before you spend the big bucks look in the pet section! I spent $20 on this versus the $40 they wanted for the same things in the “people” department. Best part…the cover is washable.
The light is made from a funnel I purchased and a tractor supply store and light kit from IKEA.
The blue stripes are from duct tape. Yes, I’m obsessed with the stuff.
And his tooth pillow rounds out the nook.


I know I’m going to get a few questions about the bed lights. With good reason…they are fabulous! I’ll be giving the tutorial soon. And each one cost about $12.00. Love that!
Now, about those curtains…here’s what you need to know.

The WHAT WHAT:
fabric dropcloth (found at any home improvement store)
Sharpies (I used the Stained by Sharpie Brush Tip Fabric Markers, 4 Colored Markers (1779004)![]()
…I’ll explain why. But, you can use the regular ones too)

The HOW HOW:
Draw on the dropcloth.

Yes, it really is that easy. But, there are a few things I want to mention…
#1) The markers. I haven’t figured out how to stop the traditional Sharpies from bleeding just a bit when they are washed. Not that I will be washing these curtains often (or at all, let’s be honest) but I thought I should cover my bases and use the fabric paint Sharpies. They cost $6.00 a pack and never dried up. Well worth it.
#2) Wrinkles. I tried to iron the fabric a bit, near impossible. But, using an iron or fabric release spray to get the worst of the wrinkles out is a good idea.
#3) Keepsake quality. When Levi tires of these, or thinks he’s too old for them I have plans. Pillows, blankets, slipcovers…you name it! He’ll be a grown man and see traces of these curtains in my home. I am not parting with them anytime soon!
#4) Sewing. No, didn’t. I just cut and hung. Did you notice? No, I don’t think you did. So, why bother? The ruffle top? First, it is NOT called a ruffle…it is ??? overhang???…yes, overhang! I folded the top forward and clipped the curtains on the fold. It creates a cute little “overhang”.
#5) Doodling. There is no wrong or right way to doodle. If you think there is, or you want these a certain way…do them yourself! Don’t ask your kid for help. That being said, they take time…there was several hours of doodling on these. I had him do these over the course of a few days so that he wouldn’t get bored and try to go too fast. He had a blast! Each “monster” he drew has a story and a reason for looking the way it does. So, don’t rush it…take the time!
Levi is uber pleased with his room! He loves the colors, the bed, and mostly…the nook! I’m really pleased that I stuck to my budget and still gave my boy a room he can really enjoy.
Janel, this room looks like it’s SO MUCH FUN! We’re really impressed with all that you and Levi were able to accomplish on a trim budget. Way to go!
If Levi’s bedroom makeover has inspired you to tackle a room redo for a boy you know, check out these rooms that have been previously featured here at Remodelaholic for even more ideas:

Colorful Teen Boys Bedroom | Boys Rooms by Bloggers | Surfer Boys Bedroom


Thank you so much for sharing Levi’s room!! What a treat to see today!
Such a cool room! I love the drop cloth drapes and headboard area.
This is one of my favorite little boys’ rooms I’ve seen! So creative and SO beautiful. That light is AMAZING!
Firstly, a massive thank you for this tutorial and such amazing ideas!!!
I’m a single parent and always working on a tight budget. Your ideas and basic common sense know-how, are so inspirational, I’m going to make a start properly on my boy’s bedroom tomorrow 🙂
I’m so thrilled to have come across this post, I will be looking out for more ideas.
I’ll be sure to take some photos along the way too!
Many thanks again, Helen x
Helen, you are welcome. We are glad that you find helpful information on out site. Good luck with the project!
I also am a single mum with a tight budget and wanted a fresh idea to tidy my sons room today as he has his friend coming over after school and my sons bedroom looks like the before shot.
thankyou so much.