Build a Wood Bar Cart for Entertaining and Storage; Day 5


Hey Remodelaholics! Nina from Everyday Enchanting here, bringing you some holiday entertaining DIY Inspiration! This year we’re hosting both Thanksgiving and Christmas for both sides of the family, as well as a birthday party for my younger son and the neighborhood cookie swap- so we have a lot of events on our holiday entertaining schedule! With the new baby due to arrive in January, traveling was a little iffy, so we thought it would be safer to have everyone come to us. Although we remodeled our kitchen last year, and added a DIY kitchen island, I was still seeking additional space for the coffee maker and jars of beverage supplies taking up the counter space.

Cue my idea for a DIY bar cart! I absolutely love this versatile piece. We added casters, so it can move around to different rooms to suit our different events. For example, it became a mulled cider bar for Thanksgiving, will be a hot chocolate bar during the cookie swap, and will hold various brunch items and coffee on Christmas morning.
I’m still searching for the perfect handle hardware, but with the casters it still moves easily! Here’s how we built it.
DIY Wood Bar Cart
Materials List:
- (3) 2 x 4 x 10s
- (1) 2 x 4 x 8s
- (1) 20 x 72″ Stain Grade Panel
- (1) 20 x 36″ Stain Grade Panel
- (4) 2″ Locking Swivel Casters
- Handle (optional)
Cut List:
- (6) 2x4s at 31.5″
- (4) 2x4s at 34.5″
- (6) 2x4s at 15.5
- (2) 15.5 x 34.5″ Shelves
The first two 2x4x10s will be cut to (3) 31.5″ lengths and (1) 15.5″ length.
The third 2x4x10s will be cut to (3) 34.5″ lengths and (1) 15.5″ length.
The 2x4x8 will be cut to (1) 34.5″ length and (3) 15.5″ lengths.
The 20×72″ Stain Grade Panel will be cut to (2) shelves at 15.5 x 34.5″.
The 20 x 36″ Stain Grade Panel will become the top.

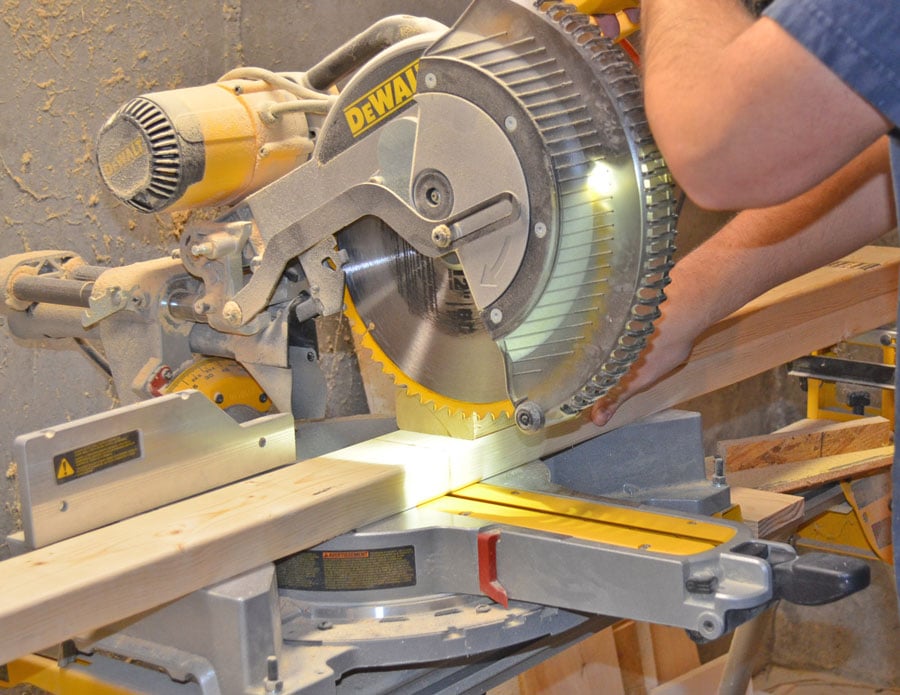
Step 1
Make all of your cuts to the specifications above. After that, we ran the 2x4s through the table saw to give them a nice square appearance. I also sanded down each piece before assembly using an orbital sander and 80-grit sandpaper.

Step 2
You will need all (6) of your 31.5″ lengths for this step. Use a pocket hole jig and drill two holes on each end of the inside of the pieces. Take (2) of your pieces, and (2) of the 15.5″ lengths. Create a box with the 31.5″ pieces inset, as shown in the photo.

We made sure the box was square, and used clamps and glue to secure each angle. Once we had the angles secure, we used pocket hole screws to attach the pieces. We repeated this twice more, so we had three total boxes.

Step 3
Next we attached our (4) 34.5″ pieces vertically to the outside corners of one of the boxes. Again we checked for square, added wood glue, and used clamps. We used two screws in each corner from the inside.

We decided the middle shelf should sit directly in the middle, centered, and we repeated the process to attach it securely (we also used spacers for this step to help make sure we were level). Lastly, we added the third box at the top of the structure so that it sat flush with the top of the 34.5″ pieces.

Step 4
The casters were actually very helpful to raise the cart frame off the ground for the staining process, so we went ahead and installed those to the bottom of the cart.

Next, I sanded down the whole cart again with 80-grit sandpaper, and followed that with 120-grit for a smooth finish. We gave the cart frame a coat of Minwax Dark Walnut stain (my go-to!).

Step 5
Our final step was to add the shelves. We cut them down to size using the table saw, and I sanded away the saw marks using 80-grit sandpaper. I then followed with 120-grit, and also softened the edges a bit.

We attached to the cart frame using wood glue and finish nails. You can fill in the holes from the nails with wood filler if you choose. Once dry, we applied a coat of Minwax Dark Walnut to the shelves, and followed with Polycrylic.
Project Breakdown:
Time: approx. 4hrs
Cost: approx. $75 (although we had a lot of the wood already)
Thistlewood, Inspired by Charm, Funky Junk, Shanty 2 Chic and Songbird Blog
 |
 |
 |
 |
 |
 |


Great cart-love it!
I love the idea of casters on the bar cart. They add to its versatility. The end result looks both rustic and sophisticated. I’m showing my husband these pictures!
What a great piece! I love that it doesn’t take up a whole lot of room too!
I’ve been looking for something to fit a 24″ space to make a coffee bar, and this looks perfect! Any idea on your total cost for building this? Thanks!
Just saw approximate cost was $75 after re-reading directions, lol!
This is exactly what we have been looking for. Wish you would have posted this 2weeks ago. But it will be ready by CHRISTmas….Thanks.
Glad you found us, Thomas! Send us pictures when you’re done!
Thanks for the concept! I did just make this bar cart and it turned out great! I had a difficult time finding stain grade wood large enough for the tops. Finally I decided that I would use 1×8″ and 1×10″ Poplar boards and stain grade pine for the main supports. This is my first attempt at making furniture, all-though I have refinished plenty of pieces. With that said this was a learning experience. I made the shelves 16″ wide so that I could use two of the 8″ boards. Little did I know that a 1×8″ board is 1×7.25″ and same for the 1×10″. I later found out this is due to the saw blade cuts. The only alternative that I found was to use butcher block for the tops. As I had a deadline to maintain I stayed with what I had. I followed the directions pretty closely with exception to the width of the shelves, I did not have a finishing nail gun therefore I clamped and glued the tops on the shelves. I ended up spending about $130 on materials as I did not have a pocket jig and needed a few of the other materials called out. I spent a lot of time on this as I wanted to make it as clean as possible. Total time on the project that I spent would be somewhere around 15 hours and took 5 nights in total to complete.
Thanks for the feedback! We’d love to see a picture! You can email us at hello@remodelaholic.com or fill out the form here: https://www.remodelaholic.com/share-brag-post/
Love love love this! Definitely building it. Just wondering what length of screws you used and if you have a rough estimate on how many you may have used?
Thanks
what were your finished dimensions for the cart?Thank you
I can’t wait to make this for my homeschool/teenager hangout room. This will be a cafe cart to hold their mugs, hot drink selections, and treats. I am just learning woodworking so I really appreciate the cut list and instructions.
What a great idea, Heather! We’d love to see pictures once you’re finished!
I LOVE the cart! Can you supply the finished dimensions per this cut list? Thanks!!!
Hi Lori,
The top of the cart is 20×36, and the legs are 34.5″, plus 2″ casters and the height of the top, so about 38 inches. Easy to modify to your desired dimensions, too 🙂
Hi we are in the process of making this cart, but we’re having a hard time finding stain grade panel, any suggestions?:)
Great cart! My only question is how did you screw the boxes to the vertical pieces (Step 3?) Was it pocket hole screws again? Thanks and looking forward to building this cart this weekend!