DIY Faux Marble Countertop to Fit $30 Budget
Transform your kitchen or bathroom with a stunning faux marble countertop for just $30 – this DIY guide shows you how!
If you like this post you‘ll also like Great Options for DIY Kitchen Countertops, Glossy Painted Kitchen Countertop, and Copper Countertops Tutorial.

If you’ve ever dreamed of durable and elegant marble countertops and then nearly fainted at the price, you NEED today’s post! When I saw how Ronda from Batchelor’s Way had created faux marble countertops for her laundry room, I begged her to share the tutorial with us here because it is going to knock your socks off!
Instead of paying $650 for Carrera marble or even over $200 for marble-look laminate, Ronda picked up a countertop from the ReStore and some leftover paint and made her own faux marble countertop for just $30. What a great alternative! Here’s how to paint your own counter, vanity top, or kitchen table top.
DIY Faux Marble Countertops by Ronda of Batchelor’s Way

This project was so scary for me, but I am so glad I overcame my fears and did it because I am happy as a clam with my new beautiful countertop!
This post contains affiliate links. Learn more and read our full disclosure policy here.
To Create Your Own Faux Marble Countertops, You’ll Need:
- the countertop (we got our 36″ deep, rounded edge countertop at the ReStore for $5!)
- white primer for glossy surfaces (I used Valspar Contractor Primers/Bonding Primer)
- gray paint in different colors (mine was leftover latex paint, but you could use craft paint, too)
- white iridescent glitter (I bought mine at Michael’s)
- sea sponge
- feather and small brush
- small stir sticks
- sponge paint brushes
- cheap bristle paint brush
- SuperGlaze or EnviroTex Lite
- disposable putty knives or a large spreader
- a drop cloth
- painter’s tape
- wood filler (if your countertop has a tiny hole or two like mine did)
- a radial saw and/or jig saw to cut the countertop to size (if it’s not already)
*If you don’t have access to an old countertop to repurpose or a cheap IKEA countertop, you can cut and paint plywood instead – you’ll just have to finish the cut edges.
Step-By-Step Guide
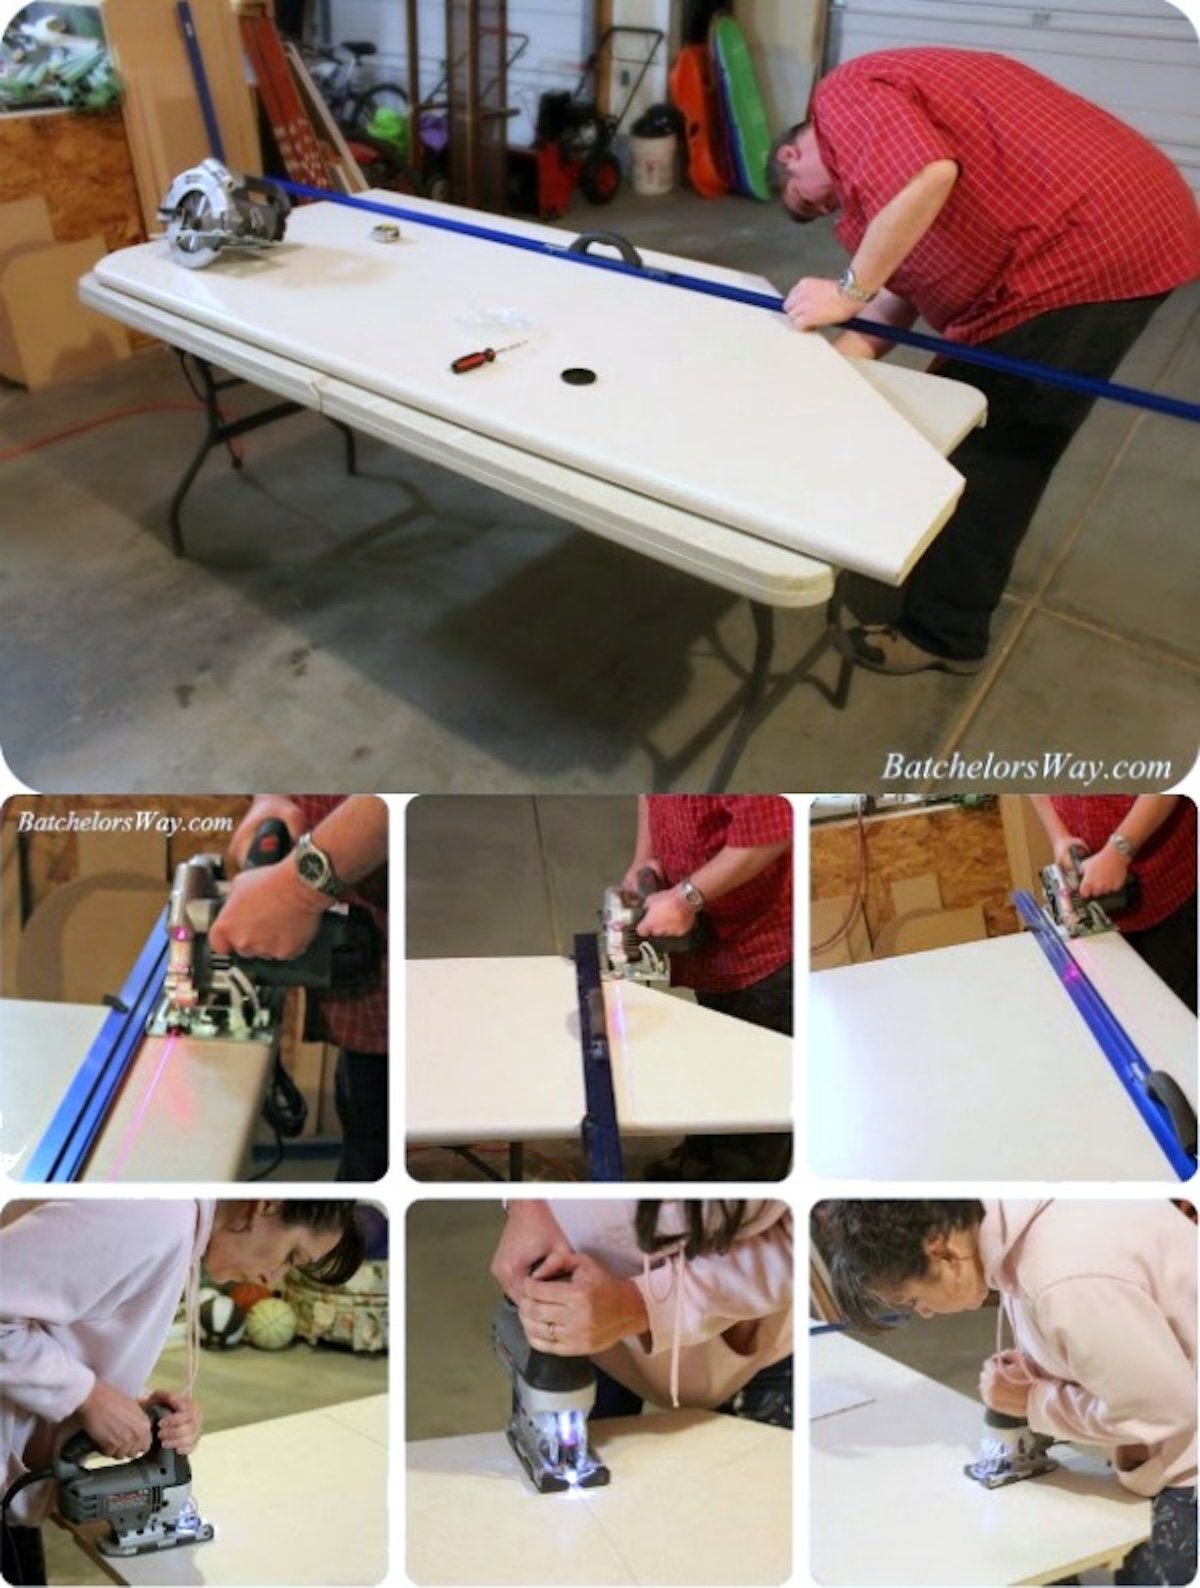
1. Cut Counters to Size
FIRST, if your countertop isn’t already fit to the space you’re putting it in, cut it to size. Ours was an odd L shape scrap bought second-hand, so my husband used a radial hand saw (circular saw) and straight edge to cut the rectangle and then I used a jig saw to cut out the arm at the end. We scribed the “L” shaped area to get a really close fit — very important since nothing was really square. If you’ll be installing a faucet or fixtures, cut those holes now as well.
Note: We have lots of questions asking if you could paint your already-installed countertops in place — yes you can! See more about the finishing process in this glossy painted countertop tutorial, and read more tips for painting countertops here.
2. Repair Any Holes or Scratches
Next, fill in any holes, scratches, or blemishes in the countertop so you have a nice surface to start painting on. I just used wood filler (Dry Dex Spackling by DAP) and sanded it smooth to remove any bumps.
3. Clean and Prime the Countertop
Clean the countertop well with soap to remove any dirt or grease. Prime with a white primer for glossy surfaces, that’s meant for a laminate surface. I applied two coats with a foam roller to ensure coverage of any stains. Be sure to prime the overhang edge area, too. Once the primer is dry, lightly sand the whole surface.

4. Paint the Faux Marble Look
Mix your paint. I just used leftover paint to mix up three different gray coordinating color options: a very dark gray, a medium gray, and a light gray paint color. Now you can start painting! I suggest painting a couple of sample boards to get comfortable with the technique and learn what look you like and how to layer the different paints across the countertop surface.
Start painting by dipping the sea sponge into the lightest gray paint and dabbing it on to create the light/dark marble variations with a perfectly coordinated look.

Add the marble veins by dipping the tip of the feather into the darker gray paints and dragging and wiggling it across the countertop. Occasionally flip and push the feather (rather than pulling it) to create natural looking veins. Then lightly dry brush the vein with your cheap bristled brush to soften it.
Sponge over any of the veins with the lighter colors to soften the vein or create a feeling of depth to make it look like a real marble countertops.
5. Step Back and Check Out Your Work
Stand back often to look at the countertop and see how it looks from a distance. It’s helpful to compare to an inspiration photo to get a similar look compared to the marble’s natural counterparts.
Be sure to place the piece under the lighting that it will be under — when I put it in place, I decided that mine was too dark, so I used white paint and sponged over the whole thing. I even sponged out nearly the whole middle section with white paint since I felt that there were too many similar veining patterns. Sponging over areas actually works to your advantage, as it makes the veins look deeper and more natural, giving the faux marble some dimensional texture. (That’s called a happy accident.)
6. Glitter Time
To give your countertops a truly remarkable faux marble finish, you need glitter! Not large pieces of glitter like I was originally picturing when I read about putting glitter on faux finish countertops (duh moment!) — use a very fine glitter, the kind that looks like sand or dust. I used the white iridescent glitter from a Creatology brand glitter pack from Michael’s.
You should dust the countertop with glitter while the paint is still wet, but I just sponged white paint wherever I wanted the glitter and then sprinkled it with fine iridescent white glitter. It really does look like natural mineral deposits on your faux marble and makes the whole countertop look like an expensive piece of natural marble.
7. Sealing the Countertop
Most of the faux granite/stone countertop tutorials I read used a product called EnviroTex Lite to seal their countertops to create a moisture-resistant surface. You can buy it at Hobby Lobby or online. I didn’t want to drive to the other end of the valley to Hobby Lobby or pay shipping to order online, so I looked around a bit and found that I could get a similar product at Home Depot, which was a much shorter drive.
The sealant I used is called Super Glaze, and it is a two-part epoxy that pours on and is the equivalent of using 60 coats of varnish. I bought two boxes ($25 each) based on the information on the package, but I only ended up using one (and had a lot left over) to cover my counter of approximately 6 square feet.
8. Prep the Edges and Area
First, use painter’s tape to tape off the raw edges of your countertop. You don’t want any epoxy build-up on them or the countertop might not fit back into place.
Place a good drop cloth beneath the project to catch all the runoff — the resin will not come off anything it comes in contact with. Level the counter; the Super Glaze self-levels and you’ll want it to spread out evenly.
9. Mix the Epoxy
Next comes the scary part: mixing the epoxy! Read the directions on the box and follow them very closely. I mixed part A and part B in a bucket and stirred for the required time, even having my sister time me so it was exact!

At this point, the mixture looks yellow but it will spread out and dry clear, so don’t panic! Following the directions, I poured the mixture into another bucket and stirred for the required time again. Then, it’s ready to pour!
10. Pour on the Epoxy
Once you pour some epoxy on the countertops, start spreading it out. Anything you use to spread it will have to be thrown away, so use something disposable. Bigger spreading tools will make it easier! I used plastic putty knives I had on hand, but I wish I had listened to my mother and picked up the $2 giant disposable spreader at the store.
Smooth out the mixture as best you can and let it run right off the edges. It looks like glass. It will level as it sits, and you have to work quickly to get it spread before it begins to set up.
Be sure to check all the edges and so everything is covered. (After mine dried, I found two tiny spots on the front edge that we missed, which I touched up with clear fingernail polish.)
Under the front edges, I used a sponge brush to catch the drips so they wouldn’t harden and create a bumpy edge. Do this several times during the first hour as it dries. You’ll also want to remove the tape around the raw edges of the counter — I removed mine within the first hour after pouring the epoxy.

Once the surface is covered, DON’T TOUCH IT! But do look closely for air bubbles. Other tutorials that I read used a blow torch or their own breath to pop the bubbles. My torch wouldn’t light so we just blew on all the air bubbles that we could find — if I did it again I would try the blow torch.
11. Allow It To Cure
After you get all the bubbles out, let it sit for 3 days to dry and cure (according to the package directions) and then you can install it. YAY!!
This DIY painted marble countertop installs just like any other countertop: set in place and secure, then use silicone caulk around the edges.

TOTAL COST
- $5 countertop
- $25 Super Glaze
- FREE Paint left over from other projects
- Grand Total approx $30!!
________________
If this process still makes you a little nervous, we’ve heard really great things about this gray granite/marble paper foil contact paper that sticks directly to counter tops. It’s supposed to be very easy to work with and looks very real. It may be a great solution for countertops that don’t take too much abuse and/or smaller DIY projects like coffee tables, etc.! It’s also supposedly deposit-friendly for a rental apartment!
How to Clean a Painted Faux Marble Countertop
Since this is a laminate counter with a standard pressed wood countertop core, you’ll care for the surface much like you would a regular laminate countertop with everyday challenges. It’s a fairly durable material with a few precautions to prevent permanent stains or damage.
- Quickly clean spills or messes with a soft cloth to prevent stains.
- Clean regularly with mild dish detergent and no abrasive cleaners or rough scouring pads.
- Use a trivet under a kettle and any hot pots or pans.
- Consider placing appliances (like the toaster or coffee maker) on mini rollers to prevent scratches in the countertop.
Verdict: Painted Countertops that Look Like Real Marble Countertops
Creating a DIY faux marble countertop on a $30 budget can be a practical and stylish solution for homeowners. This project involves using affordable materials such as laminate countertops and a few essential tools.
This faux marble installation is perfect for those looking to update their kitchen or bathroom vanity without the expense of real marble. The project also demonstrates how a little care and the right materials can result in a durable, high-quality finish that complements modern style kitchens, whether paired with white cabinets or other kitchen appliances.
This enhances the overall look of the kitchen or bathroom but also offers an affordable price and an alternative to expensive marble slabs. The end result is a countertop that arrives in perfect condition, featuring a perfect look that is a popular choice among DIY enthusiasts and homeowners seeking a stylish yet economical solution.
________________
Faux Marble Countertop Update 1/11/16
Yael, one of our readers, followed this tutorial and sent us this message:
“Hi! I just wanted to let you know that I successfully completed a faux marble counter based on your tutorial. I am so pleased with the results!”

Amazing job, Yael! It looks beautiful! Thank you for sharing!
For more details, visit her blog at Jewish Latin Princess.
Other amazing and affordable DIY countertop tutorials:


DIY Faux Marble Countertop


Pin this to save and share!
First published 9 Apr 2014 // Last updated 4 Sept 2024


I am wanting to know the same as many have asked. Can you do the sink too? I have a one piece sink and countertop. And would love to do this technique.
Looks beautiful! I love the touch of glitter. Will this work for kitchen counters?
Yes! We have lots of info about painting kitchen countertops here: https://www.remodelaholic.com/diy-painted-countertop-reviews/
(One important thing to remember is that you’ll want a food-safe finish for the kitchen.)