DIY Industrial Pipe Shelves and Desk
Hello Remodelaholics! I am Tasha and I blog over at Designer Trapped in a Lawyer’s Body. You may remember some of my other contributor posts about how to transform an outdated, cultured marble vanity with concrete or my more recent post about how I made my own screen door for a fresh new look. Well, I am back with another DIY project that will totally transform the look and function of a room in your home.
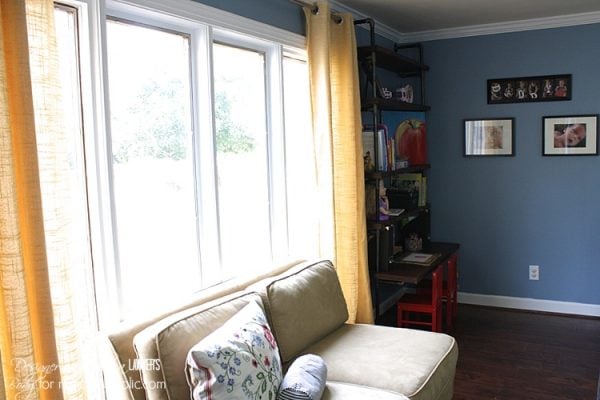
Industrial decor is VERY HOT right now, which is fabulous for me because I love it. I don’t think it’s a trend that will end any time soon–in fact, I think it’s a very timeless look. There are so many options for industrial shelving! I love this idea for vintage crate shelving, and these easy rustic shelves are deliciously industrial and affordable. But when I realized we needed some functional, built-in shelving and desks for our twin girls’ playroom, I knew I wanted to get my hands on steel pipe and wood! Now, read on to learn how I did it!

How to Build Industrial Pipe Shelves/Desks
Materials Needed:
- 2 x 12 pine boards {amount varies by project size}
- 3/4 inch gas pipe {amount varies by project size}. We went with gas pipe since it is already black. We also purchased only lengths that were pre-cut so that we did not have to worry about having the pipe cut and threaded. The lengths you choose will depend on what you want to use your shelving for. You can see the lengths we used in the diagram below.
- “T” joints {amount varies by project size}
- Elbow joints {amount varies by project size}
- Floor flanges {amount varies by project size}
- Wall anchors
- Screws
- Stain {we used Brown Mahogany gel stain by General Finishes}
- Protective top coat
Tools Needed:
- Drill and/or drill driver
- Kreg jig
- Miter saw
- 1 1/8″ Forstner bit
Steps:
1) First, take your time to measure your space and plan out your project. You will need to figure out exactly what lengths of pipe you need and how wide your shelves need to be. Don’t forget to take into account the length that the T-joints and elbow joints will add to the height! We added identical units to each side of the large window in our girls’ playroom.
2) Next, purchase the components you plan to use and assemble the pipe “skeleton.” Then, make sure it fits in the space! This sounds silly, but with the threading and screwing pieces together, you cannot accurately predict the exact finished height. Then, measure the distance between your pipes to determine the length you will need to cut your shelves/desk.

3) Cut all your shelves to length and stain them.
4) Use a Kreg jig to attach two of the shelves together to form your desk, which will be used on the bottom. Don’t forget to also drill the holes for your pipe to go through, as described more fully in step 6.

5) Attach a bracket to your wall to support the back of the desk. The bracket will support the back of the desk. The horizontal pipe pieces will support the front of the desk. Note that for all of the shelves, the horizontal pipe pieces will face the wall–for the desk, they will face away from the wall to support the desk.

6) Now you are ready to assemble. Start at the bottom and work your way up. Be sure to check for level each step of the way. We also marked the centerline of our wall and the center of each shelf so that we could easily mark the holes that we needed to drill on the front of each of our shelves for the pipe to go through. That ensured symmetry as we built our way up. We also wrapped the ends of the shelves with tape so that we could trace exactly where the holes needed to be drilled, without marking directly on the wood. We use a 1 1/8 inch Forstner bit to drill the holes.


7) For each shelf, you will drill the holes, put the shelf in place and then screw your next length of pipe in place. Then repeat all your way to the top!
8) For the top of the unit, instead of using a t-joint, you will use an elbow joint, followed by an 8 inch length of pipe with a floor flange attached to the end. Then, attach the floor flange to your wall using screws and wall anchors if you aren’t lucky enough to hit a stud.
Time and Cost:
I have to be honest. This isn’t the quickest project in the world. The assembly moves quickly, but the planning phase takes quite a bit of time, as does shopping for all of the materials. Plus, the pipe comes with these AWFUL price stickers and labels on them that take forever to get off. And pipe isn’t inexpensive. All that said, I estimate that we spent a TOTAL of 30 hours on this project, including the planning phase. The materials cost a total of around $500. Not a bad price tag for two desks and two sets of bookshelves that are totally customized to our needs!
That’s it! Isn’t the end result stunning?! I love how functional the desks and shelves are. And of course, I love how stylish they are as well!


What do you think? These would also look amazing in a home office, den, living room, or even a kitchen! If you want to save this tutorial for later, be sure to pin it!

I would love for you to head over to my blog, Designer Trapped in a Lawyer’s Body, to explore some of our other thrifty decorating projects, like how I made an industrial pipe table for our kitchen, how I created a herringbone plank wall FOR FREE, and how I painted the vinyl floors in my laundry room. I hope to see you over in my corner of blog land soon!
 |
 |
 |
More ways to add industrial style to your home:


I love these industrial shelves and have been thinking of making some for my son’s room. I was wondering if you had to attach them to the floor somehow or if they just sit on the floor and the weight of everything supports it?
Hi Laura! Thank you. We attached the bottom flange to the floor with one screw only. It was really only to hold them in place while we assembled the units. The weight of the shelves and securing them to the wall at the top is more than enough to hold them in place, but having one screw in place to hold the bottom still while we assembled was very helpful!
love this idea. I also love the color of the walls. What color is it?
I’m also curious as to what the color of the wall is. Love it!
Love how this looks, thanks for posting such detailed instructions, I have been wanting one of these for my kids! Thanks!
Could you please tell me the paint color you used on the wall. Thanks.
Did you have any problems getting things level as you started attaching the different shelfs?
Just curious what the width and depth of each shelf is? I saw that you purchased 2 x 12 but wasn’t sure if that meant each shelf was 12″ deep or wide.
Can you please share the color of the paint used?
What is the length of your shelves
I was wondering how do you go about figuring how much weight a wall with this kind of shelving can sustain. I’m building one now but it’s over 13 feet length wise and I’m afraid that I may be putting too much strain on the wall due to the amount of shelves and pipe that I plan on putting in place. Thanks in advance!
The black pipe leaves a residue when you touch it. Did you clean it with something first?
Where did you get the black pipes? Our Lowes and Home Depot only have pipes with a matte black coating. Did you take that coating off and this is how they look underneath? How did you get the coating off? Did you use anything to treat the pipes for rust?
I too am wondering about where you got the black pipes? Home Depot had pipes with a waxy coating andI love the industrial grey of yours.. did you spray anything to seal the pipes? Thank you for your time.
I ❤️❤️❤️❤️ the paint color. It looks amazing with your wood and pipe colors. Would you share brand, color and sheen? Thank you so much!
Thank you! The paint color was Nostalgia by Valspar in Eggshell finish.
Thank you ????
i love this industrial desk. do you have specs on a double length for two boys? thx!
For the desk level, you can also use a cross instead of a T and then a L bracket on both sides for better support.