Get organized! See our favorites in the shop

Remodelaholic

DIY tutorials, Woodworking plans and more.

FREE BONUS: Kitchen Organization Boot Camp
  • Home
  • About Us
    • About US
    • Contributors
    • Facebook
    • Pinterest
    • YouTube
    • Instagram
    • Disclosure and Advertising
    • Contact Us
  • Shop
  • Project Ideas
    • Our Houses
      • Birch House (current projects)
      • Canyon House
      • Park House
      • Downing House
      • Logan House
    • DIY Project Plans
    • All projects
    • Barn Door Baby Gate
    • Dutch Door
    • Framing A Wall Mounted TV
    • Indoor Playhouse
    • Beach Themed Living Room Design
    • Chicken Coop Building!
    • Computer Desk
    • Computer Desk Plans
    • Custom Newel Posts and Stair Remodel
    • Family Room Sneak Peek
    • Headboard Tutorial
    • Living Room Progress
    • Mood Boards
    • Scrabbled Family Names
    • Pets
  • Design By Room
    • Bathrooms
    • Landscape
    • Kids Bedrooms
    • Kitchen
    • Living Rooms
    • Laundry Rooms
    • Master Bedrooms
    • Mood Boards
    • Office
  • Holiday
    • Christmas
    • Halloween
    • Patriotic
    • Easter
    • Fall
    • Saint Patrick’s Day
    • Thanksgiving
    • Spring
    • Valentines Day
    • Winter
  • Crafts
    • Printable
    • Art
    • Paper Crafts
    • Kids
    • Fabric Crafts
    • Decorate
  • Recipes
    • Appetizers
    • Beef
    • Beverages
    • Breakfast
    • Chicken
    • Desserts
    • Dinner
    • Fruit
    • Healthy
    • Holiday
    • Lunch
    • Main Dishes
    • Salads
    • Sandwiches
    • Sauces
    • Seafood
    • Side Dishes
    • Soup
    • Vegetables
  • Videos

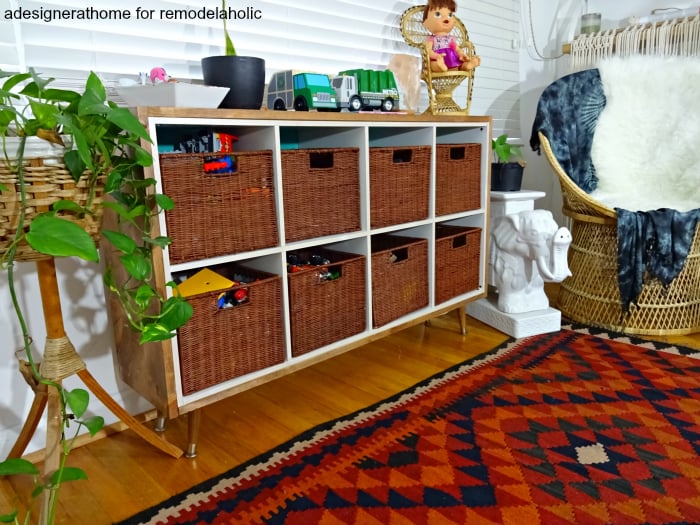
Easy IKEA Hack: Wood Wrapped Kallax Cube Shelf

Written by Corinna

  • Facebook
  • Twitter

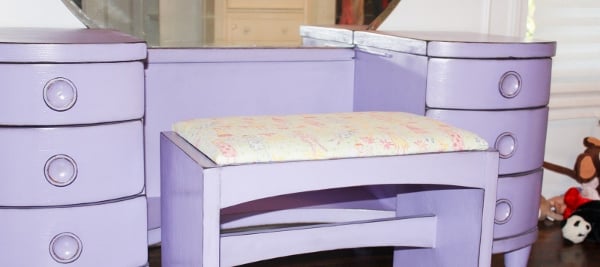
Hello! It’s me, Corinna from A Designer At Home. As always, it’s a joy to be here today to share an easy Do-It-Yourself project. I’m not a furniture builder, but I still have fun customizing pieces to be more than “blah,” like my DIY stool I shared here last time. This time we’ll be cranking things up a bit by using a basic 8 cube organizer unit to create rustic and retro inspired toy storage (or storage for whatever, if you’re not swimming in toys like me!). A couple pieces of wood, basic knowledge of a drill and a bit of muscle if all you’ll need to get one created for yourself.

Easy update for IKEA kallax or expedit shelf

A lot of us have small rooms and those rooms have to be stretched really thin with multiple purposes. A fantastic solution for that is furniture that can pack a lot of storage, in a small space, that still fits the decor of the space around it. Cube organizers are perfect for this, the only thing they lack is appearance. There are lots of furniture legs available nowadays, everything from mid century style tapered legs to bun feet to contemporary square feet. Grab a stain or paint you like, a style leg that fits your decor and you’re set to customize this tutorial for your specific space.traditional kids storage with a twist

How To Make A Rustic Retro Cube Organizer

 If you can’t see the video, check it out on our YouTube channel and be sure to subscribe, pretty please!

Supplies:

  • Cube Organizer Unit
  • 4 Furniture Legs
  • 4 Furniture Leg Plates
  • Enough wood to wrap around the organizer (varies by size)
  • 20 1 1/4 inch screws
  • Drill
  • Construction Adhesive
  • Stain & Rag

The first thing you’ll want to ensure is that your organizer is tightly put together. No loose screws, it’ll only make the whole process more difficult and your results may not be so great. Then, measure the top (should be same as bottom) distance. Also measure the sides, adding an extra 3/4 inch, or 1 inch (whatever width wood you decide to use- mine is 3/4)  times 2 (for the top and bottom boards).

adesigner at home for remodelaholic marking screw holes for furniture leg plates

align furniture leg plates with pre marked holes and screw into place using a drill

Use a carpenter’s square to align the plates for the furniture legs and mark the holes with a pen/pencil/marker. Drill the screws into place, securing the plates. If you’re using angled plates, it can get confusing going back and forth. So it may be helpful to test the plates before actually drilling them into place.

Flip the board over and squeeze a bead of construction adhesive along the ends. Then place the organizer atop the wood and secure with clamps.

squeeze a small layer of construction adhesive onto the board and place the unit atop the board, clamp into place

Repeat the adhesive and clamps with the top piece. While it dries, screw the organizer to the wood with 1 1/4 inch screws. Screw from the inside of the organizer, into the wood, near the corners. Reinforce the top and bottom board with screws in the center.

Once the top and bottom is secure, spread a bead of construction adhesive along the top and bottom edges of a side board, lift the organizer to rest atop it and screw into place. Once secured, repeat with the remaining side.

connect the organizer to the wood by screwing from the inside of the organizer into the wood

Using an old rag (or in my case, a sock) spread the stain over the wood, going in the direction of the grain. I love this step. It really brings out the warmth and it helps match the piece to my other furniture.

Right before staining the piece, I filled in the small gap between the top and side boards with wood filler. I’m not 100% with the results. I mostly just wanted to keep playdough and other kid crust out of the crack and make it a bit more seamless. I figured I’d share that just in case you were wondering, but it may not have been the best solution.

apply stain to wood using an old rag, wiping in the direction of the grain

When the stain dried, I dragged it into the living room, filled the cubbies with wicker baskets and filled the baskets up with toys. I had a lot of fun, surprisingly, organizing all of his toys into different categories. My son is a die hard fan of garbage trucks, so I kept 2 of them on top and the rest are in a giant wicker trunk.

8 cube organizer upgrade

wrapping a basic 8 cube organizer with wood for a warm and cozy look

rustic retro toy storage cube organizer makeover

rustic joint of woods meeting up at the top

really interesting wood grain on side of made over cubby organizer


And, if you really want to jazz things up, you can paint a fun geometric design onto the backing. I chose to split the squares in half diagonally and paint it a bright aqua color. This way, when the top baskets are removed, it’s still pretty.

retro inspired toy storage unit for the DIY impaired

pretty kid's toy storage for DIY cheap

a modified cube organizer made to fit in with other furniture and look better

Thank you for letting me share with you today. I hope you take this idea and have fun creating, or embellishing, a basic piece to be your own. You should come by my blog for more ideas for decorating, creating and enjoying home. It’s what I love so you can find me at my blog, A Designer At Home pretty often! Here are a couple posts I’ve picked out to share with you-

kate spade daisy place jewelry tray knock off for pennies on the dollar - a designer at home tutorial

Fake A Kate Jewelry Dish – A Designer At Home

cheery vintage eclectic hallway makeover- refreshed in 3 short weeks

Boho Vintage Hallway Refresh – A Designer At Home

Mix & Match to create an epic gallery wall

A Guide to Mixing and Matching for Eclectic Gallery Walls – A Designer At Home


Cube shelves aren’t boring anymore!

IKEA cubbies to Pottery Barn consoleikea corey 2

Easy play kitchen from a set of cheap cube shelvesCute and Easy DIY Kids Play Kitchen

plus even more ways to make basic IKEA look amazing:

High-Class IKEA Hacks featured on Remodelaholic.com

  • Facebook
  • Twitter
Remodelaholic is a participant in the Amazon Services LLC Associates Program, an affiliate advertising program designed to provide a means for sites to earn advertising fees by advertising and linking to amazon.com. Please see our full disclosure here.

Published: May 7, 2016Filed Under: Contributor, Furniture Building Projects and Plans, How To, Tutorials

About Corinna

Hey There! I'm Corinna and I share my passion for creating beautiful space meant for living in on my blog A Designer At Home. You can expect to see tutorials, room reveals, design advice, home improvement and tips & tricks for the home.


free email bonus

Kitchen Organization Boot Camp

Is your kitchen a zen paradise? It can be. I'll show you how.

Previous Post
DIY Plank Ceiling in a Beautiful White Kitchen Renovation
Next Post
New Video Series

Comments

  1. Vineta @ The Handyman's Daughter says

    May 8, 2016 at 9:53 am

    I have a turquoise Kallax shelf, and it’s just a bit too much turquoise for the room. Wrapping it in wood would tone it down and look great! Thanks for the inspiration!

    Reply
    • Cass says

      May 9, 2016 at 10:05 pm

      Ooh, what a fun combo! We’d love to see pics if/when you do!

      Reply
  2. Sonya Tartt says

    July 14, 2016 at 4:33 pm

    What type of wood did you use?

    Reply
  3. Mary says

    April 28, 2020 at 10:35 am

    Where did you find the little legs? Did you order them online, if so would you mind sharing the link?

    Reply

Leave a Reply Cancel reply

We love hearing from fellow Remodelaholics, so let us know what you like about this and leave any questions below in the comments. If you have followed a tutorial or been inspired by something you have seen here, we would love to see pictures! Submit pictures here or by messaging us over on Facebook.
Recipe Rating


Hey there, I am Cassity! Nice to virtually meet you!

This blog is about DIY at its finest. We are obsessed with it and so are you, so while we're working and have nothing to show you of our own projects we show off yours. So submit your projects! More About Us…

Categories

  • Facebook
  • Instagram
  • Pinterest
  • RSS
  • Twitter
  • YouTube

Meet The Team

Privacy Policy

Remodelaholic is a participant in the Amazon Services LLC Associates Program, an affiliate advertising program designed to provide a means for sites to earn advertising fees by advertising and linking to amazon.com. Please see our full disclosure here.

© 2005-2016 Remodelaholic LLC, All Rights Reserved

  • Facebook
  • Instagram
  • Pinterest
  • RSS
  • Twitter
  • YouTube

Copyright © 2021 · Remodelaholic

  • Pinterest
  • Facebook
  • Twitter