All Gardening Plans on Sale! Click To Shop

Remodelaholic

DIY tutorials, Woodworking plans and more.

FREE BONUS: Kitchen Organization Boot Camp
  • Home
  • About Us
    • About US
    • Contributors
    • Facebook
    • Pinterest
    • YouTube
    • Instagram
    • Disclosure and Advertising
    • Contact Us
  • Shop
  • Project Ideas
    • Our Houses
      • Birch House (current projects)
      • Canyon House
      • Park House
      • Downing House
      • Logan House
    • DIY Project Plans
    • All projects
    • Barn Door Baby Gate
    • Dutch Door
    • Framing A Wall Mounted TV
    • Indoor Playhouse
    • Beach Themed Living Room Design
    • Chicken Coop Building!
    • Computer Desk
    • Computer Desk Plans
    • Custom Newel Posts and Stair Remodel
    • Family Room Sneak Peek
    • Headboard Tutorial
    • Living Room Progress
    • Mood Boards
    • Scrabbled Family Names
    • Pets
  • Design By Room
    • Bathrooms
    • Landscape
    • Kids Bedrooms
    • Kitchen
    • Living Rooms
    • Laundry Rooms
    • Master Bedrooms
    • Mood Boards
    • Office
  • Holiday
    • Christmas
    • Halloween
    • Patriotic
    • Easter
    • Fall
    • Saint Patrick’s Day
    • Thanksgiving
    • Spring
    • Valentines Day
    • Winter
  • Crafts
    • Printable
    • Art
    • Paper Crafts
    • Kids
    • Fabric Crafts
    • Decorate
  • Recipes
    • Appetizers
    • Beef
    • Beverages
    • Breakfast
    • Chicken
    • Desserts
    • Dinner
    • Fruit
    • Healthy
    • Holiday
    • Lunch
    • Main Dishes
    • Salads
    • Sandwiches
    • Sauces
    • Seafood
    • Side Dishes
    • Soup
    • Vegetables
  • Videos

Ribbon Wall Treatment

Written by Cassity

  • Facebook
  • Twitter

Submitted by design megillah

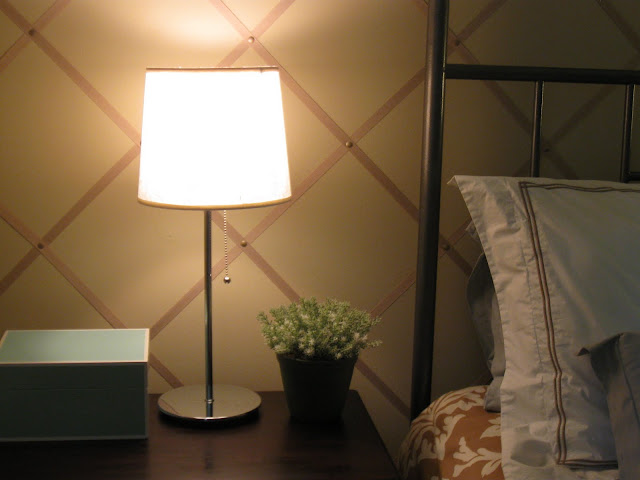
Since the bed in a master bedroom has the leading role, the wall behind that bed is the supporting actor.
Here is a super easy, inexpensive way to enhance that wall using nothing but grosgrain ribbon and thumbtacks. I must admit it took a while, but because there’s no mess or chemical smell, it can be done over a period of days while still sleeping in the room.

The first step was to draw light pencil lines to form the pattern. I used a level and ruler to do this. Next, I started from the top of the wall and ran the ribbon down to the floor, using a bit of double backed tape to hold things in place before I was able to criscross and insert a thumbtack. I did a diamond pattern but squares would also work.

I didn’t want my thumbtacks the silver color they came in, so I pushed them into a piece of styrofoam and spraypainted them in a bronze color.

The paint color is Cappuccino from Restoration Hardware.

  • Facebook
  • Twitter
Remodelaholic is a participant in the Amazon Services LLC Associates Program, an affiliate advertising program designed to provide a means for sites to earn advertising fees by advertising and linking to amazon.com. Please see our full disclosure here.

Published: November 3, 2011Filed Under: Decorate, Guest Bloggers Tagged: Bedrooms, Decorating, Ribbon, Wall Finishes

About Cassity

Cassity started Remodelaholic with her husband, Justin, to share their love for knocking out walls together. She is an interior designer, wife, and mother of two. She and Justin have remodeled three homes from top to bottom and are working on their fourth. Making a house a home is her favorite hobby.


free email bonus

Kitchen Organization Boot Camp

Is your kitchen a zen paradise? It can be. I'll show you how.

Previous Post
Free Thanksgiving Printable
Next Post
12 Steps Ahead! R.A. 95

Comments

  1. Brooke @ Inside-Out Design says

    November 3, 2011 at 5:11 pm

    LOVE this!!! So pretty and what a unique way to make a focal point out of that wall but without being a distraction from the bed. Plus I love how the diamond pattern echoes the look of the duvet. Gorgeous!

    Reply
  2. Meggan S. says

    November 3, 2011 at 5:13 pm

    I think this is AMAZING! Great job! (and I’m in love with the duvet).

    Reply
  3. Debbie says

    November 3, 2011 at 5:44 pm

    What an awesome idea… absolutely love it!!!! I’ve “pinned” this on Pinterest.

    Reply
  4. Debbie says

    November 3, 2011 at 5:50 pm

    What an awesome idea… absolutely love it!!!! I’ve “pinned” this on Pinterest.

    Reply
  5. Becca says

    November 3, 2011 at 6:17 pm

    I just shouted “yes!” out loud! The perfect solution for me, a renter. I can out holes in the walls, but no paint and it drives me batty! Thank you so, so much for sharing!

    Reply
  6. Liz Gossom says

    November 3, 2011 at 7:12 pm

    I love how the diamond pattern mimicks the pattern on the spread. Looks easy to do – great idea about the double sided tape!

    Reply
  7. Rhiannon says

    November 3, 2011 at 7:44 pm

    wow what a great idea! i bet this was time consuming but not as tedious as a stensil what a great idea!

    Reply
  8. Alyson says

    November 3, 2011 at 10:51 pm

    I really, really love it! My walls are super textured (house is 120 years old, and the thick, chunky texture covers all the cracks from more than a century of settling, I think), and I’m excited because this is something that could work even on textured walls!

    Reply
  9. classic•casual•home says

    November 4, 2011 at 12:30 am

    Such soothing neutrals and a creative wall treatment!!!

    Reply
  10. Peg says

    November 4, 2011 at 12:58 am

    This is beautiful! I’m linking it to my Ribbon Crafts article at Squidoo. Thanks! https://www.squidoo.com/ribbon-crafts

    Reply
  11. Windy says

    November 4, 2011 at 3:20 pm

    Very good idea! I think it’s a nice counterpoint to all the stenciling I’ve been seeing everywhere. Also a good idea for renters (obviously you’d have to substitute the tacks for glue or tape).

    Reply
  12. Amy says

    November 5, 2011 at 10:48 am

    Great idea! Looks beautiful.

    Reply
  13. Jo @ To a Pretty Life says

    April 10, 2013 at 10:03 am

    Looks gorgeous! But there’s no way my kids (or, lets face it, my husband) would leave it alone 😉

    Reply
    • Cassity says

      April 12, 2013 at 9:59 pm

      That is so funny(the husband part)! But very true!

      Reply
  14. Stephanie says

    April 11, 2013 at 5:46 am

    I really like this idea. Great for apartment dwellers!

    Reply
    • Cassity says

      April 12, 2013 at 9:57 pm

      That is a great point Stephanie!

      Reply
  15. Roberta says

    December 13, 2018 at 12:45 pm

    Love the ribbon wall treatment in the bedroom. I would really like to know a bit more about the project so I can get an idea of amount of supplies. Question 1 is….what was the size of the bedroom wall? 2…How many yards of ribbon did it take? 3…..How large are the squares? And last how do you know where to start the ribbon? I just love this idea for my bedroom. Thanks.

    Reply

Leave a Reply Cancel reply

We love hearing from fellow Remodelaholics, so let us know what you like about this and leave any questions below in the comments. If you have followed a tutorial or been inspired by something you have seen here, we would love to see pictures! Submit pictures here or by messaging us over on Facebook.
Recipe Rating


Hey there, I am Cassity! Nice to virtually meet you!

This blog is about DIY at its finest. We are obsessed with it and so are you, so while we're working and have nothing to show you of our own projects we show off yours. So submit your projects! More About Us…

Categories

  • Facebook
  • Instagram
  • Pinterest
  • RSS
  • Twitter
  • YouTube

Meet The Team

Privacy Policy

Remodelaholic is a participant in the Amazon Services LLC Associates Program, an affiliate advertising program designed to provide a means for sites to earn advertising fees by advertising and linking to amazon.com. Please see our full disclosure here.

© 2005-2016 Remodelaholic LLC, All Rights Reserved

  • Facebook
  • Instagram
  • Pinterest
  • RSS
  • Twitter
  • YouTube

Copyright © 2021 · Remodelaholic

  • Pinterest
  • Facebook
  • Twitter