A House Divided…But in a good way: Screen Building Tutorial
I am very excited to show you the project we have been working on.
First, let me give you some background. I used to work at Icon Health and fitness while attending college. No that doesn’t mean I worked out a lot, I worked in the legal department and the treat drawer was huge… I gained weight while working there… Along with the extra ten pounds, I did get a smokin’ deal on a huge elliptical, and later a recumbent bike. Just recently my neighbor sold us their old treadmill… So, while I am thankful to have my own personal gym, it is not all that pretty in my family room. But how to hide it?
Enter google search.
I love you google search!
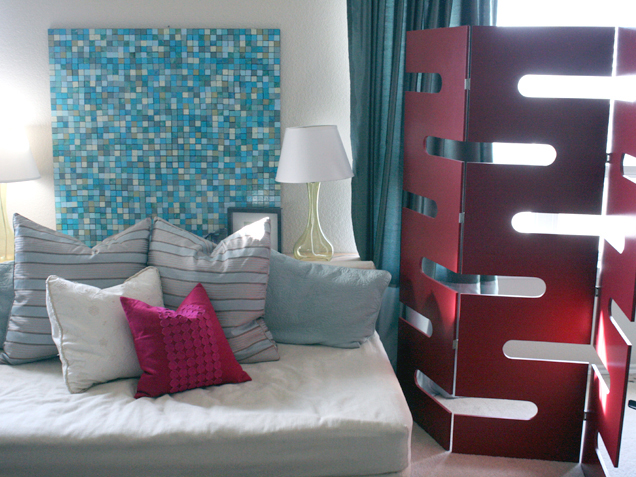
Anyway. I found this screen online and thought “$519.00 dollars” gulp… But, it is funky, and oh so fun. You know what? I could make it. SOLD!
And guess what, now you too can make this! Original on left, ours on the right.


Just keep that in mind, that you will be blown away when you can see how we did it for $30 to $50, depending on the size you want.
Supplies:
1 to 2 sheets 1/2″ x 4′ x 8′ mdf, cut to size at the store, see specification sheet for dimensions, (Home Depot makes cuts FYI) Approx $20.00 a piece
6 hinges, very small 2 screw hinge. These come in sets of two for Approx $2-3.00
Paint
Wood patch compound (optional, for oops!)
Tools:
Straight edge, or long ruler (for drawing on template)
Measuring tape (for drawing on template)
Pencil (for drawing on template)
Jig saw (to cut out shapes) – not included in cost, but they are only about $30.00, for a simple saw, FYI
1-2 sheets, 150 grit sand paper (for sanding raw cut edges)
A round object (for sanding curves, see instruction sheet)
Sanding block (or small piece of wood with sanding paper wrapping it)
(If you do not have these tools check bottom of post for another option to build the screen)
without author’s written consent before use. Thank you


>This is just what I have been looking for. All the room dividers I have found have not been that great looking/very expensive. THANK YOU!
>OMG. Your projects are taking my breath away! We have a screen divider that hides our stationary bike but I was just thinking yesterday that I'd love one that better matches our decor.
This is exactly what I was looking for! I am going to put this up in our family den (of our newly bought house) to separate my office from the rest of the family room. Thank you, thank you, thank you! 🙂
YOU are so welcome! (it is funny I was shopping at HomeGoods a couple weeks ago and they had this exact screen for sale, it made me happy!!!) I hope you love your screen!)