Get organized! See our favorites in the shop

Remodelaholic

DIY tutorials, Woodworking plans and more.

FREE BONUS: Kitchen Organization Boot Camp
  • Home
  • About Us
    • About US
    • Contributors
    • Facebook
    • Pinterest
    • YouTube
    • Instagram
    • Disclosure and Advertising
    • Contact Us
  • Shop
  • Project Ideas
    • Our Houses
      • Birch House (current projects)
      • Canyon House
      • Park House
      • Downing House
      • Logan House
    • DIY Project Plans
    • All projects
    • Barn Door Baby Gate
    • Dutch Door
    • Framing A Wall Mounted TV
    • Indoor Playhouse
    • Beach Themed Living Room Design
    • Chicken Coop Building!
    • Computer Desk
    • Computer Desk Plans
    • Custom Newel Posts and Stair Remodel
    • Family Room Sneak Peek
    • Headboard Tutorial
    • Living Room Progress
    • Mood Boards
    • Scrabbled Family Names
    • Pets
  • Design By Room
    • Bathrooms
    • Landscape
    • Kids Bedrooms
    • Kitchen
    • Living Rooms
    • Laundry Rooms
    • Master Bedrooms
    • Mood Boards
    • Office
  • Holiday
    • Christmas
    • Halloween
    • Patriotic
    • Easter
    • Fall
    • Saint Patrick’s Day
    • Thanksgiving
    • Spring
    • Valentines Day
    • Winter
  • Crafts
    • Printable
    • Art
    • Paper Crafts
    • Kids
    • Fabric Crafts
    • Decorate
  • Recipes
    • Appetizers
    • Beef
    • Beverages
    • Breakfast
    • Chicken
    • Desserts
    • Dinner
    • Fruit
    • Healthy
    • Holiday
    • Lunch
    • Main Dishes
    • Salads
    • Sandwiches
    • Sauces
    • Seafood
    • Side Dishes
    • Soup
    • Vegetables
  • Videos

Beaded Snowflake Ornament

Written by Cassity

  • Facebook
  • Twitter


I thought it would be fun to show you an ornament that I have been making for a few years, my little beaded snowflakes.  Also, Stephanie Lynn invited me to be a part of her 25 homemade ornaments this year.  Please go check out my post over at Under the Table and Dreaming for another fun beaded ornament!

The thing that I love about these little snowflakes is how delicate they, how they glitter and shine on your tree or how great they look attached to the bow on a plate of cookies!

Simple-beaded-snowflake-ornament-tutorial (24)


Supplies you will need:

Various glass beads

26 gauge wire

string


Tools:

Needle nose/wire cutting pliers


Step One:

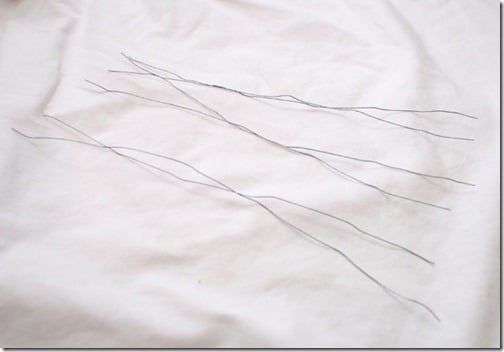
Cut your wire to length.  You will need 6 pieces about 9 –10 inches long.

Simple-beaded-snowflake-ornament-tutorial (3)


Step Two:

Bundle the wires together and tie with strings in the center.  You want to make 6 arms.  So separate your wires into 6 arms of two.  Weave in and out of the strands, with your threads, tie and trim excess. It should look like the image below.

Simple-beaded-snowflake-ornament-tutorial (5)


Step Three:

Start adding beads.  I usually just copy the bead placement on each arm around the circle.  To hold the beads in place as you string the next arm, just bend one of the wires down.

IMG_8857


Step Four:

To create a secondary circle you string beads on one wire at a time, and then twist it into one of the next arms wires.  Then take the second wire, string beads on it, and attach it to one of the wires on the next arm… (look at the pictures, it is easier for them to do the explaining!)  Just work your way around the circle.

IMG_8859

IMG_8860

IMG_8861

IMG_8862IMG_8863IMG_8866IMG_8871IMG_8872


Step Five:

To add small circles within each arm, add a few beads to each individual wire. Twist and top with another bead.

Simple-beaded-snowflake-ornament-tutorial (8)Simple-beaded-snowflake-ornament-tutorial (9)

Simple-beaded-snowflake-ornament-tutorial (10)

Simple-beaded-snowflake-ornament-tutorial (11)

Simple-beaded-snowflake-ornament-tutorial (12)Simple-beaded-snowflake-ornament-tutorial (13)


Step Six:

Finish off each arm as you wish with beads.  To secure them  At the end you can either add a small loop of wire, by wrapping the wires around the needle nose plier tip, or  just bend the wire back over the last bead and wrap just under the bead.  Like so:


Simple-beaded-snowflake-ornament-tutorial (15)

You’re done!

Simple-beaded-snowflake-ornament-tutorial (19)

Simple-beaded-snowflake-ornament-tutorial (20)

Now you can just add a hook to the end of one of the arms, and use it where ever you please!

Simple-beaded-snowflake-ornament-tutorial (23)

Simple-beaded-snowflake-ornament-tutorial (26)

  • Facebook
  • Twitter
Remodelaholic is a participant in the Amazon Services LLC Associates Program, an affiliate advertising program designed to provide a means for sites to earn advertising fees by advertising and linking to amazon.com. Please see our full disclosure here.

Published: December 15, 2011Filed Under: Crafts, Holiday, Tutorials Tagged: Christmas, Ornaments

About Cassity

Cassity started Remodelaholic with her husband, Justin, to share their love for knocking out walls together. She is an interior designer, wife, and mother of two. She and Justin have remodeled three homes from top to bottom and are working on their fourth. Making a house a home is her favorite hobby.


free email bonus

Kitchen Organization Boot Camp

Is your kitchen a zen paradise? It can be. I'll show you how.

Previous Post
Kitchen Island From Antique Sideboard
Next Post
Fabulous Dining Room Makeover

Comments

  1. cassie says

    December 15, 2011 at 7:24 am

    i LOVE these! they are adorable and have a great vintage look.

    Reply
  2. Lauren Clark @ Prudence Design Spot says

    December 15, 2011 at 3:17 pm

    I am curious to know what area of Texas you live – we recently moved back to the Dallas area! Love the blog!

    Reply
    • Cassity says

      December 15, 2011 at 4:35 pm

      Lauren,
      We are in West Fort Worth, but we are moving to Dallas maybe in the spring. We are thinking of Richardson or Garland… I don’t want to have to deal with a big commute time for my husband! I would love to hear your thoughts about Dallas.
      Cassity

      Reply
      • Lauren Clark says

        December 30, 2011 at 2:46 pm

        You will be right up the road from me if you move to the Richardson Garland area. I am pretty sure it’s a sign that we need to become friends =)

        Reply
  3. Michaela Stephens says

    December 15, 2011 at 6:59 pm

    How pretty! You make it look so easy and fast!

    Reply
  4. Eliza Shumway says

    December 19, 2011 at 7:53 pm

    Sweet Cass!!! love this!

    Reply
  5. Laura @ Laura's Crafty Life says

    December 21, 2011 at 9:11 pm

    These are beautiful. This is an excellent tutorial. Thank you for sharing. 🙂

    Reply

Leave a Reply Cancel reply

We love hearing from fellow Remodelaholics, so let us know what you like about this and leave any questions below in the comments. If you have followed a tutorial or been inspired by something you have seen here, we would love to see pictures! Submit pictures here or by messaging us over on Facebook.
Recipe Rating


Hey there, I am Cassity! Nice to virtually meet you!

This blog is about DIY at its finest. We are obsessed with it and so are you, so while we're working and have nothing to show you of our own projects we show off yours. So submit your projects! More About Us…

Categories

  • Facebook
  • Instagram
  • Pinterest
  • RSS
  • Twitter
  • YouTube

Meet The Team

Privacy Policy

Remodelaholic is a participant in the Amazon Services LLC Associates Program, an affiliate advertising program designed to provide a means for sites to earn advertising fees by advertising and linking to amazon.com. Please see our full disclosure here.

© 2005-2016 Remodelaholic LLC, All Rights Reserved

  • Facebook
  • Instagram
  • Pinterest
  • RSS
  • Twitter
  • YouTube

Copyright © 2021 · Remodelaholic

  • Pinterest
  • Facebook
  • Twitter