Bifold Door Makeover into French Doors

This is one such project. I have never loved the basic standard bifold doors in our kitchen, but I didn’t hate them enough to do anything about them sooner. Well, I am getting ready for some rather important company to come into town, so it just became a little more important! 🙂
So here is what I did, to take my doors from builder grade to an upgrade!
Paneled Bifold Door Makeover, into Flat French Doors
Materials Used:
- 1×4 (4) @ 10′
- 4×8′ Sheet of paneling
- Liquid Nails
- 1/2″ Finishing Nails
- 6 Standard Door Hinges
- Wood Filler
Tools Suggested:
- Miter Saw
- Router
- Table Saw
- Nail gun
- Drill
- Sander or Sandpaper
For converting bifolds into french doors, you have two options…
1st option) Remove the roller pin thingy (pretty sure that is it’s technical term). See image below. You can keep the doors so that they pivot on the already existing pins (like this closet door makeover). Granted, I wanted to make sure that my doors were more secure and wouldn’t be falling when my kids inevitable swing on the door using the knob as a handle…. Yes, they do that… often. Especially the 3 year old. Heaven help me.
Back to my point, if you aren’t terribly concerned you can use those as pivot points, you may just need to adjust their placement so the doors don’t hit the door casing, since you’ll be adding some depth to the front of the door. You’ll probably also need to add a catch of some sort (like the magnetic catch used here) to help the doors stay closed properly.

2nd Option: This is much more sturdy, but more work. It requires adding hinges to the doors, and removing the track system. This is the option I chose. I actually had to case out the door frame so that my hinges would have a place to sit that was level with the door molding.
Like I said this will be a case by case basis, so decide what is best for your space.
So let’s dive in shall we !?
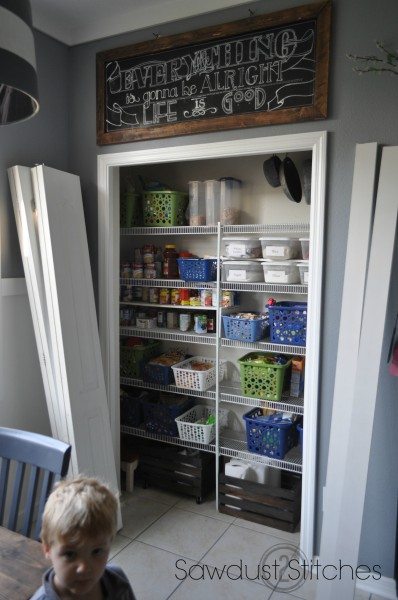
This is what it looked like for the previous owners…

I began by removing the original doors, the track and hardware.
( I know my pantry interior isn’t matchy-matchy, it is on another one of those to-do lists)
I then removed the door hardware. At this point I needed to do some math. Because I was turning these into french doors, and adding hinges and trim to the wall, I needed to adjust the width of my doors. Keep in mind: ALL door openings and doors are going to be different measurements. But here’s the basic formula of what I did to determine how much to cut down my doors:
This will not be a “one size fits all” equation
Door Gap Clearance (1/4″) = 1/4″ (subtract .25″)
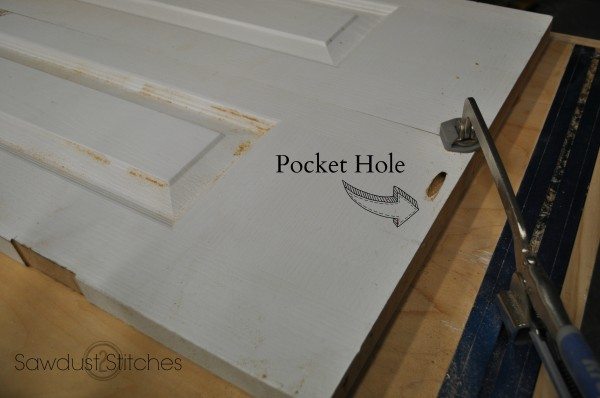
 I cut that measurement off the inside of the doors so that there would not be a raw edge exposed. To secure them together used my Kreg Jig to make pocket holes along the edge of the door, and reinforced with liquid nails as well.
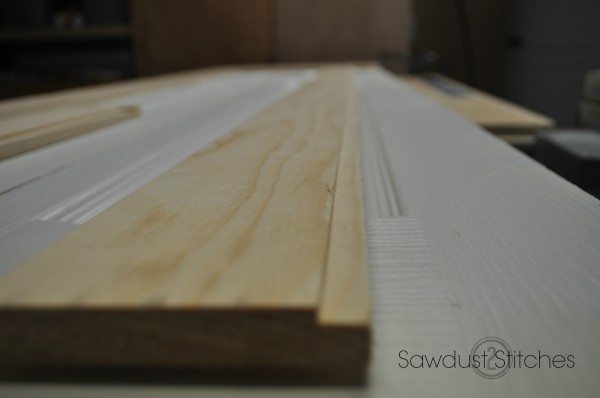
I then cut my 1×4″ s that would create my edging. I took an extra step and planed down these boards just a little bit so that they would not be as elevated off the door. (Not necessary, but I like the look of it.)

I then used a router to route out a notch about a 1/2″ wide and 1/8″ deep. This will allow the paneling to sit below the 1×4’s without adding more bulk.

Once all the boards were prepped, I started by adding the top piece and ONE long side piece, first gluing, and then reinforcing with 1.25″ finishing nails.

At this point I measured the distance between my two long side boards (measuring to the inside of the routed edge). Using that measurement I cut the paneling to fit the spanned distance.
Next I spread a liberal amount of liquid nails to the back of the paneling and slid it into place. (It should slide under the 1×4’s into the routed out groove.)
 Once the paneling was in place I proceeded to glue and tack in place the 2 remaining boards.
I then filled the holes from the nails with a wood filler.
While waiting for the wood filler to dry I routed out where the hinges would be.
(It can work without routing out the hinges just make sure you equate that into your math.)
Once the hinges were routed out, I gave it a final sanding to smooth out the edges and get rid of any excess wood filler.

At this point, you can either hang the doors and paint in place, or give it it’s final finish. I decided to install them first, simply because I was nervous my measurements might be off. Thank goodness the fit! I proceeded to stain and finish them in place.
I started by staining both doors “Classic Gray” by Minwax. After it had completely dried I used a white wash technique to lighten them. I used a mixture of 1 part water, and 2 parts white paint. Simply brush on mixture with a stiff bristled brush. I painted the doors one at a time with the mixture. I let it dry for a minute then would wipe of the excess with a rag. It will create a very rustic finish. I repeated this 2 times on each door, in order to lighten up the doors to the color I desired.
Last step, I added my hardware! I love the look of a plated doorknob, but was having a heck of a time tracking them down. I actually found the plates online and the knobs at Home Depot!
I first added my “Door Escutcheon Plates”. These I found on Amazon, and were made to fit vintage door knobs, but I liked them and would need to make them work.

So I headed to Home Depot and I found these bad boys. They where perfect! They had a wide enough base to cover the hole, and they didn’t look too small for the plates. Perfection.

I just proceeded to drill a hole like you wold for any cabinet hardware.

Just thread it through and tighten er’ up.
 It is all in the details!
So there you have it folks, high end look for less!  Take Luck,
——————————————
More ways to update your doors:
Make closet bifold doors into paneled french doors

Turn a flat door into a paneled door, painted or wood

and 40+ more ideas here


This is genius! I love it, however, reading “Take Luck” at the end was like the cherry on top! Thanks for the laugh! #BrianReganForTheWin #SayEight!
Just making sure you take all the hardware off from the running on top correct??
Good post 🙂
Good work!
Umm, that is a very organized pantry! Love reading and seeing your projects. Hoping to have the time/$ to do some things to our home eventually. Keep up the good work!
What do the inside of the doors look like?