Get organized! See our favorites in the shop

Remodelaholic

DIY tutorials, Woodworking plans and more.

FREE BONUS: Kitchen Organization Boot Camp
  • Home
  • About Us
    • About US
    • Contributors
    • Facebook
    • Pinterest
    • YouTube
    • Instagram
    • Disclosure and Advertising
    • Contact Us
  • Shop
  • Project Ideas
    • Our Houses
      • Birch House (current projects)
      • Canyon House
      • Park House
      • Downing House
      • Logan House
    • DIY Project Plans
    • All projects
    • Barn Door Baby Gate
    • Dutch Door
    • Framing A Wall Mounted TV
    • Indoor Playhouse
    • Beach Themed Living Room Design
    • Chicken Coop Building!
    • Computer Desk
    • Computer Desk Plans
    • Custom Newel Posts and Stair Remodel
    • Family Room Sneak Peek
    • Headboard Tutorial
    • Living Room Progress
    • Mood Boards
    • Scrabbled Family Names
    • Pets
  • Design By Room
    • Bathrooms
    • Landscape
    • Kids Bedrooms
    • Kitchen
    • Living Rooms
    • Laundry Rooms
    • Master Bedrooms
    • Mood Boards
    • Office
  • Holiday
    • Christmas
    • Halloween
    • Patriotic
    • Easter
    • Fall
    • Saint Patrick’s Day
    • Thanksgiving
    • Spring
    • Valentines Day
    • Winter
  • Crafts
    • Printable
    • Art
    • Paper Crafts
    • Kids
    • Fabric Crafts
    • Decorate
  • Recipes
    • Appetizers
    • Beef
    • Beverages
    • Breakfast
    • Chicken
    • Desserts
    • Dinner
    • Fruit
    • Healthy
    • Holiday
    • Lunch
    • Main Dishes
    • Salads
    • Sandwiches
    • Sauces
    • Seafood
    • Side Dishes
    • Soup
    • Vegetables
  • Videos

How to Build a Shiplap Backdrop for Photos or Parties

Written by Jenny McArthur

  • Facebook
  • Twitter

The amazing and talented Jenny is here again to show off one of her latest projects: a large shiplap backdrop, perfect for parties, photos, and more! We’re pretty convinced that Jenny is the new Martha (yes we mean Stewart) so to see more of her work, check out her previous projects here on Remodelaholic or you can follow her over on Instagram here. And yes — she made the cake, too!How to build a large DIY shiplap backdrop for photos and parties | Tutorial on Remodelaholic.com

When I first taught myself some of the basics of home renovation and woodworking, I never imagined how many different ways I would find to use the skills I was learning! Case in point: building a backdrop for a dessert table.

The possibilities are endless! Use a single piece of plywood instead of slats. Paint it any color of the rainbow. Make it any size. Keep it plain or write or draw something on it. Use it as a photo backdrop or, as I did, as a backdrop for a dessert table. You could even use it as a sign to hang on the wall in your home. Put those DIY skills to use!

How to Build a Shiplap Backdrop

This post contains affiliate links. See our full disclosure policy here.

Supplies:

4″ x 8″ piece of 1/4″ plywood ripped in to 6-inch slats (for the center); you could also keep the center piece whole, instead of using slats

1″ x 3″ lumber (for the frame) and back supports

How To:

  1. Use the 1/4″-thick piece of plywood as a solid piece or rip it into 6-inch slats, as I did.
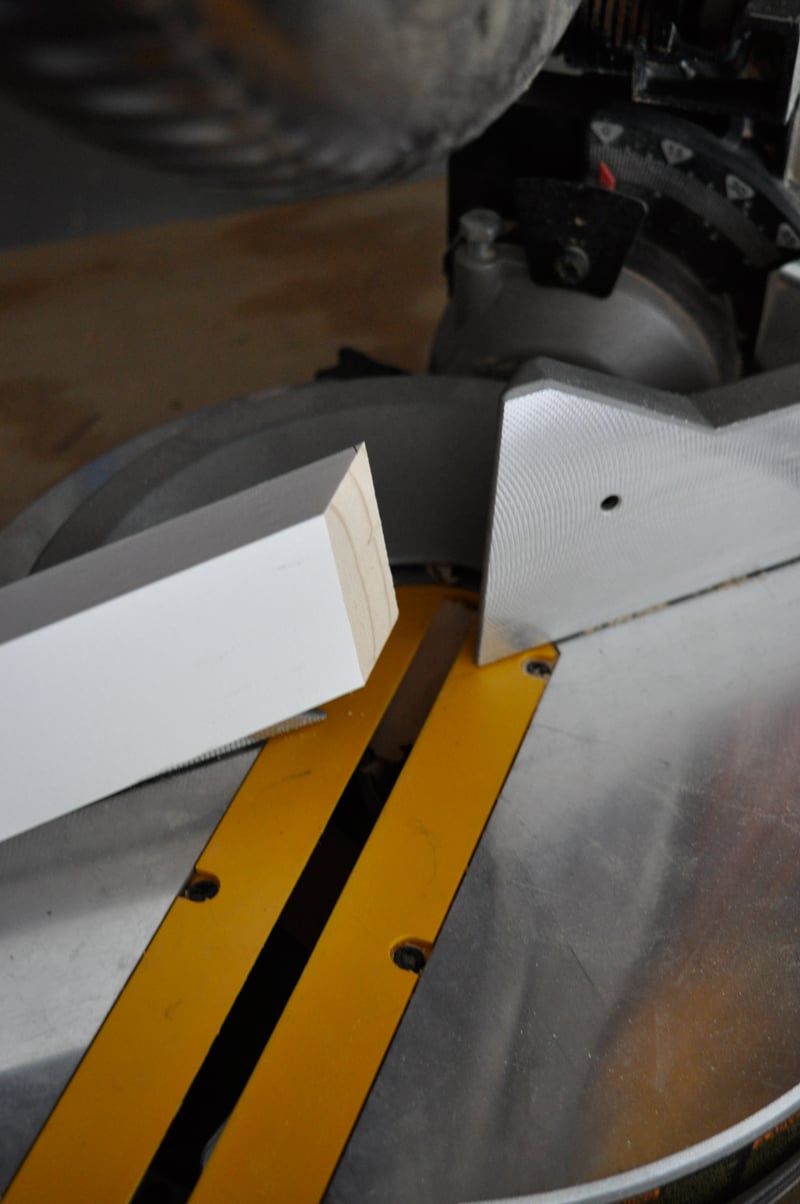
  2. Cut the 1″ x 3″ boards at 45-degree angles on each end to build the frame. My backdrop dimensions are 3.5′ H x 5′ W.How to build a large DIY shiplap backdrop for photos and parties | Tutorial on Remodelaholic.com
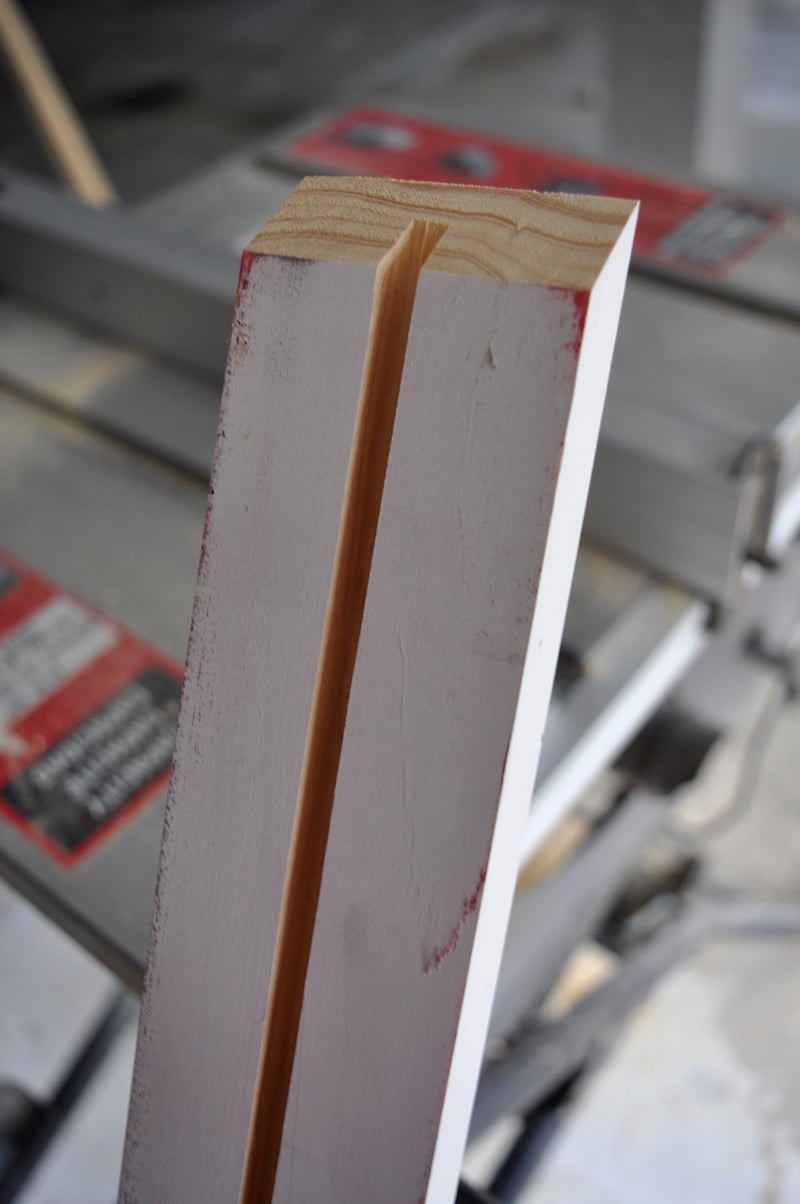
  3. Use a router or table saw to make a groove in the center of your frame boards (the 1″ x 3″ lumber). I used a table saw and had to make two separate passes to get the correct width (you want the grooves just a smidge wider than the width of your plywood slats as you’ll be sliding the slats down into the grooves).How to build a large DIY shiplap backdrop for photos and parties | Tutorial on Remodelaholic.com
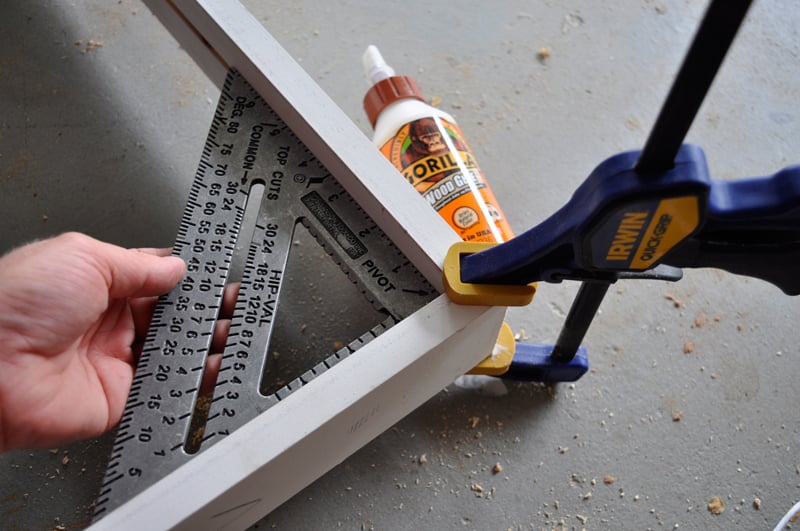
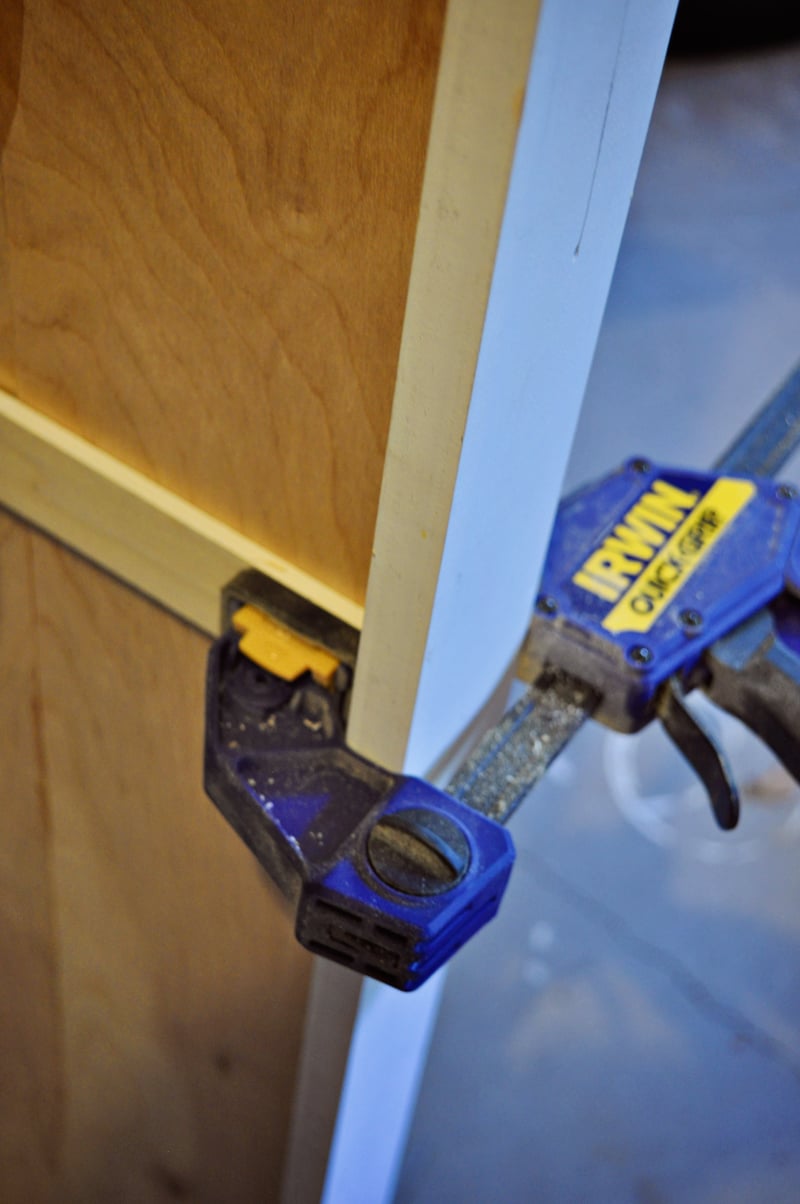
  4. Use wood glue and clamps to build your frame out of the 1″ x 3″ boards, joining the boards at the mitered corners. If you have a corner vice or clamp to use for the job, that would be ideal. I did not, so I used a square to make sure my boards were at a 90-degree angle.How to build a large DIY shiplap backdrop for photos and parties | Tutorial on Remodelaholic.com
  5. I reinforced the bond by nailing the corners from each side with a 16-gauge nail gun.How to build a large DIY shiplap backdrop for photos and parties | Tutorial on Remodelaholic.com
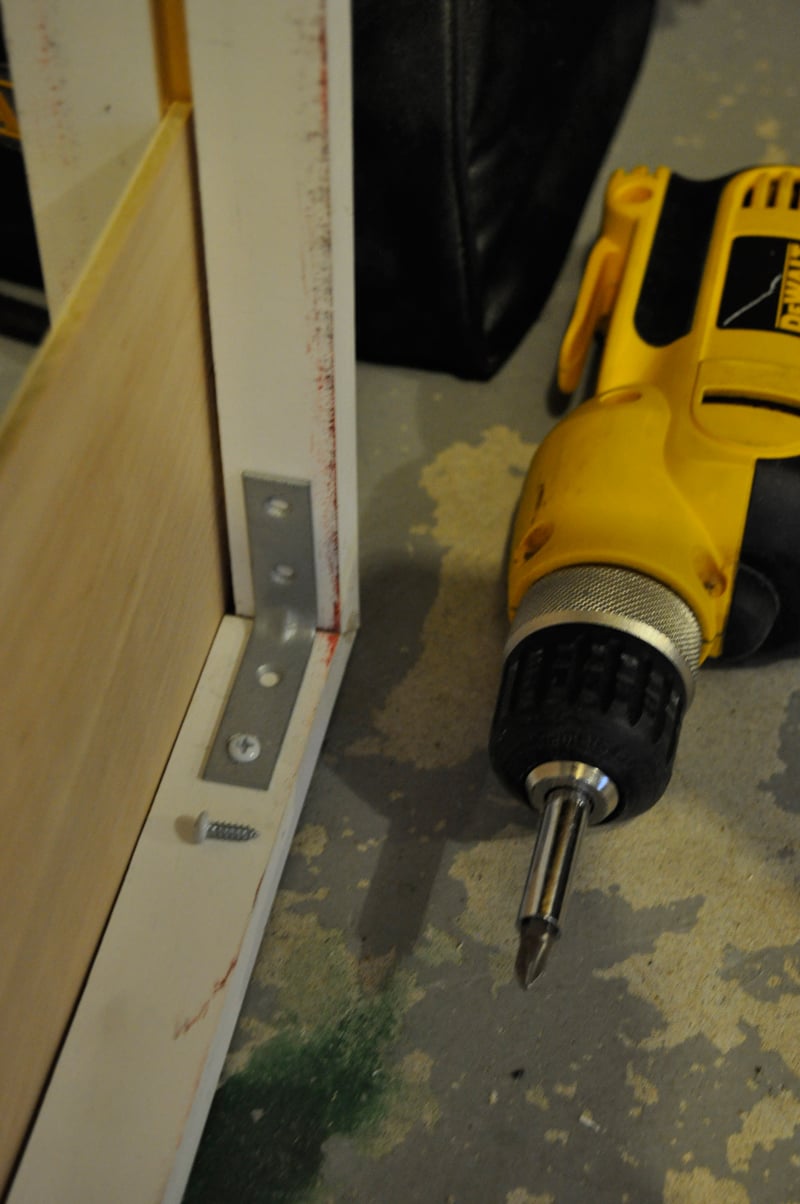
  6. I further reinforced the 2 bottom corners of the frame with these metal brackets. The brackets were especially helpful as they added stability during the installation of the plywood slats.How to build a large DIY shiplap backdrop for photos and parties | Tutorial on Remodelaholic.com
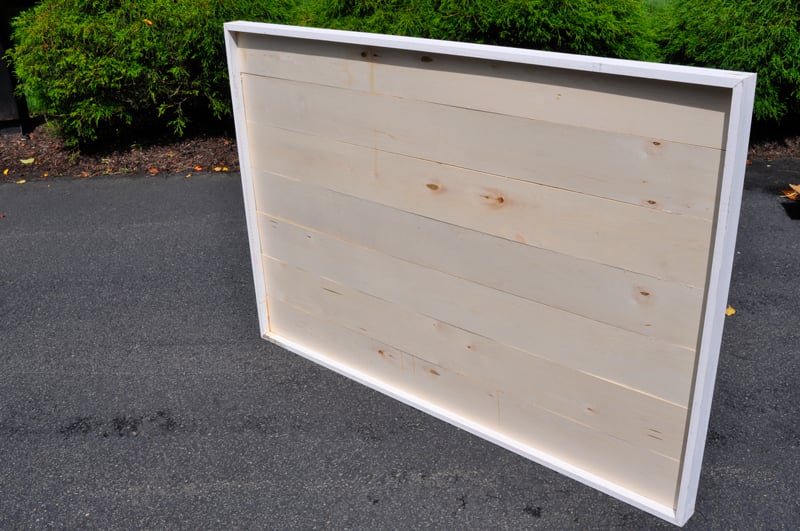
  7. Then, I cut the plywood slats to size and slid them, one by one, down in to the grooves in the center of my framing boards.How to build a large DIY shiplap backdrop for photos and parties | Tutorial on Remodelaholic.com
  8. I added the final framing board on top, sliding the groove in the board down on to the edge of the top slat, securing with wood glue and clamps and nails, as before.
  9. For added stability, at the same time I glued the top framing board, I glued a skinny piece of scrap wood down the center back of the plywood slats and clamped it to set.How to build a large DIY shiplap backdrop for photos and parties | Tutorial on Remodelaholic.com
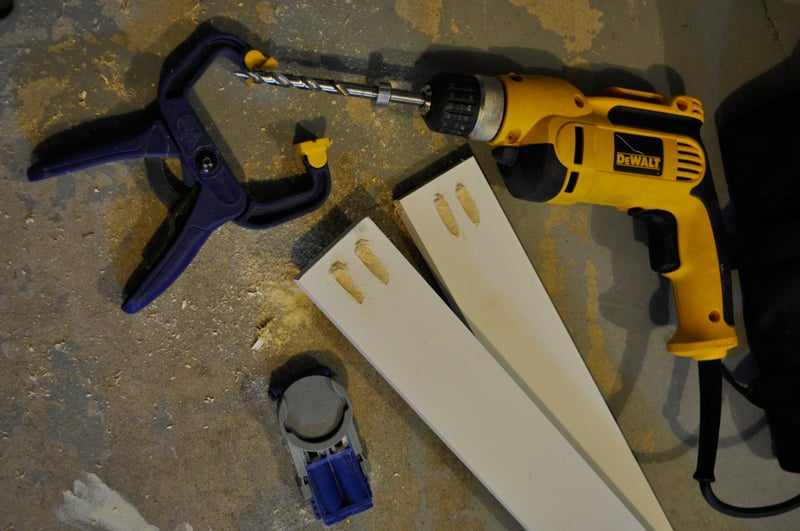
  10. I used a Kreg Jig to drill pocket holes on either side of two 1″ x 3″ boards, cut to the same height as my backdrop.How to build a large DIY shiplap backdrop for photos and parties | Tutorial on Remodelaholic.com
  11. I then secured the 1″ x 3″ boards to the back of the backdrop using Kreg Jig screws, creating a ‘bridge’ between the top of the frame and the bottom of the frame, making the entire backdrop much sturdier. Below, you can see the glued strip down the middle and the reinforcement boards on either side of it, screwed in to the top and bottom of the frame.How to build a large DIY shiplap backdrop for photos and parties | Tutorial on Remodelaholic.com How to build a large DIY shiplap backdrop for photos and parties | Tutorial on Remodelaholic.comHow to build a large DIY shiplap backdrop for photos and parties | Tutorial on Remodelaholic.com
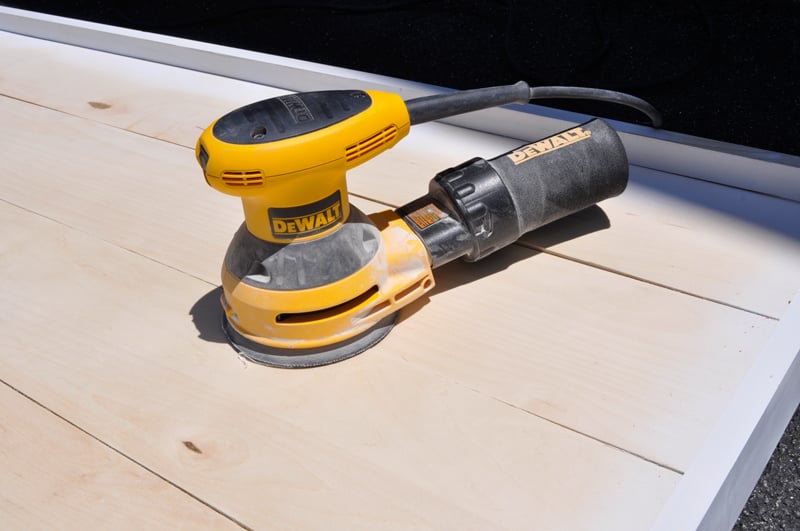
  12. I sanded to smooth away any roughness and then vacuumed up all the dust before painting with one coat of primer and two coats of paint.How to build a large DIY shiplap backdrop for photos and parties | Tutorial on Remodelaholic.com
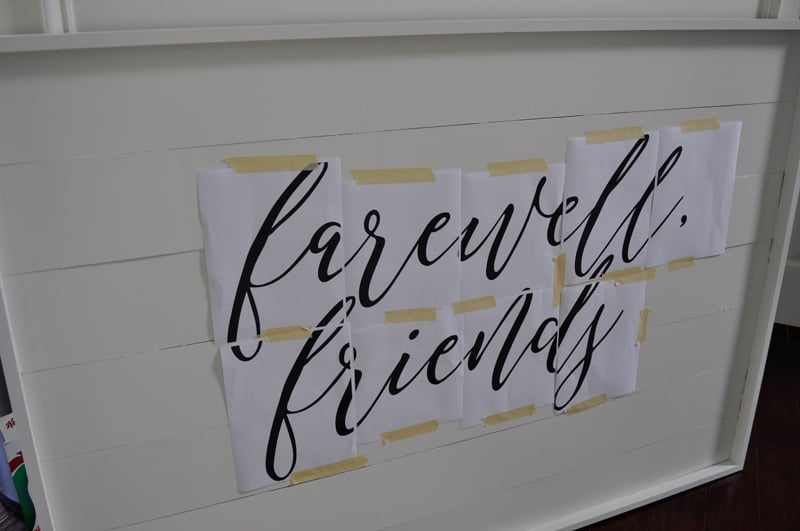
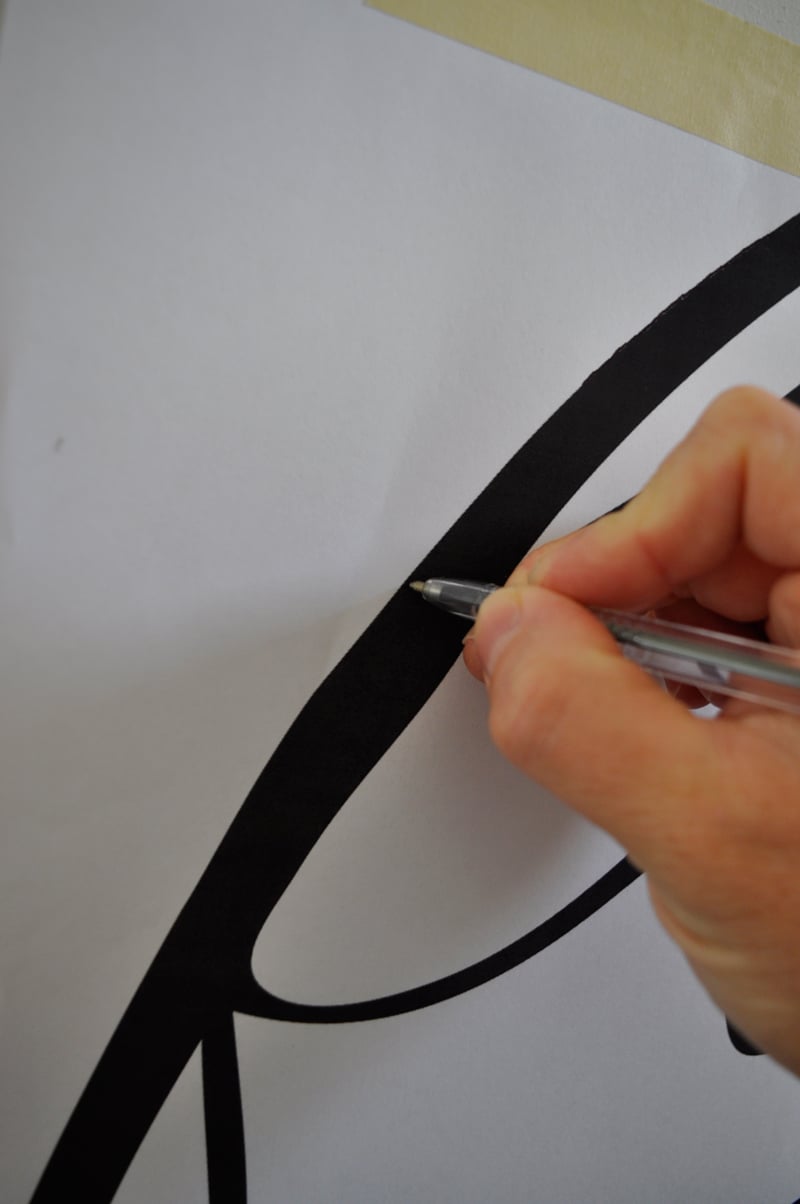
  13. Then, I added lettering to the front that reads, “Farewell, friends.” I used Photoshop Elements software for the design and to divide the words in to sections that I could then print out on 8.5″ x 11″ pieces of paper. (The font is “Remember Script Regular.”) I taped the papers where I wanted them on my board and then used a ball point pen to trace over the outside edges of each letter (I did not push all the way through the paper. There was no ink on the wood—just the impression, or indent, made by the ballpoint pen). I traced each of the markings made by the ballpoint pen with a gold Sharpie marker (to make them easier to see) and then filled each letter in with a gold Liquitex Professional Paint Marker.How to build a large DIY shiplap backdrop for photos and parties | Tutorial on Remodelaholic.com How to build a large DIY shiplap backdrop for photos and parties | Tutorial on Remodelaholic.com
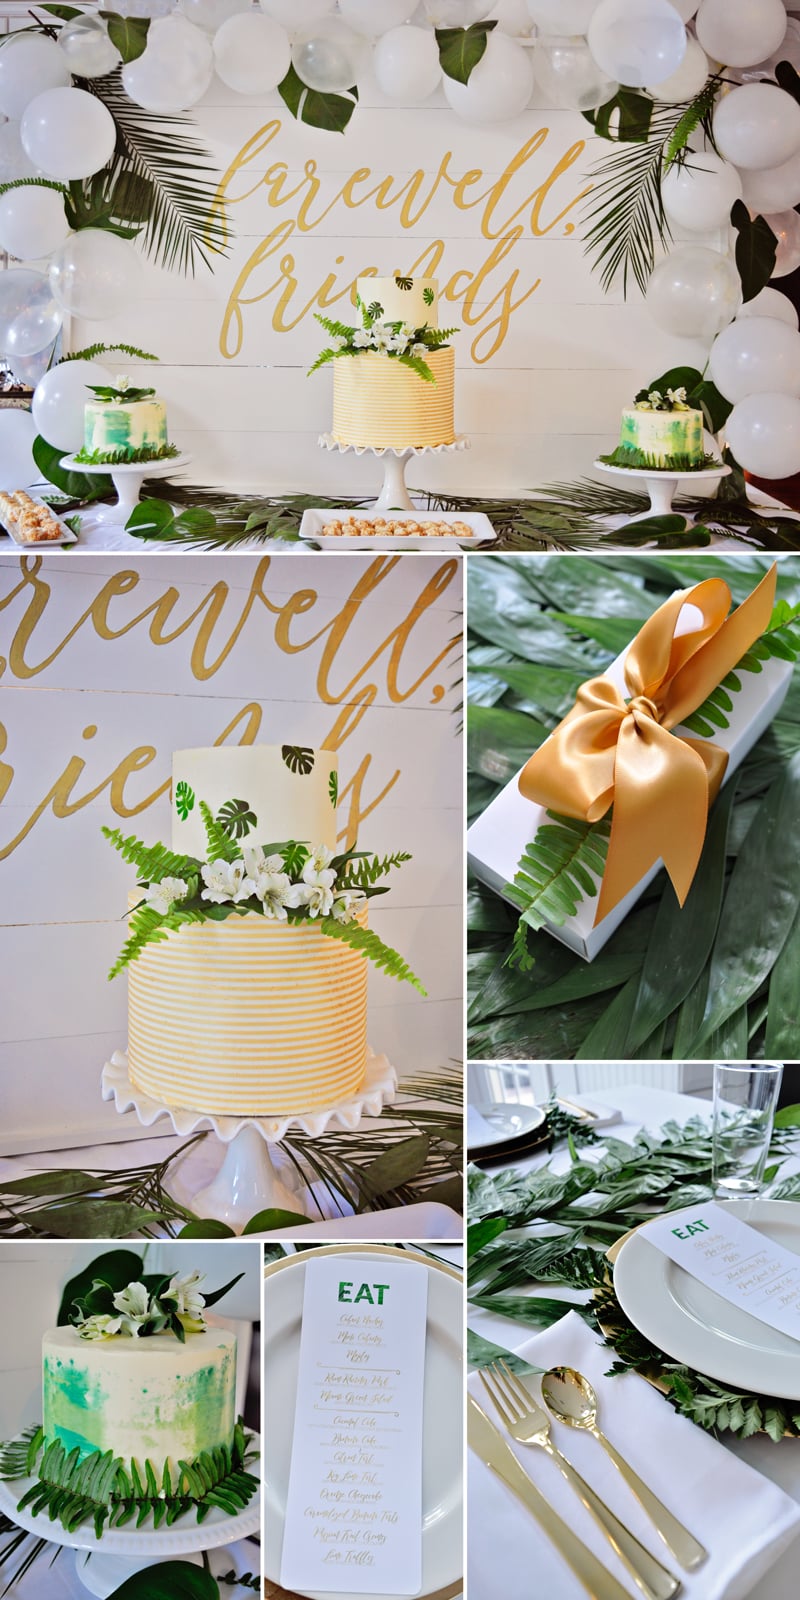
  14.  My finished sign is below. I plan to store the backdrop and paint over it again and again, as needed, to use as a backdrop for future parties. The backdrop can be displayed many different ways. You could attach hardware to the back for hanging it on a wall, you could prop it up against a wall, or you could add supports to the back to make it free-standing (or, alternatively, make the bottom base wider which might make it stand better on its own).

How to build a large DIY shiplap backdrop for photos and parties | Tutorial on Remodelaholic.com

Below, you can see pictures of how I used my finished board as the backdrop for a dessert buffet at a dinner party. (I made the cakes, too). DIY all the way, baby.

How to build a large DIY shiplap backdrop for photos and parties | Tutorial on Remodelaholic.com


Isn’t Jenny AMAZING?!? So many skills to share and beautiful photos as well. Leave Jenny some love in the comments!

See more from Jenny here:

kitchen makeover

The beadboard backsplash and crown molding make such a difference in this kitchen makeover

beginner tips for installing trim
Wainscot and Trim Tips (1)

how to build a window cornice
This DIY window cornice gives windows a MAJOR new look! Full detailed step-by-step photo tutorial on Remodelaholic.com


  • Facebook
  • Twitter
Remodelaholic is a participant in the Amazon Services LLC Associates Program, an affiliate advertising program designed to provide a means for sites to earn advertising fees by advertising and linking to amazon.com. Please see our full disclosure here.

Published: July 26, 2016Filed Under: Build, Contributor, Crafts, Decorate, DIY, How To Tagged: Party ideas, party tips, photo prop, Photography, plywood

About Jenny McArthur

Jenny enjoys making life more beautiful in the details. For her, there's nothing more satisfying than figuring out how to get it done DIY-style! She dabbles in a little bit of everything . . . home renovation and decorating, graphic design, cake decorating and baking . . . whatever strikes her fancy at the moment. You're welcome to follow along with her DIY adventures on her Instagram account @turnip_greens_sweet_tea


free email bonus

Kitchen Organization Boot Camp

Is your kitchen a zen paradise? It can be. I'll show you how.

Previous Post
Real Life Homes: A Cute Cottage Makeover
Next Post
DIY Modern Alphabet Wall Art Pennant

Comments

  1. Sarah JENSEN says

    July 26, 2016 at 5:23 pm

    This is really stunning. Wish I’d been at the party! If I made it, I’d probably use it for everything so wondering what the easiest way to change the text from party to party would be. Just paint over it?

    Reply
  2. Jenny McArthur says

    July 26, 2016 at 6:22 pm

    Thank you, Sarah! My plan is to just paint over it, but you could also mount a poster or attach paper or vinyl cut-outs. And it works great not just for parties, but you could use it for home decor or a photo backdrop or any number of things!

    Reply
  3. Dyan says

    July 27, 2016 at 8:48 am

    LOVE this! I did something similar, in that I created a chalkboard, starting with a flat frame from 1×3’s, and added a chalk “ledge.” I then painted plywood with chalkboard paint. I attached the plywood to the back of the frame with mirror clips so that it could easily be removed. I’ve already painted over it several times, using different text for various occasions. I really like the way you assembled the frame, though, using the “channel.” Not sure if my skills are up to that, but I’d like to try. Thanks so much for the wonderful step-by-step tutorial.

    Reply
  4. Jenny McArthur says

    July 27, 2016 at 11:13 am

    Thank you, Dyan! I love the idea of making a chalkboard as you described. Using the mirror clips is genius!

    Reply

Leave a Reply Cancel reply

We love hearing from fellow Remodelaholics, so let us know what you like about this and leave any questions below in the comments. If you have followed a tutorial or been inspired by something you have seen here, we would love to see pictures! Submit pictures here or by messaging us over on Facebook.
Recipe Rating


Hey there, I am Cassity! Nice to virtually meet you!

This blog is about DIY at its finest. We are obsessed with it and so are you, so while we're working and have nothing to show you of our own projects we show off yours. So submit your projects! More About Us…

Categories

  • Facebook
  • Instagram
  • Pinterest
  • RSS
  • Twitter
  • YouTube

Meet The Team

Privacy Policy

Remodelaholic is a participant in the Amazon Services LLC Associates Program, an affiliate advertising program designed to provide a means for sites to earn advertising fees by advertising and linking to amazon.com. Please see our full disclosure here.

© 2005-2016 Remodelaholic LLC, All Rights Reserved

  • Facebook
  • Instagram
  • Pinterest
  • RSS
  • Twitter
  • YouTube

Copyright © 2021 · Remodelaholic

  • Pinterest
  • Facebook
  • Twitter