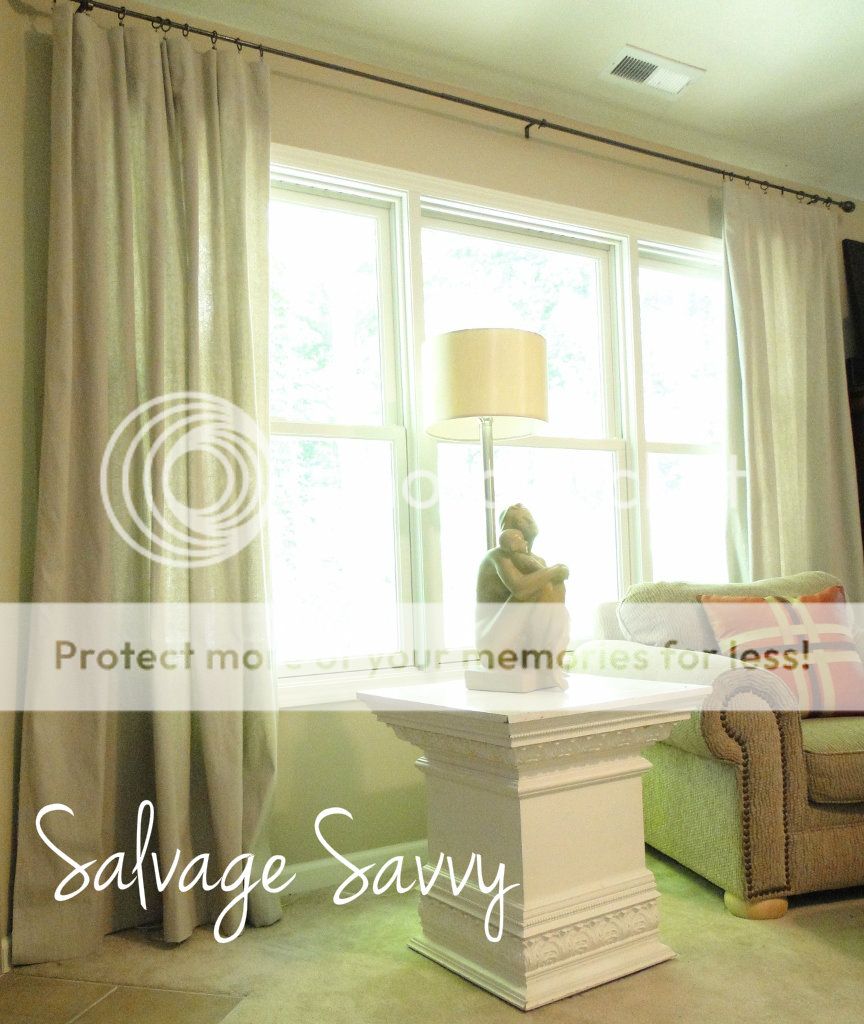
Check out these beautiful drop cloth curtains, that you can make too!


Hello, my name is Connie and I have a little blog called Salvage Savvy, where I share tips and ideas for making thrifty look fabulous. One of my all-time favorite transformations is this dresser. When I purchased it, this thing put the “ug” in ugly!! Check out my Vintage Dresser Makeover post if you want to see just how bad it was, and what I did to turn it into this beauty 🙂
I love expensive artwork… but unfortunately I can’t afford it, so I just make my own instead! Check out this tutorial on How To Create Your Own [Unbelievable] Artwork and see how you can create your own abstract art as well.
Lastly, I am constantly trying to get organized. One thing I’ve discovered is that if I want to have any chance of staying organized I have to make it pretty! This is a DIY Organizational Project that has completely changed my life [basically because I don’t spend half my day hunting down all that daily life “stuff” now!]

Here are my DIY drop cloth curtains! I was able to to make each panel for only $12!! Here’s how I did it
First, I purchased 6ft. x 9ft. drop cloths from a home improvement store. Here’s what I learned about drop cloths: be sure to examine the colors of each cloth because they vary… some drop cloths were darker than others [which wouldn’t matter at all if you were using them correctly!!]. Here’s something else I learned: there are two different weights of drop cloths, the heavier fabric cost about $13 each for a 6×9, and the lighter one was $10. I didn’t want really heavy curtains so I chose the lighter [and cheaper!] ones. And one more note: I chose to pre-wash and iron them before sewing… I’ve got three kids and a dog, so there is a really good chance that I’ll need to wash these curtains so I didn’t want to chance them shrinking after being completed.
Now, onto the actual process! I began with the hem [they are already sewn on the sides… so you can skip that… yea!!!]. I had to shorten mine quite a bit, so I just measured it out and ironed my bottom curtain line into the fabric [all of the material below that line is what needs to be hemmed up.
Because I didn’t want a gi-normous hem, I double-folded it… simply take the bottom edge and make it meet your ironed line, then iron down the “new” bottom line [am I making any sense here? it’s easy, I promise!].
Here’s how it looks when you’ve got the fabric folded under…
*Sided note: make sure that your edges are lined-up… you don’t want them hanging over and looking sloppy [plus that means that your hem is straight, which is a good thing…]
Here’s how it looks when it’s pinned and ready to sew…
Now, just sew straight across that top edge.
Now it’s time to make the pleats for the top… purchase this stuff [I soooo wish I had a name for you, but it comes in a giant roll and you have to have it cut to size like fabric… and I didn’t write down the name… sorry, I’m a terrible blogger lady]. Anyway, find it in the drapery section of the fabric store. There are several pleat options, so find the style that will provide your desired look. Purchase enough to span the width of your panel [these are 6ft x 9ft so I purchased 2 yards for each panel]. This stuff is magic… you’ll see why soon…
It couldn’t be easier to sew. Just line it up with the top of your curtain [another note: drop cloths aren’t sewn perfectly… it’s ok, I promise] and pin it on.
Then sew it on [top and bottom].
Here’s where the magic happens… once it’s all sewn on, just pull the little strings and…
Keep pulling… [note: I learned that you should secure the end strings, then begin pulling from the middle first, working your way to the edges.]
And just like that… you’ve made a pleated curtain!!!! Wow, right?! My sister [thanks Amy!] told me about this stiff, and it’s amazing! [Seriously, if it makes ME look like a seamstress then it’s a miracle product!]
Now, they are made to be used with rings and hooks, but I used clips [I’ll explain why another day…] so apparently you can use either.
And that’s what I did! I basically made a couple folds and sewed three straight lines 🙂 Sew simple [I know, cheesy… but I had to!]
Be sure to check out these lovely curtains as well!
Related


 I love expensive artwork… but unfortunately I can’t afford it, so I just make my own instead! Check out this tutorial on How To Create Your Own [Unbelievable] Artwork and see how you can create your own abstract art as well.

.jpg)
.jpg)
.jpg)
.jpg)
.jpg)
.jpg)
.jpg)
.jpg)
.jpg)
.jpg)
.jpg)
.jpg)
")
")
")


Great tutorial! I have noticed that drop cloth curtains seem to be the hot thing to make these days. Never would have thought to do so!
Can you share where you found such a long curtain rod?
I have been wanting to make some drop cloth curtains for our hobby room – great tutorial! Now I am inspired! Thanks for sharing this with us!
I have bought my drop cloths and am ready to go. Now …if I only knew how to sew. This could be a problem. 🙂
This is going on my to do list! Great tutorial!
Erin
These curtains are so pretty! Thanks for the great tutorial because I am a terrible seamstress!
Beautiful finished product! My walls have been naked since I painted – only because I couldn’t decide on what style of curtains to get. Now I have my answer and will be making these soon. BTW – it’s pleat tape and Joann’s or most larger fabric stores carry it.
Does anyone know where I could get the curtains shown on the 2nd from the bottom picture (under this post)? I’m talking about the blue chevrons in four different shades of blue. Thanks.
If you click on the image it takes you to a tutorial to make those curtains: https://www.remodelaholic.com/2011/10/ombre-painted-chevron-curtains-tutorial/
Thank you so much for sharing this tutorial!! I followed them exactly and we are so happy with our drop cloth curtains! https://leahandkyleg.blogspot.com/2013/02/drop-cloth-curtains-for-our-family-room.html
Leah, that is good news. We are glade that you found it helpful.
Great blog! Thank you for the inspiration!
Thanks for the compliment! I hope you come back!
Dumb question – why is the pleat tape necessary? Could you not just hang the cloths from rings and clips? I ask bc I have had naked clip rings hanging in my living room for SIX years! Looks like an extra step that may be optional? Am I dreaming?!
I don’t think that the pleat tape is “necessary”, there are plenty of drapery panels sold that are just flat panels. However, to get the more finished looks of drapes, as she has shown here, you would use the pleat tape. I think it is just according to your taste!
just curious where you purchased your drop cloths from? I bought some from lowes only to open the package to find out they have a huge seem down the middle and would run horizontally…Wondering if I should try them any way or find a different brand, thanks!
Hi Kaitlyn – this post is from a guest, so I can’t tell you for sure, but you can click over to their blog (linked up toward the top) and ask for sure there. Thanks!
I used them anyway with a seam in the middle. Once they are hung does not show that much. This was a great idea for my son newly purchased home, he hasn’t got furniture yet so doesn’t know his color scheme. The drop clothes are an inexpensive way to keep the neighbors from seeing you at night. Great idea. however after trying this I would not use the pinch pleats to make pleats. the first one I tried, I had so much trouble trying to even out the pleats and get them to the right length, I finally cut them off and made my own pleats. so much faster, just gather and tack in.. They also look go with just the clips. Thanks for a wonderful cheap idea.
Thanks for the tips, Pam!
Excellent tutorial, you make this easy enough for ME to do – and finish! 🙂
How do you know how wide to start off with, if it will be made a bit more narrow with pleat tape?
OK…I know I’m a later bloomer with the drop cloth curtains, etc., however, they are great and I used your tutorial and they turned out wonderful. Sorry I don’t have pics
Awesome! Great Job Helen!
I bought my drop cloth @ Harbor Freights Hardware store I paid $8.00. 48″Wide X 102″ Long. I used iron transfers and fabric markers. My curtains turned really good.
OK I have seen this tutorial everywhere and decided to do it. I bought several drop cloths from Home Depot. They all have a seam right across the middle. In every tutorial, nobody mentions this seam. I don’t see one in them. How is it that every single pair I bought happens to have this, but nobody else’s does??