From Evergreen to Ever-fabulous! – Folding Chair Makeover
Hello Remodelaholics! Thalita here from The Learner Observer again! You might remember me from the hutch makeover or that time I painted my bathroom tile? I’m so happy to be back to share another DIY project with you today! There is much to love about this makeover, but my favourite thing about it is that it was going to become trash before it was rescued. Isn’t that always a good feeling? Salvaging things from going into a landfill is pretty much the best ever! Rather than letting it go to waste, I paid someone $3 to let me take it off their hands. Yep… $3!

Folding Chair Makeover with Chalkboard Bottom
The thing I love about folding chairs is that they are super convenient to have around. In a crunch when you have lots of guests, they can be easily pulled out and don’t take up much space when it’s time to pack them away. They’re also super easy to transport, so you can throw them in your car when someone else is in a pinch and needs extra seating, too! I guess that means there are two things I love about folding chairs…
Anyway, these were not exactly attractive when I found them…

See what I mean? Forest green with plastic seats and back. There were tears and rips on them, and they were super dirty, but that second part was easy to fix. First thing’s first: take the back and seat off.

Better? Not exactly! Next, you’ll want to clean up the chairs. Just a damp cloth did the trick for these because they were mostly just dusty.

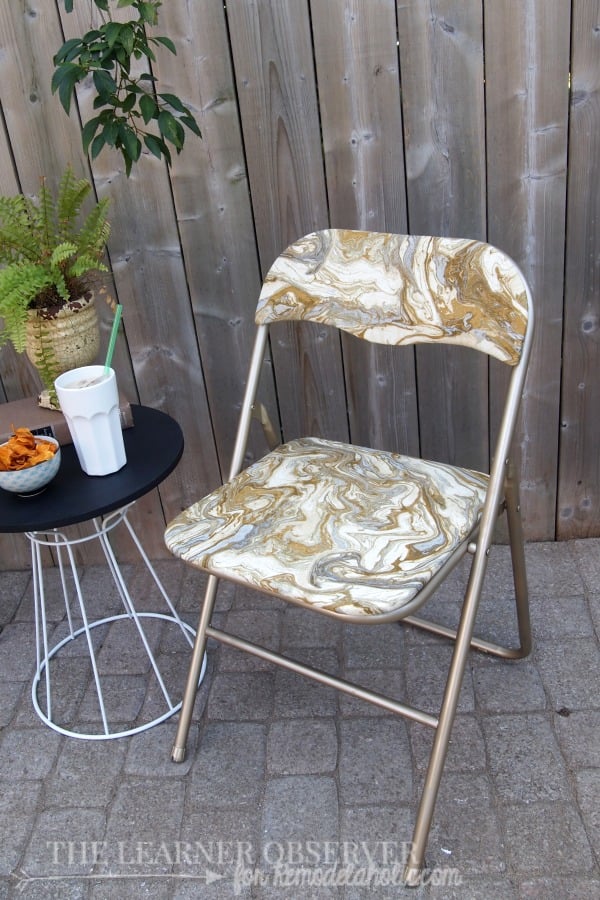
The colour I chose to spray paint these beauties is called Champagne Mist by Rustoleum. It took 2 cans because I was covering up a dark colour and didn’t use a primer. Here are the chairs with the first coat on:

They look like they’re well covered up, but believe me, there was a lot of forest green peeking through! Be sure to flip the chairs over to get the bottom parts covered as well because these will be seen from all angles when folded up. I didn’t bother to take the plastic caps off because spray paint also adheres well to plastic, so for now they will stay. They’re easy to replace though, and any home improvement store will have replacement ones in black, white, or other colours.
Get your staple gun and scissors ready!

Now comes the fun part! The fabric! I chose this Marbleized fabric from Tonic Living, which is 100% cotton and perfect for upholstery projects like this. It’s nice and thick and easy to clean – see what I mean when I say perfect? To measure out how much fabric I would need, I laid each piece down on the fabric and cut about 2-3 inches around each one.

Now you can start stapling. be sure to pull tight, and with folding chairs, don’t put the staples too close to the edge because you’ll be able to see them when the chairs are folded up – there’s a bit of a gap between the edges and where the metal sits. The corners can be tricky, but if you fold the fabric over on either side and pull tightly, you won’t have any creases – like this:

Now, cut off the excess fabric around the edges. I’ve been saying how you can see all angles of the folding chair, and the bottom of the seat is most visible when the chair is folded up. Instead of covering that area with fabric, I decided to use really heavy black paper and make a “chalkboard.” I just traced the seat on the paper and cut it a little smaller, then cut off any excess as needed.

As you can see, it’s not even – that’s ok! It will be covered when you put everything back together! Speaking of which, screw the backs and seats back on and get ready for the most fun part of all! I used the chairs while working on them, which I thought was kind of amazing. It doesn’t take much to amuse me!

I chose to use two similar sayings on the chairs, and sketched a quick few words on the bottoms before using a white paint marker to finish the job.

Don’t worry about mistakes with the pencil – they can be erased, even on dark paper. I used white paint markers because they will be permanent and I won’t need to worry about chalk rubbing off, and if you use lots of strokes when writing with them, it gives off a more “chalky” look!

There they both are! I added the embellishments after going over the words in marker because they looked a little plain. I am loving how they turned out, and you have to admit – the take/grab a seat play on words is kind of cute, no?

If you don’t want the chairs to be quite so playful, leaving them unfolded and ready to be sat on is an option, that way no one has to see the chalkboard bottoms.
They work well indoors and out, but don’t leave them out to get wet! You’ll want to bring these inside when you finish with them.
Here’s a closer look at the fabric:

Materials cost breakdown
- Metal folding chairs: $1.50 each (major deal on Craigslist)
- 2 cans of Rustoleum Champagne Mist paint: $6 each
- 1 yard of Tonic Livings Marbleized fabric: $24.95
- 2 sheets of black cardstock: $0.97 each
- White paint marker: already had, but can be purchased for around $4
- TOTAL: $41.89 (Per chair: $20.95)
Not bad, considering brand new folding chairs can cost up to $45 each, right?
I’d love to hear your thoughts on this project and also your questions, if you happen to have any. I’d be happy to answer them!
xoxo
-Thalita
—————————————————–
Chalkboard style is simple to add to any space in your home!
It’s great in a toy room:

In large doses:

or smaller pops:

See even more chalkboard projects here:


Can you give me some ideas about sprucing up those all metal folding chairs?
Hi Jan! One of our lovely readers, Kelly, spray painted hers in a variety of bright colors and it looks great! You can read it here on her blog.
Thanks for the shout out! 🙂
Hope you are having a great week.
Kelly
You’re welcome! Love your colorful chairs 🙂
I am completely obsessed with that marble fabric and need to come up with a way to use it in my house as soon as possible! What a gorgeous transformation – who knew folding chairs could be so glamorous?!
Thanks so much, Brynne! I knew the second I laid eyes on that pattern that I wanted it, though to be honest I was expecting it to be on a pillow, not these chairs. I’m super happy it worked out 🙂
These are incredible, Thalita!! The champagne color is so pretty, the fabric is fab, and the puny sayings on the bottom bring it all together!
Thanks so much, Em!!! I’m obsessed with the fabric, can you tell? haha!
Just love the folding chairs. Will keep in mind for future use to add extra seating.
Thanks so much, Judy! It’s been a handy thing to have around, and people love the chalkboard bottoms 🙂
I love the chairs! You are a great DIY!!
Thank you, Mairie! So happy you liked them 🙂
The fabric choice really puts these chairs over the top. They look great.