Updating a Book Shelf


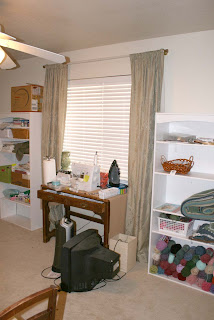
I wonder, do you have one of these book cases? or one very like it? Wanna give it a face lift? For $20.00 to $60.00? It’s easy…. come check out updating a book shelf.
I had two of these babies. These cheap bookcases, are like the stepping stones to furnishing your house, it is almost a requirement that you own one at some point in your lifetime. I guarantee that most of you have one, more than one or have had one in the past… Am I right? …well, maybe you are just cooler than me.
Moving on, for those of you that do have one, I have an idea for you. Actually, I have been working on this one off and on for about a month as part of my craft room makeover. Technically they weren’t in the original plans. But, when I banished the exercise equipment from my craft room (see now I don’t feel guilt about sitting on my rump crafting all day!!) I had all this extra room.
I decided to find all craft like objects and corral them into one room. … is it okay to admit I am a bit of a “stuff to craft with” hoarder? And I had these thing in every spare closet… NO more!
Anyway, I had two of these book cases from my last house. Since moving here they had taken up residence in two closets. The other day (Christmas Eve to be exact) I thought it would be fun to have my sewing desk flanked by two book cases, but I am sorry to say, they looked ugly. That and showed too much of my junk.
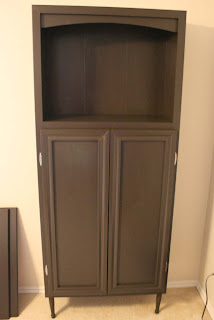
Hence my makeover, so for your DIY pleasure. Now you too can make that 25.00 bookcase into a thing of beauty! I am not fully done, but when I reveal the full craft room, you’ll see it all decked out.
What you need
Hand saw and miter box, or miter saw
4 pieces 6′ foot long 1″ x 2″ mdf or pine plain square boards
wood glue
finishing nails and a hammer
paint
L bracket (to secure bookcase to wall)
(optional stuff)
4 wooden legs and screw plates
Piece of mdf same size as whole base of bottom of shelf unit
Doors-
A piece of 1/2″ 4′ x 8′ mdf board, cut to width and length at the lumber store (I know H.Depot does this)
Small, most inexpensive baseboard approx 10′ linear feet per door, 20′ total!!
4 hinges
Top- (either)
Crown molding enough to wrap front and sides (optional)
or a piece of the 1/2″ MDF (from doors) in the dimensions of the shelving unit plus 2 inches in length and 1 in width
Decorative paper for back
You could go more expensive on the wood, but it really wouldn’t prove anything. The book case was only 25.00 after all, and you might as well save the money for something funner! (cause that’s a word!)
This sounds a little complicated to begin with, but I promise it is not. I will show you our little scrap book of creating it, then I will show you the breakdown.
The bookshelves and all their junky glory- (there is a blanket in there that I have been crocheting for about 3 years…)


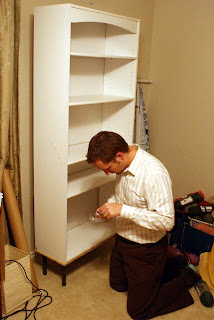
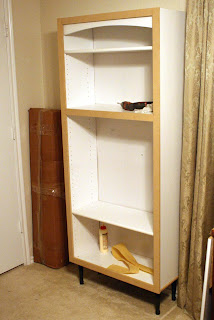
Cut the face frame pieces to their proper length according to you bookshelf dimensions. Begin to glue the pieces together at the corners. We clamped our because we own the large clamps, you can just hold them together for a few minutes and then let the wood glue dry for at least 30 minutes minimum. I added the arrows to show you what seams you glue, at each rail.


Feel free to save the instruction for your own personal projects, but you may not reproduce them without my permission. If you would like to link to this project, please contact me! Thanks… We worked hard on this!


My book shelf is 5′ tall x 3′ wide x 1′ deep. Just to give you an idea.
According to your shelf’s dimensions!!


>Wow very impressive. I love the look. Thanks for sharing with Made it Monday! Jules
>I definitely have one of these, but even worse than white it's a pretty hideous dark fake paneling colour. bleh. I'm going to be needing a SERIOUS crafting upgrade on that soon and these were great ideas! Thanks! 🙂
>man, you DO look hot in safety goggles!!
i totally love this. they turned out so cute. i love that you were a little daring with the color and the fabric…that fabric is so fun!
and thanks for the detailed instructions.
you are so right about all of us having those cheap bookcases. my hubby and i made a pact about 6 years ago to stop purchasing "disposable" furniture. we had way too much laminate/mdf furniture at our house!
great post.
man, you have been busy. when you are sleeping?!
>Wow! That turned out great! It looks so Mid Century Modern to me! The L bracket is a MUST! I'm from earthquake country AND I have two monkey children so I know better!
>What a great way to spice up those ugly yet functional bookcases! I do agree with you about the paper although it depends on the total makeover which I look forward to seeing. Thanks for a great tutorial!
>You got skills! Great tute!
>Wow, you did great on that!
>Looks fantastic! It's funny, we just finished building wall shelves and making our own cabinet doors for them, using a similar method. It turned out great!
>terrific make-over.
>Love this idea!!! Thank you so much for sharing!
>you're amazing!
>Wow! What a transformation! And such a detailed tutorial to go along with it!! I love what you did!!
>I'm enormously impressed. I've been flirting with the idea of getting a miter box for a while; I think you've inspired me to take the leap!
>You never cease to amaze me. Beautiful job! I love the color and the snappy little print in the back!
>I was just thinking this would be a great project. I bought a flat screen television this year, and want to remove the UGLY television stand from my living room. You helped me to visualize what I need to do. Now, I am off to measure. I would like to create a link so if I do create it, I can link back to give you credit. (thanks) Karyn
>Wow! I have two of those Billy Bookcases from IKEA that would work great for this tut. I may just have to do this!
>I really like that!! And how did you know I had a bookcase like that????? 😉
>Wow thank you for this!! I have two of these EXACT ones in my office! I sooo want to try this! Thanks for the inspiration!
>Love it… the power of paint and molding! Brilliant!
>What a transformation! It went from the cheap shelf to a chic 50's inspired piece. Paper is cheap and easy to replace so don't stress there. I work at a scrapbook store and I am thinking of all the cute paper there that would be cute in that cab. Now, do you think I could do this by myself?