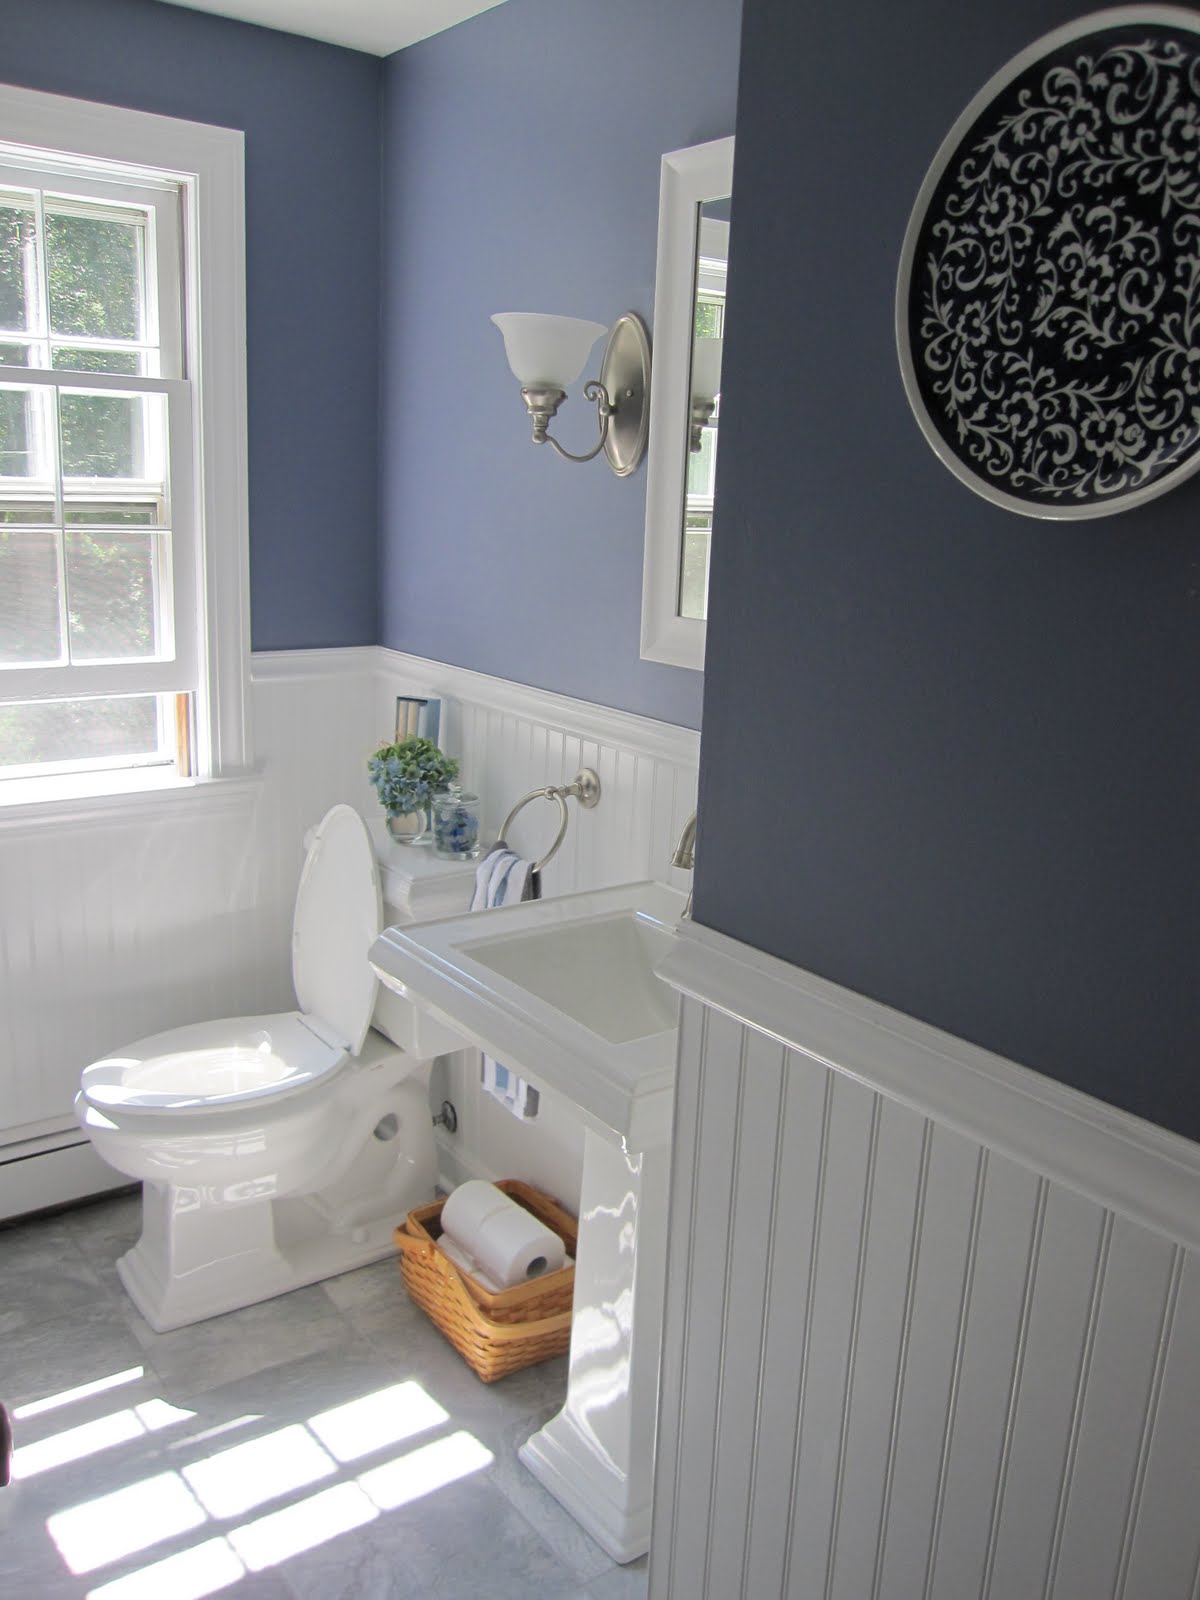
This is such a beautiful bathroom it is so bright, beautiful and clean – the perfect combination for a bathroom! I LOVE the tile floor, and the bead board wainscoting. Check out the transformation from Heather and Simple.beautiful.home.
So I FINALLY found my camera the other day, which means that I was able to upload some “before” photos of the house. I definitely remember what it looked like when we bought it (oh, how i miss those post-it-colored walls), but I haven’t seen a side-by-side comparison of the projects until today. YAY! Take a look at the “photos” tab up top for more before and after reveals. My goal is to do a post about each step of the transformation (and definitely some tuturials for DIY-related projects…which is a lot!!) over the next few weeks. First up is our half bath…
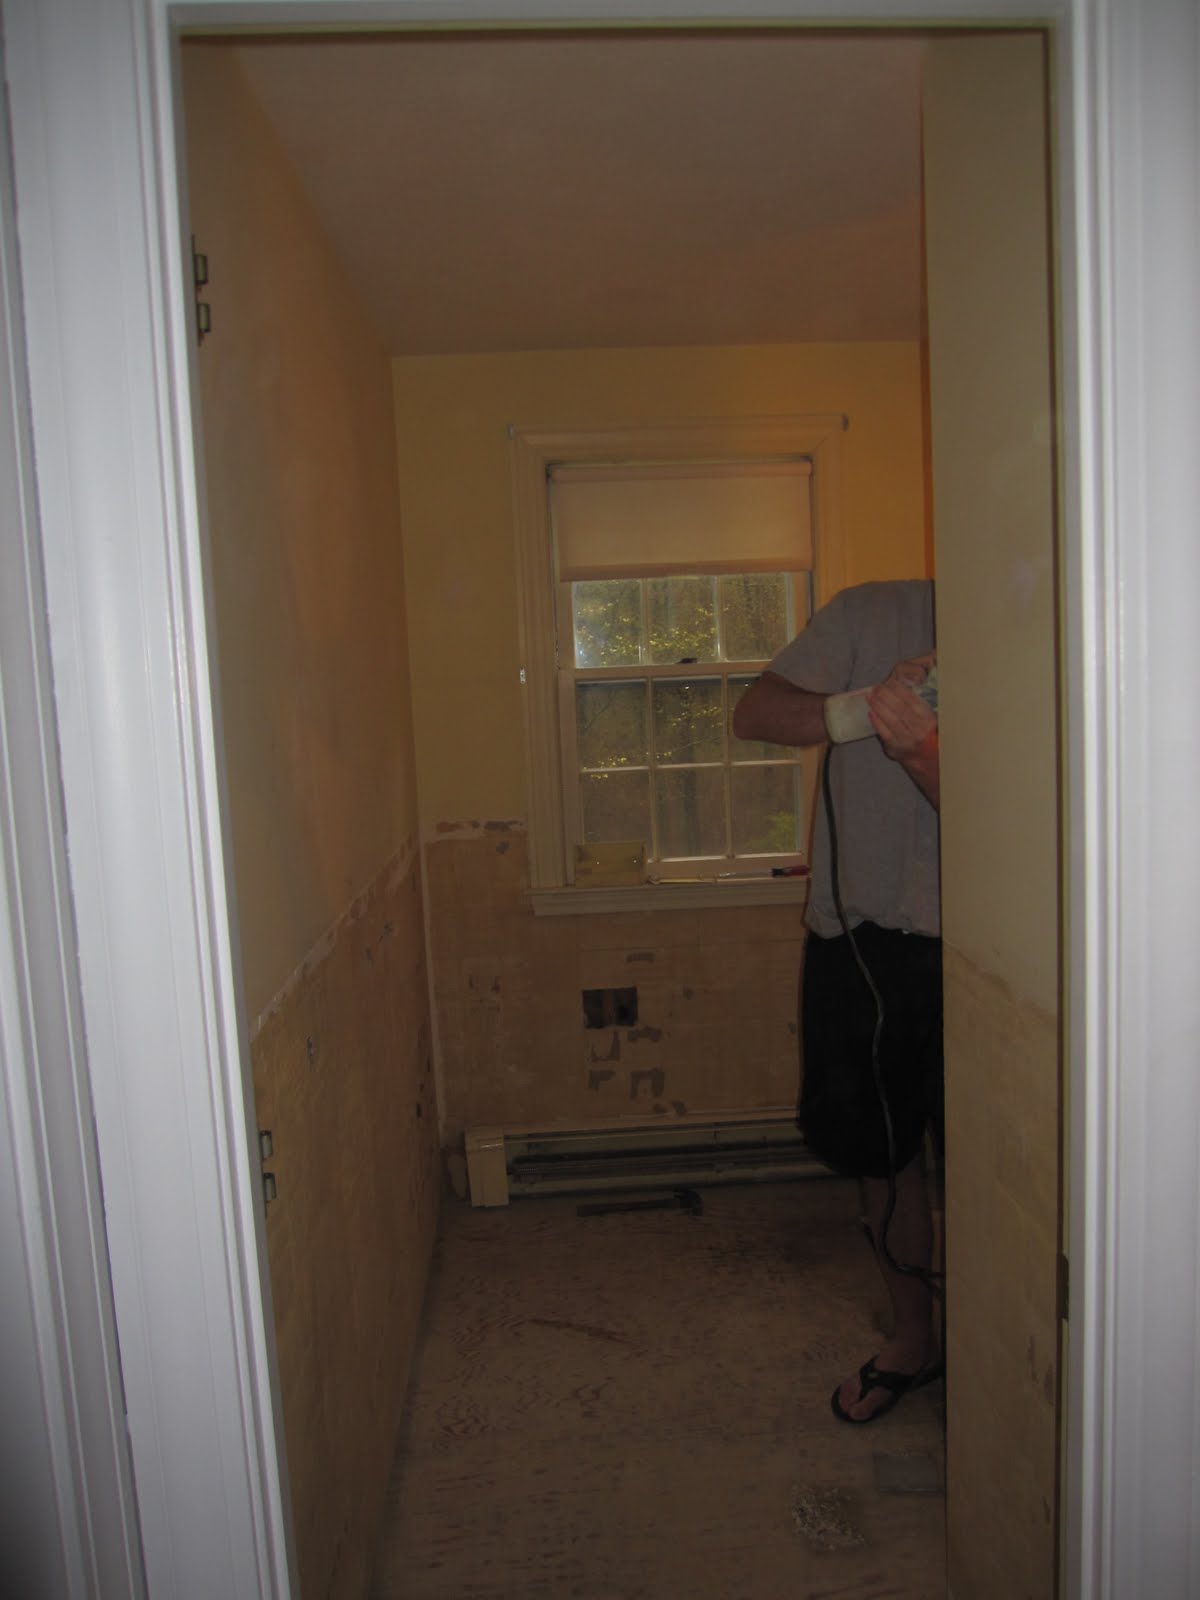
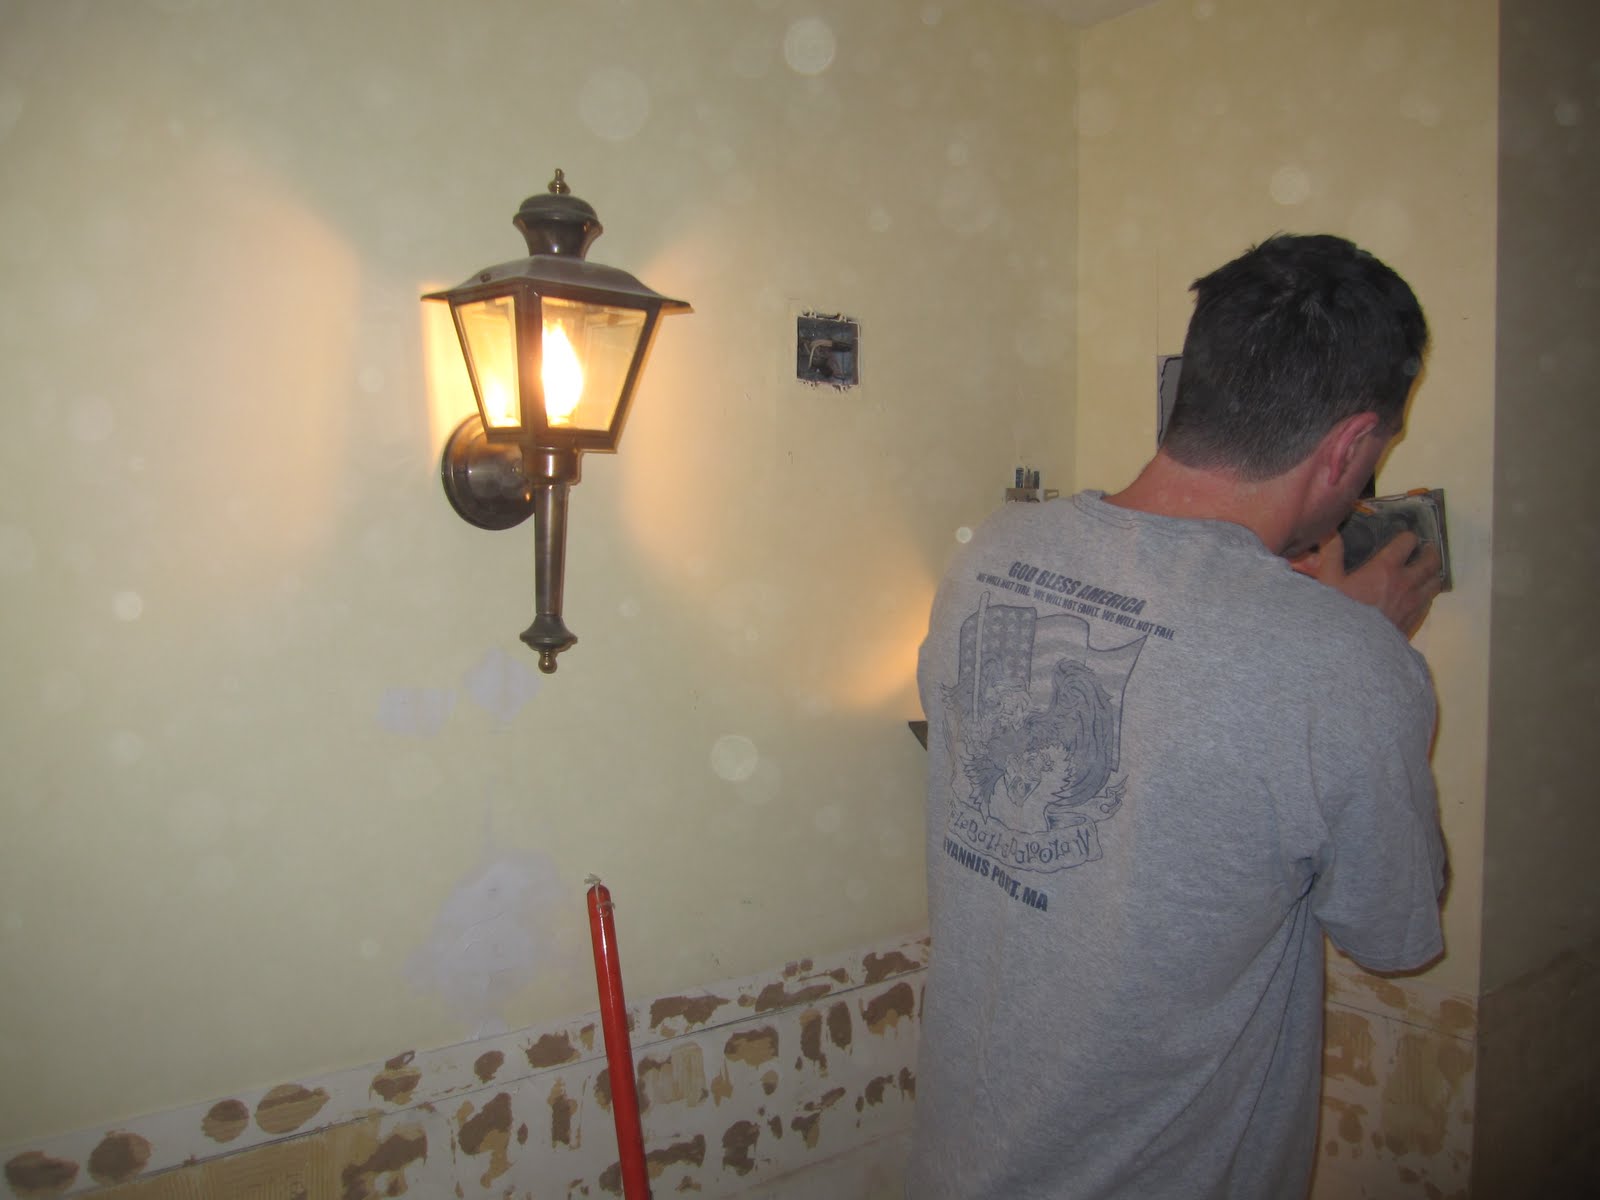
For some reason we didn’t take a lot of pictures of the lovely space pre-renovation (although we might have video of it), but let me paint a picture for you. Yellow tile on the walls (about waist high), yellow tiles on the floor, a yellow-painted vanity with a yellow sink, a yellow toilet AND yellow walls. Oh, and even the baseboard heating covers were painted yellow….and the door too. Yea, I think that’s it. Oh wait. No. Here’s the best part. There were two brass carriage lights flanking the mirror (oh yea, the ones that you put OUTSIDE your house next to your EXTERIOR doors). L.O.V.E it! So….here she is after we ripped everything out.

(I apologize for the bad photo. B was in the process of cutting a hole in the wall to make a little cubby shelf – the wall he is facing goes into another little pantry closet for the kitchen, so we could afford to lose a little space in there for extra shelving in the bathroom). I will definitely have him write up a little tutorial on that in case someone out there wants to try it in their own home. It only took him about 2-3 hours to complete, so its a pretty quick (and cheap!) storage solution.
(Cubby shelf – pre-molding),
I also painted the walls at this point, since it is much easier to do that before installing the beadboard than trying to cut in around it after the fact. We also wanted to do this before we installed the new floors so that I wouldn’t ruin the nice new grout with big blue paint splotches. I am definitely careful, but accidents can happen. And they always do in our house!
Before installing the beadboard or wainscotting (I’ve heard both terms thrown around), though, we had to install a new floor. I spent SOOOOO long looking at different flooring options. I really loved the look of the penny tiles or the small hexagon ones in white, but white flooring is just not a good option in my home. Not only is my husband a little messy, but it is a guest bathroom that will be used quite often, so I just envisioned scrubbing the tile and grout ALL THE TIME. Not fun. In the end, I chose a blue/gray/white porcelein tile from a small tile store down the street in Norwell. It was really affordable at $2.50/sq. ft. so that made my decision easier as well.
My uncle was nice enough to come by and show us how to install the tiles one weekend. We thought about heading over to Home Depot to have all of the tiles cut for us, but since we are planning on re-doing the backsplash in the kitchen this summer at some point, we decided it was worth the $79 to get our own tile saw. And let me tell you, it is my husband’s new favorite toy! Not only is it pretty convenient to be able to cut and install all of the tile ourselves, but we also made a HUGE mess of ourselves in the process. I wish I had a picture of us at the end of that day. B looked like a mad scientist with a big white stripe going up through his hair. See…in order to cut the tile, it needs to be wet, so there is a little pool of water at the bottom of the saw that keeps the blade lubricated while you are cutting….sooo, when you put the tile through, the water sprays right at you!! He loved it. I did not, but hey, I got a new floor that day, so I couldn’t complain too much!
Next up, grout. [Side note: up until this point, I had no idea that you can find ANY color grout that you want. I always just thought it was black, white and beige. End of story. But no, you can have ANY color of the rainbow. Crazy!!] So. We waited for the tiles to set for a day and then mixed up the gray-colored grout in a little bucket. We took a trowel and spread it all over the tiles, pulling back in criss-cross motions, making sure to get an even amount in between each tile. We let it sit for a few minutes (maybe 5 or so) and then started wiping off the excess with a wet sponge. The entire process took about 5 hours.
1.5 hours for laying out and cutting the tiles beforehand
2.5 hours for laying down the tiles (we used thinset mortar to adhere the tiles to the floor)
1 hour for grouting and wiping down
We also bought a grout sealer as well, but I haven’t put that on yet.
Finally, we started working on the beadboard. We purchased the big sheets of it at Home Depot. I believe it was $15 each for the tall 8 ft. ones. We cut them in half (or ripped them, as B says) and went 48″ high all around the room (not counting the baseboard molding and chair rail on top. For the one corner that sticks out in the room, we used a dowel rod to close up the gap between the two sheets of beadboard. I had seen that done on another blog when I first starting researching beadboard (but I can’t remember where I saw it exactly)?. Once he put the beadboard in and the rest of the molding up, I filled the nail holes with wood filler and the corners with caulking. I like using the
DAP kind from Home Depot. I get the Alex’s Plus one that is paintable. This is great for filling in all of those little imperfections (sorry, honey). Molding is a really difficult thing to do, especially in an older house where some of the walls are not exactly straight and the floors aren’t perfectly level. It just cleans everything up and makes it pretty.
We didn’t have much of a choice in going with beadboard either, since the walls were in bad shape after we pulled off the tiles. We would have had to tear down all of the walls and put up new wallboard to make it work. And let’s just say that we are better at taking DOWN walls than putting them back up. So…beadboard it is! The truth is though, I really love beadboard, so I’m happy that we went that route anyway.
Then my dad came down for the weekend and helped me install the toilet and sink (he’s my hero). I should say that I helped him install them. All I did was help to move it into place and hand him things when he needed them. Wrench. Check. Screwdriver. Check.
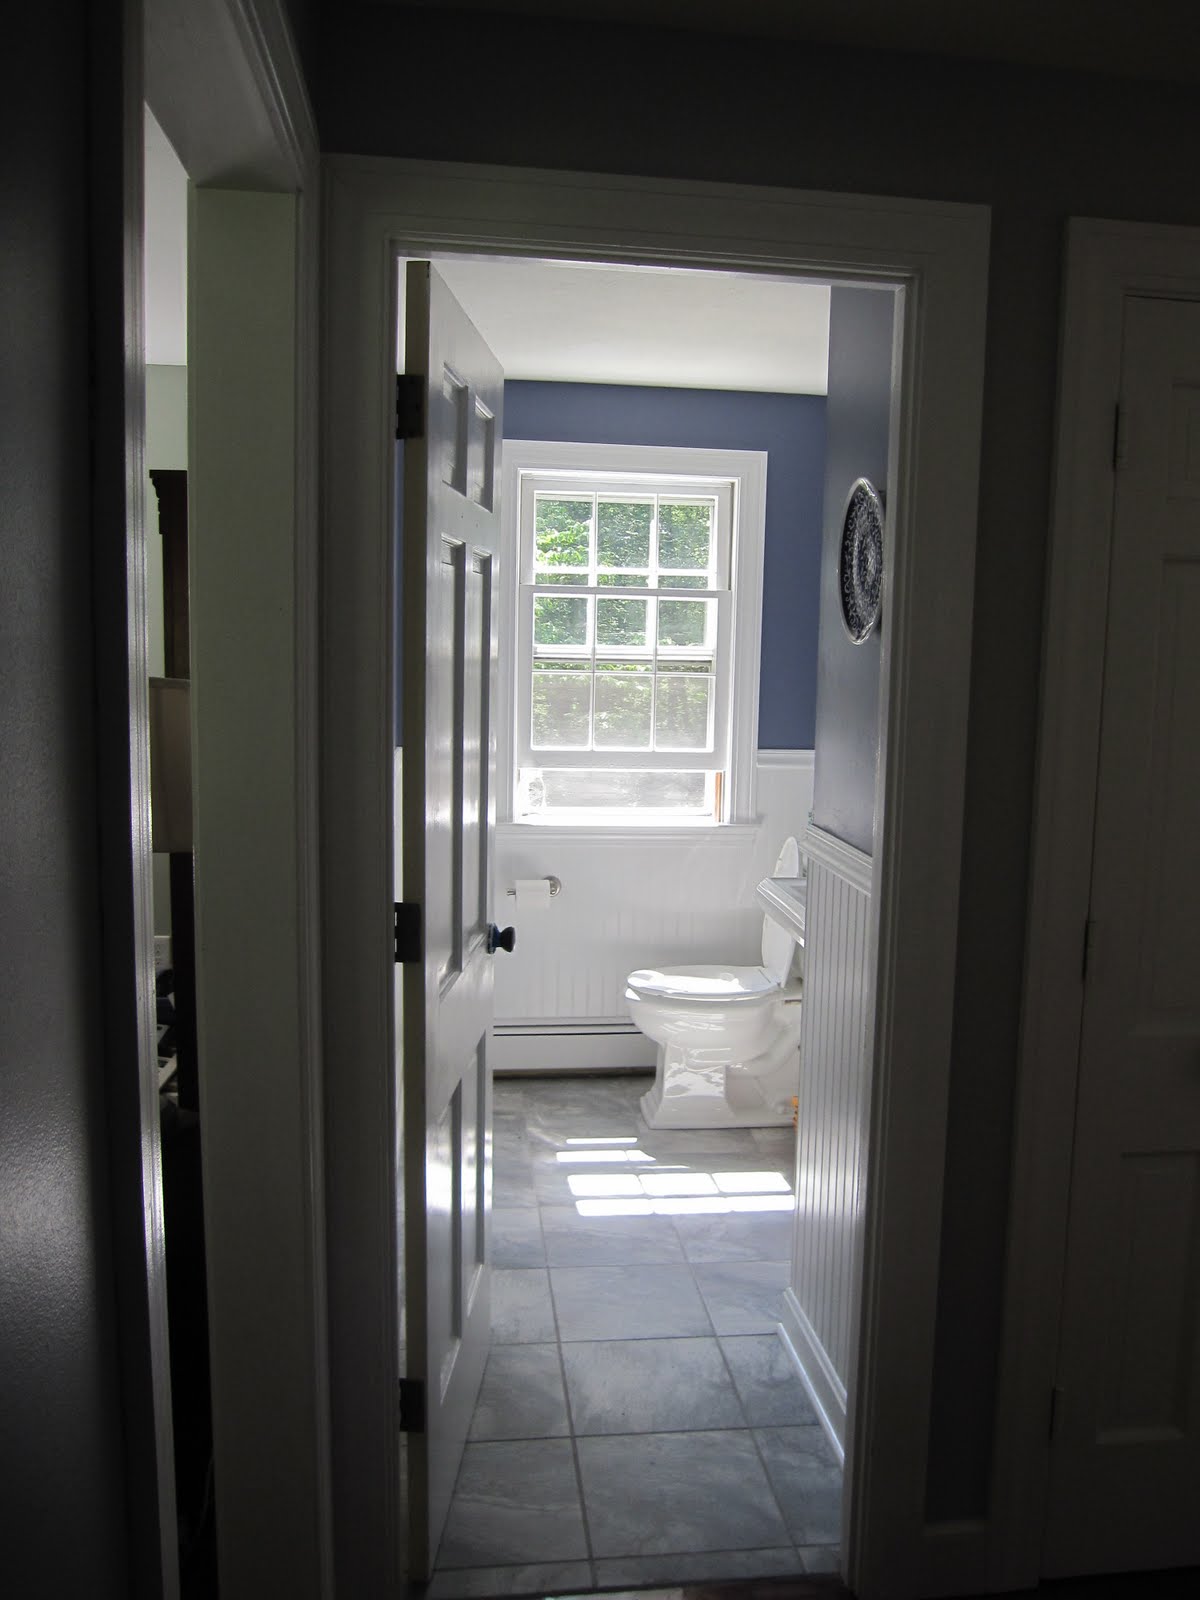
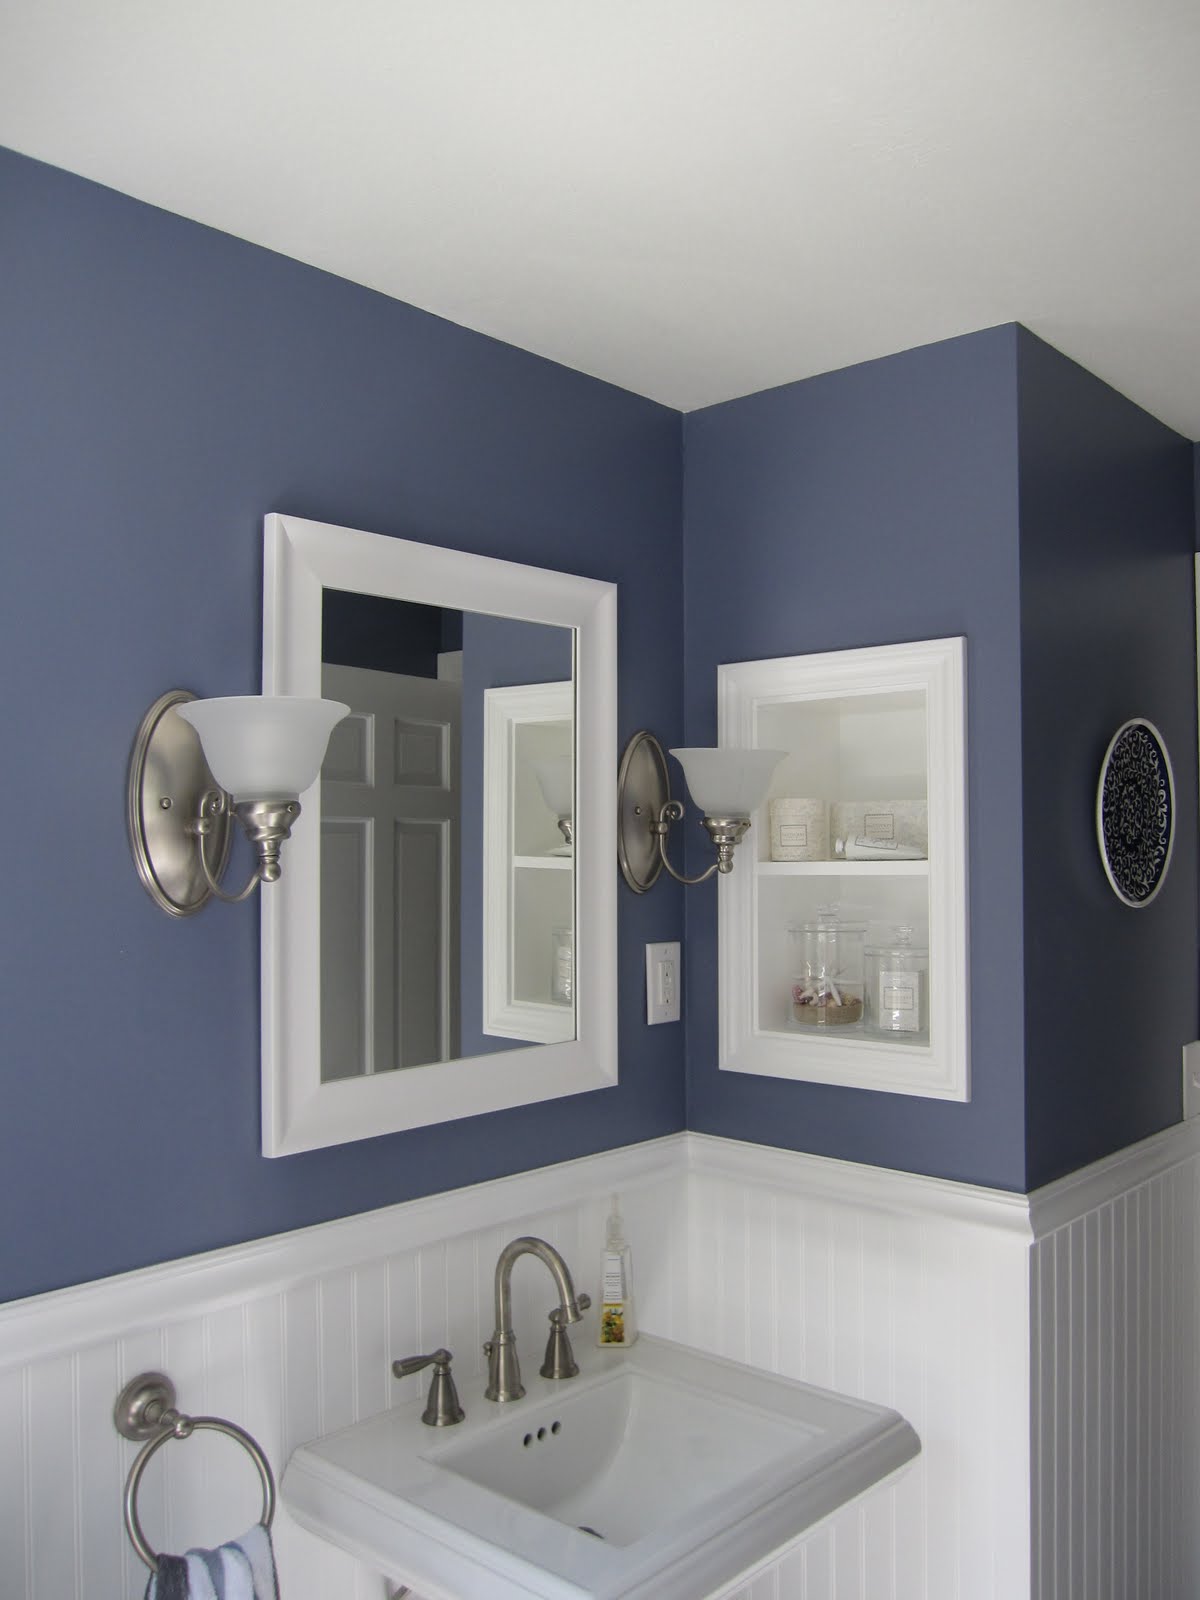
So….after all of that work (and I’m sure that you have already scrolled down for the final reveal)….here is our new updated bathroom.
I need to put something up on the wall that isn’t shown in either photo. It is just a blank wall right now with the same beadboard as the side shown above. I was thinking of doing a few beachy photos with some blue in it, but I’m not sure which photos to use. After de-personalizing our condo for a year and a half while we were trying to sell it, I’m nervous to put up personal photos around the house. I tend to go for landscapes or maps or old signs. Maybe I’ll do one big beach picture that is broken up into three frames….hm..ideas, ideas.
Since I absolutely love before and afters, here is one more look at the transformation:
Well, that’s it for our bathroom reveal.
Isn’t that totally wonderful!
I really love this space!
What is your favorite part?
UPDATE: Here’s a note from Heather about the paint color, since so many of you have asked! 🙂
“The color was one of the toughest choices for me in this room. There are so many beautiful shades of blues and they all look so different in the space (depending on the lighting). I ended up going with “Tranquil Pond” from the Behr Premium Plus Ultra line since it has some nice cool undertones, which goes well with the rest of the colors in my house. At first I thought it was a little too dark, but it provides a nice contrast against the “Pure White” Behr-painted wainscotting. I’m really happy with it!”
Related


>I like! It's so pretty and clean without being boring! Great job!
>Beautiful.
>Beautiful light and paint color. We at MyDesignGuide.com agree that less is more…however, a great compromise might be black and white's of the kids or pets etc…in the tub. Black and white is subtle, timeless and especially effective with your color scheme.
Great job. We are going to share!
>Very pretty! I love the bead board. It adds that something special and make the room look so polished!
>Fantastic!!
>Love the transformation! Very crisp and clean. Love the color you chose for the walls.
Love the blue color of the walls. Please forward Make of paint and the color name.
THxxxxxxxxx!!
Hi Debra,
I just added the info to the post!
>I deleted my prior comment and am posting a different comment, to word it better…
The bathroom is absolutely gorgeous. I love the blue color. Good choice!
I am jealous it took you such a short time to do the project! When I was in a different relationship, we owned a house together, the projects seemed to take forever. Of course we weren't working on a guest bathroom… A big bedroom (painting it RED!) and bricking the entire backyard (his idea and he ended up doing much of the work).
Were you able to make room for a small cupboard for t.p. and hand towels and such? They are helpful to have in a guest bathroom, which is why I ask.
You are very lucky to have a guy who takes or makes the time to do home improvements, from start to finish and quickly. And to have him quite good at home improvement projects too! Very lucky! 🙂
>That before light fixture cracks me up!! The after is so crisp and inviting… lovin it
Beautiful! What is the paint color and brand you used?
I absolutely love your bathroom! Beautiful transformation! I would also like to know the paint colour and brand you used. My bathroom is very long and narrow without a window at the end like yours. Do you have any suggestions on a paint colour to use for a bathroom without natural lighting?
Thank you
It looks so fresh and clean. I had thought the darker paint was going to be too dark, but it just looks classic. You all did such a nice job.
Thanks for the comment, Rita!
Love it as well! I too would love to know the brand and paint color – it’s such a gorgeous shade of blue.
Hi Karen! Since this was a guest post, I can’t tell you for sure, but if you’ll click over to the original blog (linked up toward the top) then I would guess that she has the paint color mentioned there. Thanks!
I m getting ready to up date our 2 bathrooms ,and I hate tile and love breadboard. You did such a great job.
Thanks, Carol!
I really enjoy the colors and design. I saw you listed the paint colors, but any idea what’s the name of the tile color or tile manufacturer?