How to Make a Jumbo Plywood Pegboard
We’re so excited to welcome back our amazing contributor Thalita for #PrettyPlywood with an amazing and easy way to clean up the clutter from a desktop — and this jumbo plywood pegboard would be awesome in any room in the house! It’s a great blend of form and function, which is always a winning solution in my book. Thalita has the tutorial below, and be sure to subscribe by email or RSS and follow along over on Facebook and Instagram with #PlywoodPretty so you won’t miss any of these our upcoming plywood tutorials!
Hey friends! It’s Thalita here with you today from The Learner Observer, and I have a really fun project that was so easy to make and made me feel SO organized once I put it to use: a jumbo plywood pegboard!

[pinit align=”center]
Pegboards are great for little things you need to hang up, tools, craft supplies, and just about anything you need to organize, but I really had my heart set on something made of wood to cover the wall above my desk with. I had a pegboard in my last office and loved it, but the space I work in now is wide open to our kitchen and hallway, and a regular pegboard didn’t feel special enough. It needed some oomph! In came the plywood, and this giant pegboard was born! Let me take you through what you’ll need to make your own.
How to Make an Oversized Plywood Pegboard
This post contains affiliate links for your convenience. Learn more and read our full disclosure policy here.
Materials
- 3′ x 4′ piece of plywood
- 3/4″ dowel
- drill
- 3/4″ drill bit
- paint and small craft paintbrushes (optional)
- measuring tape
- pencil or pen
- a large ruler or something long with a straight edge
- a saw (to cut the dowel, so a mitre saw if you have it, but a hand saw would do just fine)
- orbit sander

The piece of plywood I used was 3′ x 4′, so I made my holes 6″ apart. In a traditional pegboard, the holes would only be 3″ from the edge, but I wanted a thicker “border” around mine, so I measured 6″ all around. I drew the grid so it would be nice and easy to know exactly where I needed to drill.

Using my brand new drill bit, I started on the holes. You’ll want to make sure your drill is nice and straight for this, and it it catches a bit on the plywood, just take it a little slower. This whole thing only took me about 5 minutes to drill into. Once you have all of the holes, sand with your orbit sander, first using 80-100 grit sandpaper, then going up to something finer like a 150. This will get rid of all of your pen/pencil marks, as well.

I also cut a 48″ dowel into several different sizes ranging from 3″ to 6″ long and I painted the ends in different colours. I then took two simple IKEA spice racks and painted the front edges on those in some of the same colours I used for the dowels. It adds just a hint of colour to a project that would otherwise be monochromatic (which is also totally great).
And just like that, you’re ready to hang your new plywood pegboard!! I hung mine above my desk using one screw in each corner. I drilled right through the plywood and into the wall so it’s nice and secure, and I don’t mind the screws showing at all. Here’s what the desk area looked like before:

And here it is transformed by the plywood pegboard! (This whole area needs a lot of work, but this felt like a huge improvement to me!)

A lot of what was cluttering up my desk got moved up there, and since I don’t have a huge workspace, this made a huge difference!!
I used two pegs to hang one of the spice racks, but I did end up properly hanging the lower one right onto the plywood so it’s nice and secure, and I can place heavier things on it.


On top of hanging things right off of the pegs themselves, like the washi tape, I also used some s-hooks to hang simple little buckets, and I used curtain rings and clips to hang a few paper things also.
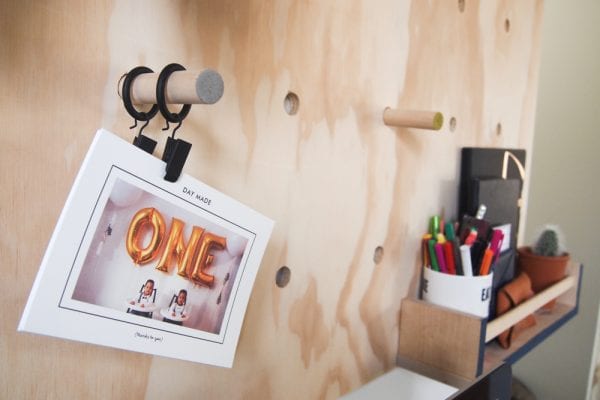

I love that things are organized and everything has its place, but yet I can still see so much of the gorgeous wood grain. The only thing I can’t move is the bottom spice rack, otherwise everything here can easily be moved around as I wish, and I’m already dreaming up how I can hang seasonal things here, or the kids’ artwork!


I hope you’re loving our #PrettyPlywood week as much as I am! Be sure to subscribe by email or RSS and follow along over on Facebook and Instagram with #PlywoodPretty so you won’t miss any of these new tutorials! And click here to see all of the plywood projects we’ve shared this week so far.

get the reader favorite
Cleaning Binder & Custom Cleaning Calendar
This 18-page editable cleaning binder printable pack will help you establish a cleaning schedule based on the custom tasks you actually need for your home. From the spring cleaning checklist to everyday cleaning recipes, this printable set is great for kick-starting a cleaning routine and staying on task with annual and semi-annual tasks, too.


That sure is a beautiful piece of plywood! I would have been tempted to paint it because I’m tempted to paint everything, but it looks so nice as is. Great work Thalita!
Thanks so much, Larissa!!! And I did think about painting it, but the wood grain told me to leave it alone haha
How thick is your plywood?
1/2 and 3/4 inch will both work 🙂
Hello! Thanks for your tuto! Is a plywood panel 10 mm thick enough? Or is it better to take 15?