Get organized! See our favorites in the shop

Remodelaholic

DIY tutorials, Woodworking plans and more.

FREE BONUS: Kitchen Organization Boot Camp
  • Home
  • About Us
    • About US
    • Contributors
    • Facebook
    • Pinterest
    • YouTube
    • Instagram
    • Disclosure and Advertising
    • Contact Us
  • Shop
  • Project Ideas
    • Our Houses
      • Birch House (current projects)
      • Canyon House
      • Park House
      • Downing House
      • Logan House
    • DIY Project Plans
    • All projects
    • Barn Door Baby Gate
    • Dutch Door
    • Framing A Wall Mounted TV
    • Indoor Playhouse
    • Beach Themed Living Room Design
    • Chicken Coop Building!
    • Computer Desk
    • Computer Desk Plans
    • Custom Newel Posts and Stair Remodel
    • Family Room Sneak Peek
    • Headboard Tutorial
    • Living Room Progress
    • Mood Boards
    • Scrabbled Family Names
    • Pets
  • Design By Room
    • Bathrooms
    • Landscape
    • Kids Bedrooms
    • Kitchen
    • Living Rooms
    • Laundry Rooms
    • Master Bedrooms
    • Mood Boards
    • Office
  • Holiday
    • Christmas
    • Halloween
    • Patriotic
    • Easter
    • Fall
    • Saint Patrick’s Day
    • Thanksgiving
    • Spring
    • Valentines Day
    • Winter
  • Crafts
    • Printable
    • Art
    • Paper Crafts
    • Kids
    • Fabric Crafts
    • Decorate
  • Recipes
    • Appetizers
    • Beef
    • Beverages
    • Breakfast
    • Chicken
    • Desserts
    • Dinner
    • Fruit
    • Healthy
    • Holiday
    • Lunch
    • Main Dishes
    • Salads
    • Sandwiches
    • Sauces
    • Seafood
    • Side Dishes
    • Soup
    • Vegetables
  • Videos

How to Make a Tall Concrete Planter

Written by Elisha Albretsen

  • Facebook
  • Twitter
We are welcoming another amazing and talented DIYer to our contributor team today! You are going to LOVE Elisha and her awesome projects, so give her a warm Remodelaholic welcome and be sure to go check out all her projects at Pneumatic Addict!Rather than spending big bucks on a premade tall concrete planter, build this one this weekend and save some cash while creating just the size you need. Dyed concrete gives the planter a beautiful custom look!

 
Hi everyone! My name is Elisha and I blog at PneumaticAddict.com. I’m a life long DIYer and power tool addict. My blog features in-depth tutorials on topics like furniture building, home decor and home improvement.
Rather than spending big bucks on a premade tall concrete planter, build this one this weekend and save some cash while creating just the size you need. Dyed concrete gives the planter a beautiful custom look!
 
We moved into our new house about nine months ago and its the first time we’ve had a landscaped backyard. I’m loving it! We are spending so much time outside, I feel inspired to spruce up our space.  I started by building a Rolling Outdoor Island, and hanging a 
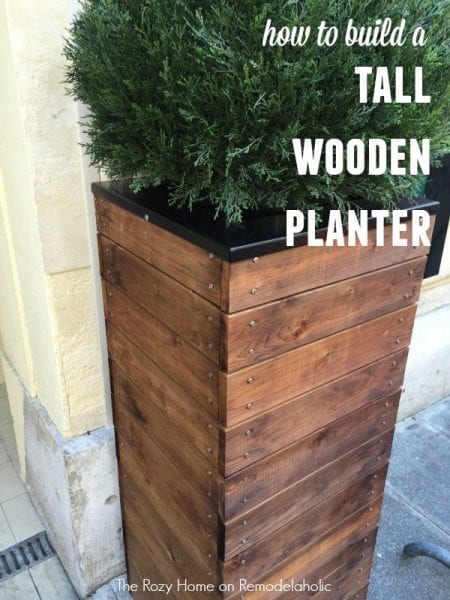
DIY Solar Powered Chandelier. Recently, I made a tall concrete planter and I’m here to show you how. Scroll down for free building plans.

How to Build a Tall Concrete Planter
by Elisha of Pneumatic Addict

Click Here to Get a Free Printable Version of this Building Plan


concrete-planter-form-dimensions-WM
This post may contains some affiliate links. Please see our full privacy policy and disclosure here.
 

Materials List:

  • (1) 4′ x 8′ x 3/4″ sheet melamine
  • (1) 23-3/4″ x 96″ melamine shelving
  • (1) 2 x 4 x 96″
  • (1) 3/4″ PVC pipe
  • (8) 50 lb bag of quick setting concrete mix
  • (4) 1 lb concrete pigment
  • masonry trowell
  • plastic drop cloth
  • duct tape
  • silicone caulk
  • 2″ wood screws
  • 2-1/2″ wood screws
  • 1/8″ drill bit
  • power drill
  • circular saw
  • shovel
  • wheelbarrow or large sturdy container


Cut List:

  • (2) melamine sheet @ 23-3/4″ x 32″
  • (2) melamine sheet @ 21-1/4″ x 32″
  • (1) melamine sheet @ 23-3/4″ x 30-1/4″
  • (2) melamine sheet @ 16-3/4″ x 30″
  • (2) melamine sheet @ 18-1/4″ x 30″
  • (1) melamine sheet @ 16-3/4″ x 16-3/4″
  • (2) 2 x 4 @ approximately 39-1/2″
  • (1) 2 x 4 @ 16-3/4″
 
1. The first step was to construct the outer box of the form. I attached the wider panels to the outside edges of the smaller panels, and secured them in place with 2″ wood screws. To avoid blowout, I made sure to pre-drill with a 1/8″ drill bit before driving the screws.
 
 
concrete-planter-form-outer-box-WM
 
 
2. Next, I attached a 23-3/4″ x 30-1/4″ panel to the bottom side of the box.


concrete-planter-form-bottom-board-WM
 
 
3. Despite having a black thumb, I remembered to include drains in the bottom of my planter. I cut two, 2″ lengths of PVC and glued them to the inside of the bottom panel.
 
 
inserting-drains-diy-tall-concrete-planter
 
4. I decided to give my planter a little decorative detail. I cut and mitered some screen moulding, and attached it around the inside perimeter of the form. You could use almost any kind of moulding, but make sure its either solid wood or plastic. MDF will dissolve while sitting in the wet concrete and be almost impossible to remove.


concrete-planter-form-small-moulding-WM
 

5. Next, I put the inner box together. Unlike the outer box, I drilled 3/4″ pocket holes along the long sides of the 16 3/4″ x 30″ panels. I then joined them together with the 18-1/4″ x 30″ panels.


concrete-planter-form-inner-sides-WM
 
6. I cut a 16-3/4″ x 16-3/4″ panel and drilled pocket holes around the perimeter. I aligned the panel flush with the bottom of the box and secured it in place with 1-1/4″ screws.
 
concrete-planter-form-inner-bottom-WM
 7. I cut a 16-1/4″ length of 2 x 4 and drilled two pocket holes on each end. I then attached it between the two shorter panels of the inner box, using 2″ screws.
 
 
concrete-planter-form-center-support-WM
 
 8. To make the forms water-tight, I sealed every seam on both boxes with silicone caulk.
 
 
caulking-seams-diy-tall-concrete-planter

Next, I used duct tape to cover any of the raw edges of the melamine.

 
taping-raw-edges-diy-tall-concrete-planter
 
9. I cut the remaining 2 x 4 in half to use as support rails. I spaced them evenly across the top of the inner box and secured them in place with 2-1/2″ screws.
 
 
attaching-cross-support-diy-tall-concrete-planter
 
10. Time to pour the concrete. I’ll give this advice: when working with dyed concrete, make sure to lay down a thick plastic drop cloth. It will stain everything it comes in contact with. I also highly recommend setting up your form close to where your planter will permanently sit. The finished piece will weigh around 400 lbs, so you don’t want to be moving it further than you have to.
 
I placed the outer box on a flat, level surface, and started to pour. I poured the concrete two inches thick, just to the top of the drains. I took a quick minute to tamp the concrete and knock out air bubbles.
 
 tamping-diy-tall-concrete-planter
 
 11. Immediately I placed the inner box inside the outer box and made sure I had a 2″ clearance on all sides. I drove two screws through each support rail, into the outer box, securing the form in place.
 
 
concrete-planter-form-support-rails-WM
 
Then, I kept shoveling the concrete till I reached the top of the form, tamping and knocking out air bubbles as I went.
 
 
pouring-dyed-concrete-diy-tall-decorative-planter
 
When the concrete is firm enough to hold a thumbprint, I used a steel masonry trowel to smooth the top.
 
 
how-to-tall-dyed-concrete-planter
 
At this point I cleaned up and anxiously waited for paint concrete to dry. The mix I used recommended at least 18 hrs, but I would wait longer if you can.

Removing the form and moving the planter with just two people was definitely challenging. I think it would be a great idea to rent a furniture dolly and invite a few buddies over. Once you have your new concrete planter in place, you can plant just about anything you’d like. It’s even large enough to house a small tree.

 
how-to-make-a-large-decorative-concrete-planter

The inexpensive screen moulding was simple to install and I’m thrilled with the clean design they left.

modern-diy-large-stained-concrete-planter


Now I really wish I had a huge front porch. A pair of tall, decorative planters would look amazing sitting by my front door. What do you think? Are you ready to get your hands dirty and make your own


how-to-make-tall-modern-concrete-planter
 
———————————————————–

More ways to give your outside landscaping a LIFT:

Build a tall “Vive la France” wooden planter
How to Build a Tall Wooden Planter with metal screw accents
 
Add an easy chevron lattice to trellis plants
Easy to build chevron lattice to add height and interest to your flower beds for spring
 
Build a gothic-inspired garden arbor and trellis combo
Vegetable Garden Arbor DIY Plans remodelaholic
 
  • Facebook
  • Twitter
Remodelaholic is a participant in the Amazon Services LLC Associates Program, an affiliate advertising program designed to provide a means for sites to earn advertising fees by advertising and linking to amazon.com. Please see our full disclosure here.

Published: July 9, 2016Filed Under: Contributor, DIY Project Plans, Gardening, How To, Sketches/Renderings, Tutorials Tagged: Concrete, Landscaping, planter

About Elisha Albretsen


free email bonus

Kitchen Organization Boot Camp

Is your kitchen a zen paradise? It can be. I'll show you how.

Previous Post
Friday Favorites: Scalloped Centerpiece and an Outdoor Bench
Next Post
Exterior Paint Colors that Add Curb Appeal

Comments

  1. Carol F. says

    July 10, 2016 at 12:23 am

    Amazing, Elisha!!! Looks fantastic! I have a furniture dolly if you ever need to borrow one.

    Reply
  2. Trish says

    June 23, 2017 at 5:26 pm

    I am not only going to use this method to make some amazing planters for my front porch I am hoping to use it to create a unique table base. Your planter is 2″ thick, correct? What are your thoughts on 1″ thickness? And, what do you know about alternatives to straight up concrete?

    Reply
  3. [email protected] says

    October 20, 2018 at 1:28 pm

    Can you reuse your forms to build more than one? A pair would be great!

    Reply

Leave a Reply Cancel reply

We love hearing from fellow Remodelaholics, so let us know what you like about this and leave any questions below in the comments. If you have followed a tutorial or been inspired by something you have seen here, we would love to see pictures! Submit pictures here or by messaging us over on Facebook.
Recipe Rating


Hey there, I am Cassity! Nice to virtually meet you!

This blog is about DIY at its finest. We are obsessed with it and so are you, so while we're working and have nothing to show you of our own projects we show off yours. So submit your projects! More About Us…

Categories

  • Facebook
  • Instagram
  • Pinterest
  • RSS
  • Twitter
  • YouTube

Meet The Team

Privacy Policy

Remodelaholic is a participant in the Amazon Services LLC Associates Program, an affiliate advertising program designed to provide a means for sites to earn advertising fees by advertising and linking to amazon.com. Please see our full disclosure here.

© 2005-2016 Remodelaholic LLC, All Rights Reserved

  • Facebook
  • Instagram
  • Pinterest
  • RSS
  • Twitter
  • YouTube

Copyright © 2021 · Remodelaholic

  • Pinterest
  • Facebook
  • Twitter