Tips and Tricks Maximizing Hall Closet Storage


These DIY hall closet organization ideas will help you make the most of a small coat closet’s storage space! Learn how to add hooks, pegs, and hall closet shelving to organize boots, backpacks, coats, and more.
See more hall closet ideas in how we improved our small coat closet to fit our family of 4’s needs, and read 11 Ways to Upgrade a Coat Closet.
The amazing Jenny is back again today to show how she completely transformed and upgraded her hall closet storage — so many smart organizing ideas in just one closet! See Jenny’s other brilliant and beautiful ideas here.
Hall Closet Organization Ideas to Maximize Space
by Jenny M
Our home has plenty of living space for our family of 6, but insufficient storage space for all of our stuff.
I’ve been thoughtfully renovating the closets in our home, one by one, to maximize the available space. (You can see how one coat closet became an extra pantry in the kitchen.)
And now it’s the front hall closet’s turn for a makeover!
The front hall closet in our home is a workhorse. I use it to store umbrellas, vacuums, backpacks, coats, jackets, shoes, lunchboxes, winter boots, and snow bibs, year round.
Everything you see in the picture below has to fit in a cramped, odd-shaped hall closet. . .

When we purchased our home, the closet came with a single wire shelf and one hanging rod—hung too high for my children to reach, which meant they couldn’t hang up their own coats. That simply wouldn’t do!
How to Maximize Hall Closet Space
Tools & Supplies:
This post contains some affiliate links for your convenience. Click here to read our full disclosure policy.
Materials and amounts will vary depending on the scope of your project. (Be sure to read my guide to planning a project here!)
- beadboard paneling
- crown molding
- assorted lumber for floating shelves, securing hooks
- hooks and pegs
- wood filler
- caulk
- construction adhesive
- brad nailer
1: Envision the Organized Closet Space
I drew out a sketch of what the closet would look like if there was a space for everything and most importantly, space that was accessible to my 4 kids.
(The look of the closet and the floating shelves were inspired by the wonderful “Sawdust Girl” closet you can find here.)
And then I built it.
2: Start with a Clean (Pretty) Slate
To start, I ripped out the existing wire shelf and hanging rod.
Then, just to make it pretty . . . (since I have thing for trim and moldings!) I put up sheets of beadboard on the closet walls.
I bought the beadboard paneling that comes in 4′ x 8′ sheets for around $20/sheet at my local hardware store. So it would better fit in my car, I had the hardware store employee cut a few pieces to size on the panel saw at the store and then I cut the rest using my table saw at home.
To attach the beadboard paneling, you can use a strong construction adhesive or brad nails. I nailed the beadboard sheets to the studs in the wall using my 18-gauge finish nailer.
(Note: I did not rip out and replace my baseboards as the beadboard sheets rested flush on the lip of the baseboards.)

I also added some crown molding. You know, just to make it pretty.

I used wood filler on the nail holes and caulked all the seams between beadboard sheets and the trim.
Knowing it would be much easier to paint at this point than after I’d installed the shelving, I painted the baseboards, crown molding, ceiling, and beadboard panels.
Here’s a helpful hint: Wrap your roller and paintbrush—and even your tray—in Saran wrap (plastic wrap/cellophane) to keep it from drying out when you take a break from painting.

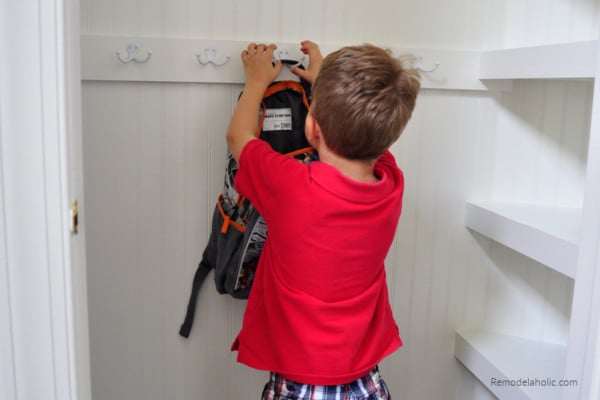
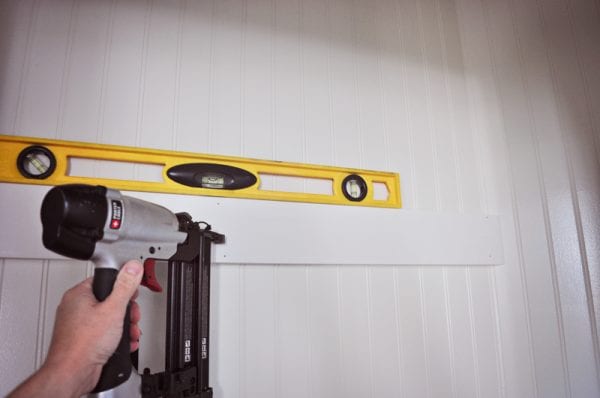
3: Install Hook Rail for Coats and Backpacks
When the paint dried, I measured and cut the boards for my hooks.
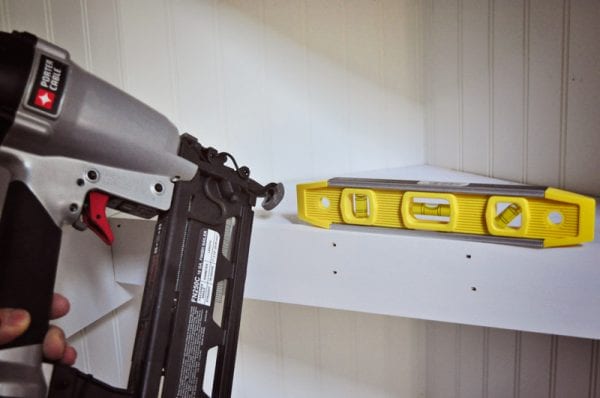
Being careful to get everything level, I nailed the boards in place—temporarily—with my 18-gauge nail gun to test the fit of the corners where the boards meet.
Once everything was level and in place, I used 3″ screws to secure the boards to the studs in the closet walls.
4: Build & Install Corner Floating Shelves in the Closet
Then, I turned my attention to the shelves.
I could have done what I did for the storage shelves I built for my kids’ Lego collection (see photo immediately below)—attach cleats to the walls and put a piece of plywood down on top for the shelf.

But I decided to try my hand at something new this time—floating shelves.
Read more tips for building and instaling floating shelves here.
Step 1: Measure Corner Floating Shelves and Install Supports
I took the closet measurements and then cut 2 x 2 boards to size as shelf supports.
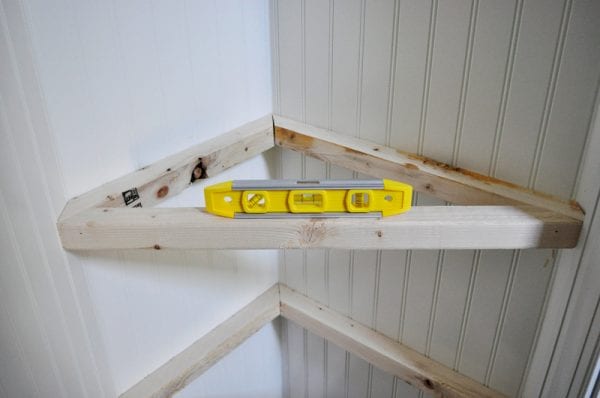
I nailed them in place first, using a level and a nail gun, just to be sure all the angles in the corners fit together properly.

I used 3″ screws to secure the 2 x 2 frames to the studs in the closet walls.

And then I added 2 supports to the center of each 2 x 2 shelf frame for added support, screwing in both ends to the existing 2 x 2 shelf frame.

Step 2: Create Corner Floating Shelf Templates
I used 1/2″ plywood for the top and 1/4″ plywood for the bottom of each shelf.
I made a template by putting a large piece of paper across the shelf and using a crayon to trace each shelf’s outline.
If the shelves had been squares or rectangles, a template would have been unnecessary—I could have just measured the dimensions and easily cut the shelves. However, my shelves had wonky angles and I determined a template would be the easiest way to get the job done.

I cut the paper template along the crayon lines and laid it over the shelf one last time to make sure it was accurate.

Step 3: Cut Corner Floating Shelves
Then I taped the template to my plywood (be sure you keep in mind which side of the plywood you want facing up when tracing the template) and traced the outline.
You can see that I also numbered the templates so that I would know which template was for which shelf. I made a top (out of my 1/2″ plywood) and a bottom (out of my 1/4″ plywood) for each shelf.

I test fit each shelf as I went along and sometimes had to trim a little off an edge here or there to get the right fit.
Keep in mind, that if this is a painted project, it doesn’t have to be as precise as you might think. Caulk and wood filler can make small gaps or inconsistencies disappear later on when you’re doing the finishing work. Read more here.
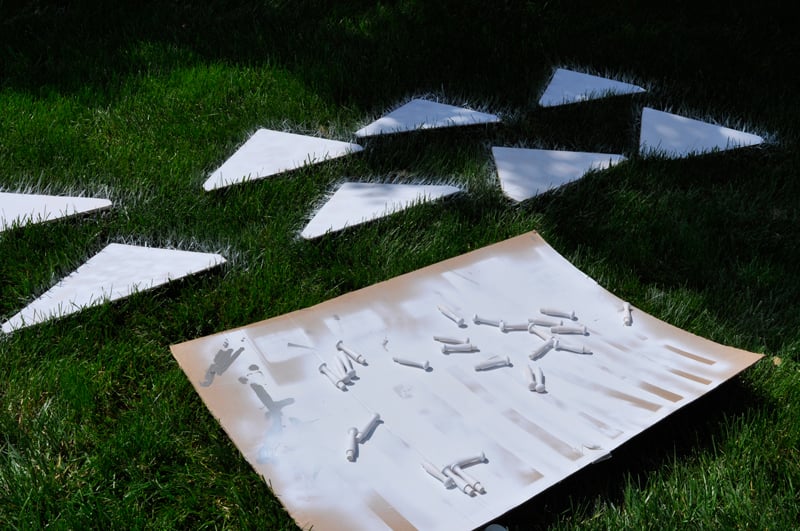
Step 4: Sand and Prime Corner Floating Shelf Tops and Bottoms
Next, I sanded and primed the one side of each board that would be visible. I also painted the shaker pegs that will become boot hangers (shoe storage pegs) in the hall closet.
Remember to number your boards on the side that won’t be painted so that you know which shelf they belong to.
Step 5: Install Corner Floating Shelf Tops, Bottoms, and Faces
I attached the tops and bottoms of my shelves to the shelf frames with wood glue and a 16-gauge nail gun.


I used a nail gun to then attach the shelf face to each shelf frame, taking care to ensure each piece was level. (The shelf face is 1 x 3 pine).
Step 6: Paint Floating Corner Shelves
Then I used wood filler on the nail holes, caulked all the seams, and painted.
The paint is Benjamin Moore White Dove in semi-gloss.

5: Install Shoe Storage Pegs
Now, for my closet’s secret weapon . . .
I wanted to make the most of the 2′ x 3′ space above the door and decided it would be the perfect space to store winter boots (since they’re only used 2 or 3 times a year).

I made peg boards and hung them above the door—space that would otherwise go unused. (I was inspired by Organize-n-Store’s great ‘how-to’ post HERE).

My pegs are spaced 3.5″ apart—perfect for storing boots, but the pegs can also be used for regular shoe storage, too.

6: Add More Hooks to the Hall Closet
Yes, more hooks! I added 30 double-hooks to the closet, too. Plenty of room to hang umbrellas, hats, coats, jackets, and whatever else needs a home.

I found the hooks at Lowe’s hardware store. You can also purchase on Amazon.

I maximized the space by installing hooks immediately below the crown molding, all the way around the perimeter of the closet and on all sides of the closet.

Just the right size! My kids can hang up their backpacks and coats now.

Now, the vacuum no longer competes for space with the coats hanging above it.
My kids can hang their own coats and don’t have to use hangers to do it.
I can open and shut the closet door freely without having to shove everything back in the closet first.
There are shelves for storing gloves and hats and scarves, all within reach of my kids.
And, in the summer months, I can hang the heavy winter coats up high, out of the way.
And, in the winter months, I can move the kids’ backpacks to the side hooks and bring the heavy winter coats down to the lower hooks where they can be easily accessed.
A place for everything and everything in its place.

More smart closet ideas:
- easy ways to make your hall coat closet better
- Custom DIY closet organizer from scratch
- entry closet transformation
- DIY built-in closet hack
- master closet renovation with mini mudroom
plus 14 more creative closet solutions

get the reader favorite
Cleaning Binder & Custom Cleaning Calendar
This 18-page editable cleaning binder printable pack will help you establish a cleaning schedule based on the custom tasks you actually need for your home. From the spring cleaning checklist to everyday cleaning recipes, this printable set is great for kick-starting a cleaning routine and staying on task with annual and semi-annual tasks, too.


Fantastic!!! What a creative closet! Love the look, extremely efficient! Great carpentry skills.
Thank you! So kind of you!
I love how you utilized all that “unused” space. So many great tips – I can’t wait to share with my daughter who has been looking for ideas to maximize the space in her sons’ closets.
Thank you, Liz! The changes have certainly made a difference for our family. I wish your daughter well as she works on her sons’ closets!
Have a hall closet that I am changing out from hanging coat type storage to shelves. (There is a coat closet right around the corner). I love your shelves, mine will be easier because there is no angle, but I will pretty much follow how you did yours. They look really sturdy! My big takeaway from your project will be the hooks. I had not even thought about that. I love looking at other people’s projects. So many good ideas. Your closet looks great.
Thank you, Linda! We’ve been using our updated hall closet for over a year now and it’s a real game changer—so much more functional and efficient. I wish you all the best as you complete your own hall closet.
I have a place with a closet similar to the one with floating shelves to one side. Now that I see how it should look when filled, I have a much better idea how to utilize my own.