Replacing A Cane Seated Chair
There are a lot of great tutorials on how to replace a cane seat.
This is not one of them.
But it does show that you don’t need special tools to do the job!
Just look through your kitchen drawers!
I haven’t always been brave enough to try re-caning. When I found this bench, for example, I chose to cut a new wood seat and ignore the broken cane (and I think that was a great choice for that project).
However, I did replace a cane seat for this set of chairs, so I was ready to tackle another one!
This is what I came home with:

In my opinion, removing the old cane is the most difficult part. Some come out easy, some don’t–this one was a “don’t.” A utility knife and a flat-head screw driver can be helpful in clearing the debris out of the channel, followed by a nice roll of sandpaper. You want to get it as clean as possible for the new cane and spline.
Then the instructions tell you to soak the cane and the spline–don’t skimp on this! That’s what makes it pliable enough to work with. Give it a good hour; you’ll be happier that way.
Then you have to push the cane into the groove. Do you need any special wedges or rollers?
Nah.
What you need is something dull, narrow, and with no sharp edges! So dig out your plastic spatulas, dough scrapers, and cookie turners!

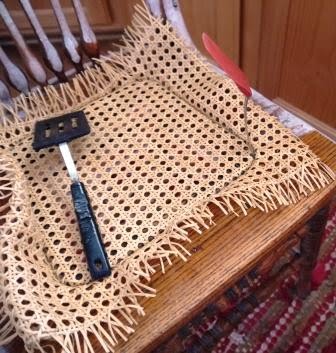
It looks goofy. But it works!
Once you have your cane tucked in nice and snug in the groove, you can just use a utility knife to cut off the excess cane just below the edge of the groove. Make sure you have a nice, sharp blade. A dull blade can pull on the spline, and “untuck” it. You can use something like a putty knife–or a nice metal dough scraper if you’re still working out of your kitchen drawers–to provide a nice straight edge to cut against. Hold the putty knife in one hand with the edge just below the edge of the groove, and run the utility knife along the edge.
You should soak your spline at the same time as your cane (did I forget to mention that before? sorry). So now that the excess cane has been cut, you’re ready to squirt a bead of glue (I use a good-quality wood glue) into the groove right on top of the cane. Insert your spline into the groove, running it all the way around without worrying about pounding it in the first time. It’s easy enough to cut with a utility knife when you get to the end. Then, use a hammer to gently tap it into place.
Yes, they sell special tools for pounding in spline. I haven’t used any of those, either!

Here’s how the chair looks after some paint, distressing, and glaze:
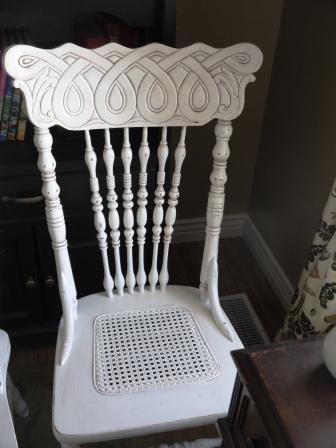
I snapped this picture just before this chair went out the door this afternoon. It was one of six pressed-back chairs that I refinished this week!
Note: I order my chair cane and spline from Rockler. The supplies are not very expensive, but shipping is! But Rocker often gives a “free shipping” code, so I always do an Internet search for one, and save my orders until one is available.


Where can I buy the cane piece?
Hi Pat,
You might try a furniture repair store near you, or you can check online and find something like this on Amazon: https://amzn.to/1VccQrz.
Please do not soak the cane for an hour, that is too long, it can become water logged; 20 minutes is plenty. Please do not use a screwdriver, a spline chisel does a much better job and is not very expensive. Please don’t paint the cane, unless you use a very light coat of oil based paint. The cane needs to be able to react to the moisture in the air, sealing it with paint will only make it become brittle and break prematurely. It is better to wipe it with mineral oil and let it naturally age. To buy cane always buy from either a basket supply company or a company like HH Perkins that sell this material and the tools to do a professional looking job.