Rotating Shoe Rack Building Plan
Hi, it’s Amy from Hertoolbelt and today we are talking about shoes! We seem to have a lot of shoes at my house, and We are always looking for a great storage solution. I love this Plow & Hearth rotating 5-tier shoe rack. It allows for a lot of shoe storage, in a small space. The overall rack size is about 24″ diameter x 29″ tall and it retails for $199.95, but you can build it yourself with these plans for about 1/4 the price.

Build a Rotating Shoe Rack
Click Here to Get a Free Printable Version of this Building Plan
Materials Needed:
- 1- Lazy susan bearing (This plan uses this 6″ bearing, but a similar sized bearing can be substituted).
- 1/2″ MDF (medium density fiberboard) – 3 pieces of 1/2″ x 24″ x 48″ or 1 sheet 48″ x 96″ (1/2 of the sheet will be left over for other fun projects).
- 9 – Dowel Screws 1/4″ x 2 1/2″ minimum
- 2 – 1″ x 48″ round dowel
- 6 – wood screws 1 1/2″ minimum length
- 8 – wood screws 1/2″ long
- Paint and Primer
Tools Needed:
- Jig Saw, scroll saw or band saw
- Drill/drill bits
- Sander
- String
- Pencil
- Small nail/screw
- Hammer
- Pliers
- Measuring tape
- Screwdriver
Project Breakdown:
- Time: ~4 hours or less
- Cost: ~$50-$60
Step 1
Trace 6 circles onto the MDF. Measure over from a side of the mdf and mark 12″, measure and mark 12″ from an adjacent side of the mdf. The two marks should cross. Place a small nail or screw on the pencil cross mark, this will be the center of the circle. Tie a string around the nail and tie a loop 12″ from the center nail for the pencil. Trace a circle onto the mdf, the radius should be 12″ (diameter 24″ across). Repeat for 5 more circles. We need 6 total 12″ radius (24″ diameter) circles.
Step 2
Cut out the 6 circles with a jig saw, scroll saw or band saw. Sand around the cut edges until the edges are smooth.
Step 3
Replace a center nail on one of the circles and trace a circle that is 11″ from the center. This is a reference mark for the dowel posts. Drill a 3/8″ thru hole somewhere on the 11″ reference circle. Make a mark on the outside of the circle by the newly drilled hole. Measure the outside of the circle about 25 1/8″ and make a mark. Repeat for the other side. Drill 3/8″ thru holes near each reference mark on the 11″ circle. Use this circle as a template to mark and drill 3/8″ holes on 2 of the other circles.

Step 4
Use the original circle template and mark the hole placement on 2 more circles. Drill 1/8″ thru holes on the 2 circles.
 Step 5

Cut the 1″ round dowel into 12 pieces that are 6 1/2″ long. In 6 of the dowel pieces drill 5/32″ hole 1 1/2″ deep in the center of each end.


For the other 6 dowel pieces drill a 5/32″ hole 1 1/2″ deep in one end and a 1/16″ or 3/32″ hole 1 1/2″ deep in the center of the other end.

Step 6
Separate the circles between 3/8″ thru holes and 1/8″ thru holes. The circles with 3/8″ thru holes are #3, #4, #5. The circles with 1/8″ thru holes are #2, #6.
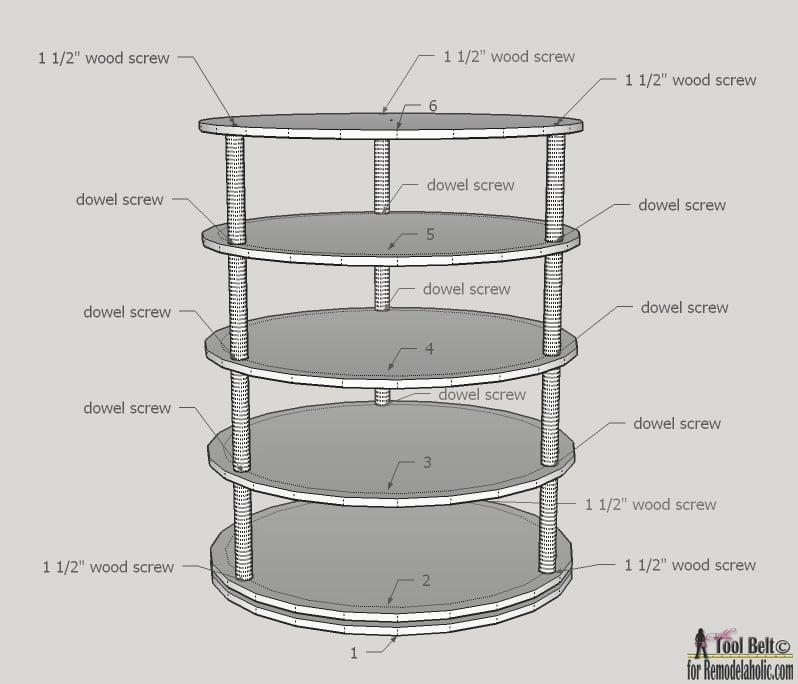
Get 3 dowel pieces that have 1/16″ hole on one end and 5/32″ on the other. Start to thread a dowel screw into the 5/32″ pilot hole, carefully use pliers if needed. Place the dowel screws through the 3/8″ holes of circle #3 and thread on a dowel that has 5/32″ holes on both sides. Repeat for each screw. Make sure the dowels are tight on the circle.
 Thread dowel screws into the top of each dowel. Place the dowel screws through the holes of circle #4 and thread on a dowel that has 5/32″ holes on both sides. Repeat for each screw. Make sure the dowels are tight, sandwiching the circle. Thread dowel screws into the top of each dowel. Place the dowel screws through the holes of circle #5 and thread on a dowel making sure that the 1/16″ hole is up. For circles #2 and #6, attach the circles to the dowels with 1 1/2″ or longer wood screws. (Note: on circle #2 make sure the nail hole is facing out, we need that mark as a center reference for attaching the bearing.)

Step 7
Print the bearing template included in the printable plan above. Cut out the square bearing template. On circle #1, place the center of the bearing template (where the diagonal lines cross) on the center mark of the circle. Mark the 4 outer large dots. Rotate the bearing template about 45 deg and mark the 4 inner dots, remove the template. Drill 1/2″ thru holes on the 4 outer dot markings (these are access holes for attaching the bearing to the shoe rack). Drill 1/16″ pilot holes on the 4 inner dot markings. Attach the bearing to circle #1 using 1/2″ long wood screws on the 4 inner pilot holes.

On circle #2, place the center of the bearing template on the center mark of the circle. Mark the 4 outer large dots. Drill 1/16″ pilot holes on the 4 markings.
On circle #1, line up the bearing attach holes with the 1/2″ access holes. Place the bearing on circle #2, lining up the 4 attach holes with the 4 pilot holes. Attach the bearing to the shoe rack with 1/2″ long wood screws.
The shoe rack should now spin easily!

Note: if you use a different lazy susan bearing, make sure the bearing is centered on circle #1 and #2.
Step 8
Fill any holes or blemishes with putty or spackle, allow to dry and sand smooth. Prime the entire shoe rack, especially the cut edges of the mdf. Once the primer is dry, paint the shoe rack 1-2 coats as needed. If you want to protect your paint, I recommend putting on 1-2 coats of polycrylic. Allow the polycrylic to dry for a couple days before using.

Check out more projects at Hertoolbelt
 |
 |
 |
Shoe Shelf Bench // Star Wars Shelf // Curvy Side Table
——————————————–
get the reader favorite
Cleaning Binder & Custom Cleaning Calendar
This 18-page editable cleaning binder printable pack will help you establish a cleaning schedule based on the custom tasks you actually need for your home. From the spring cleaning checklist to everyday cleaning recipes, this printable set is great for kick-starting a cleaning routine and staying on task with annual and semi-annual tasks, too.


Excellent Amy, I love the rotary project I want to make a rotary pen / pencil/ desk organiser.
Nice tutorial