Slipcover Instructions!
Slipcover Instructions!

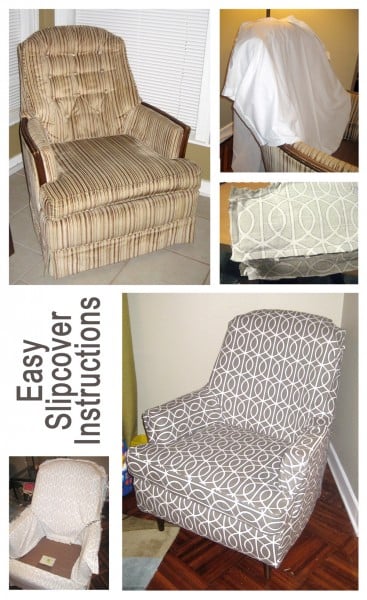
Hi! I’m Rachelle from the blog Adventures In Creating where I do everything from sewing to welding. I am thrilled to be guest posting on one of my favorite blogs. Thank you so much, Cassity, for this opportunity!

 |
 |
I’ve never slipcovered anything before so first I did some research on slipcover instructions and read a few articles:
The Nester on her slipcover project
And I did a lot of searching for fabric. I found a great deal on the Dwell fabric on this website: https://www.onlinefabricstore.net/ in case you wanted to get some of your own. Someone also asked if the fabric is durable. It’s an upholster grade fabric and is made of cotton. I haven’t had it that long so I’m hoping it lasts a long time and continues to look good. I’ll probably spray some Scotch Guard on it to protect it from stains. I’ll give you any updates as they come!
Ok, enough talk down to business!
I started with some old sheets I bought at Goodwill. I wanted to make a templates to use for cutting out my nice fabric. Since I’m a first time slipcover-er I didn’t want to waste precious fabric with mess ups.

I cut large rectangles out, then fit them snugly around each section of the chair, pinning as I went. I wanted the original shape of the chair to show through so I pinned as closely as I could around the edges.


After I did that I trimmed any extra fabric edges to get about a 1.5″ seam allowance I would to for my templates. I marked the templates so I would remember where each one was supposed to go.

I then used my templates to cut my Dwell fabric out. Using the sheet templates allowed me to line up the pattern how I wanted.
Then I repinned my new fabric templates inside out on my chair to get my slipcover shape.
 |
 |
Then sewed the whole thing up. It was a little cumbersome with all the fabric laying everywhere but I was afraid to unpin anything and loose my shape.

After I sewed it all up I refitted it on the chair to see how it fit. I pulled out a few seams that could use some refitting and stitched up a few spots that I had trouble getting the first time around.
The arm for example I pinned again and resewed.


Then is was time for the cushion, I thought that since I have done a few pillows in the past this would be easy. But it was time consuming and hard.
I traced the shape of the cushion onto the fabric leaving a 1.5″ seam allowance.

To get the fabric allowance for the middle cushion thickness I used a piece of string and ran it all along the edge. Then laid it out on the fabric, measured a few inches on either side, and cut it out.
The hardest part was sewing along the T-Shape of the cushion. Other than that it wasn’t bad.
I then pinned the fabric around my cushion in the same fashion as I did the chair, leaving an opening in the back.
Once I finally finished sewing (I’ve never sewn this much in my whole life!) I got to work on the bottom. First I cut off the outdated skirt.

Originally I was going to staple the fabric to the underside of the chair to give it a more upholstered feel. But in the end I just used pins to adhere it so I can take the slipcover off whenever it needs cleaning.

Slipcover before skirt tucked under
Though the pictures don’t show it I ended up sewing a piece for underneath the cushion using some leftover sheet fabric. Then I was all done!

I hope this has been helpful and gives anyone who was thinking of trying this themselves some courage. You can do it!
What do you think of these great slipcover instructions?!!
————–Reader Submission 2/8/18————
Do you have a chair you’ve been hanging on to, trying to get up the courage to start a DIY reupholstering job? Check out what our reader, Joan, did with an old chair she wanted to update:
“I had an old wing back chair (probably from the 50s or 60s) covered in rust-colored velvet. The seat cushion was in bad shape and I didn’t feel able to reupholster the entire chair. I covered just the back and seat cushion with a Navajo rug. It turned out great and adds just the right “pop” to the area above our stairway.”

What a brilliant idea, Joan! Thank you for sharing! It does “pop” just right!


How much fabric did you need? I have the exact chair that I purchased at an estate sale and getting ready to make slipcovers… Thank you
Thank you for sharing.. My husbands wing back chair is threadbare and the stuffing is showing… I’m sooo embarrassed when visitors come… After reading this tutorial, I’m going to pluck up the courage to try covering it….. 🙂
Do it! Do IT! DO IT! You can do it! Good Luck!
Hiyah! I’m so glad to have come across these instructions. I have been waiting, and looking…I have 2 chairs that have great structure but ugly covering. So happy to be getting closer to getting this DONE 🙂
Thanks tons!
I see a couple other people asked how many yards of fabric was used in this project, but I didn’t see the answer. Please, please share this info!! I have a glider about this size that I want to recover and I was thinking of ordering 5 yards…just wanted to know that is about what someone else used too.
This was a guest post, so i really can’t tell you how much fabric she purchased. You can click over to her blog and ask (link at the top of the post) Yardage is dependent on a lot of things, width of fabric, scale of print, if you are trying to match up patterns or not. There is a great yardage chart for all types of chairs here, this is a good guideline for starting.
THANK YOU SO MUCH for this incredible tutorial. I just used your directions to reupholster a chair, and I’m quite proud of the results. Thanks for teaching me how to do it – don’t think I would have attempted it without these instructions.
Your chair looks amazing!
It’s hard to believe that this was your first slipcover project. I still don’t think I have the courage to try it though!
Great instructions. I’m in the same boat and I can’t wait to get started. just got to pick a weekend.
Do you think someone in another state with your dimensions can do a slipcover without seeing it.
I agree. The chair is so beautiful. And much more interesting now. As I sit here on my cover less couch, I am feeling inspired. Thanks. The step by step will be helpful.
No problem Donna!
This is the best tutorial I’ve found for making slip covers. You explain everything and it makes sense. I have the ugliest brown and green polyester plaid two seater sofa I’ve ever seen,( a hand me down). I serves it’s purposed however and I can’t afford a new one. These instructions are going to be very handy. Thanks.
Thanks, Danette!
I have just started doing upholstery and I’m looking around for good tutorials. I think I have just found one:) I’m feeling inspired . Thank you
You’re welcome! Thanks for reading!
What an amazing tutorial!! I envy you and your sewing machine!! Mine is in retirement. You Rock!
Kim
I think this is fabulous for a first try! I am in my 60’s and started sewing when I was 8, so I have lots of mistakes under my belt. Did you notice the print of the fabric runs one direction on the top of the cushion, and another direction on the side of the cushion? I am not trying to pick your project apart. I’m sure you were making the best use of your fabric when you laid out the pieces!!
If you will look at the before picture, you can see it better with the stripe fabric. Running the pieces all the same direction, gives the finished project better flow for the eye. Because of the kind of print it is, it is not too noticeable. But you might consider it for another print that would be more noticeable, next time. Keep at it girl! You’ll be fantastic after 60 years!!
Thanks for the tips, Donna!
This was a super great tutorial! The end result is awesome. Like Donna, I am in my 60s, and have years of sewing experience. I do understand her comment; however, I see the fabric direction as a clever design element that adds interest and really impressed me. I think these decisions are a matter of taste. Great artists are those who were brave enough to break the rules.
Thanks, Sheri!
Very nice and intelligent way to do it!, great idea using used sheets and just pin everything, thank you!,
Claudia
Thanks, Claudia!
I have a round chair from badcocks and I would love a slip cover for it
These instructions should get you started! 🙂
Never would I have guessed that was a slipcover!
It turned out wonderful and I love your choice of fabric ,you are something girl ….well done
Now can you come to my house ????
I’m sure someone has said this already but that was so smart to use old sheets. I have an old wingback that I picked up an have been wanting to reupholster but I’ve settled for making a slipcover. I’ve read a lot of how to’s and they all say to get muslin. The sheets are a great alternative. I have couple old ones and they’re just taking up room in the linen closet. Time to pull them out and put them to good use!
I just wanted to thank you for this. My “problem chair” is almost exactly like yours, which means no ready-made slipcovers will fit (not nicely, anyway). I was intimidated by the project, but so impressed by what you did. I had quite a bit of material left over from a more conventional cushion-covering project, so last night I just started cutting that into strips and fitting it as you show. It’s solid color, not patterned, so nothing to match up. So far, so good! It won’t be as elegant as what you did, but I believe it will fit in with the sort of “Tommy Bahama” look I have in that room. And, I won’t have to worry about the cats clawing it up because I can remove and replace individual strips without affecting the rest of the cover. Thanks again for your great work, and sharing it with all of us!
Sounds like a great project, Leslie! Thanks for the comment!
Very nice job! Time consuming project no doubt. I have that same fabric, waiting to do something with it.