Slipcover Instructions!
Slipcover Instructions!

Hi! I’m Rachelle from the blog Adventures In Creating where I do everything from sewing to welding. I am thrilled to be guest posting on one of my favorite blogs. Thank you so much, Cassity, for this opportunity!

 |
 |
I’ve never slipcovered anything before so first I did some research on slipcover instructions and read a few articles:
The Nester on her slipcover project
And I did a lot of searching for fabric. I found a great deal on the Dwell fabric on this website: https://www.onlinefabricstore.net/ in case you wanted to get some of your own. Someone also asked if the fabric is durable. It’s an upholster grade fabric and is made of cotton. I haven’t had it that long so I’m hoping it lasts a long time and continues to look good. I’ll probably spray some Scotch Guard on it to protect it from stains. I’ll give you any updates as they come!
Ok, enough talk down to business!
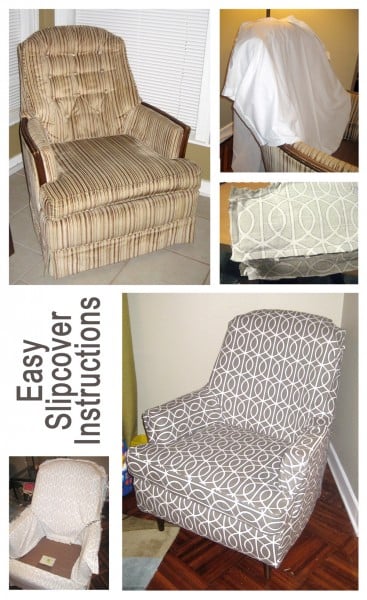
I started with some old sheets I bought at Goodwill. I wanted to make a templates to use for cutting out my nice fabric. Since I’m a first time slipcover-er I didn’t want to waste precious fabric with mess ups.

I cut large rectangles out, then fit them snugly around each section of the chair, pinning as I went. I wanted the original shape of the chair to show through so I pinned as closely as I could around the edges.


After I did that I trimmed any extra fabric edges to get about a 1.5″ seam allowance I would to for my templates. I marked the templates so I would remember where each one was supposed to go.

I then used my templates to cut my Dwell fabric out. Using the sheet templates allowed me to line up the pattern how I wanted.
Then I repinned my new fabric templates inside out on my chair to get my slipcover shape.
 |
 |
Then sewed the whole thing up. It was a little cumbersome with all the fabric laying everywhere but I was afraid to unpin anything and loose my shape.

After I sewed it all up I refitted it on the chair to see how it fit. I pulled out a few seams that could use some refitting and stitched up a few spots that I had trouble getting the first time around.
The arm for example I pinned again and resewed.


Then is was time for the cushion, I thought that since I have done a few pillows in the past this would be easy. But it was time consuming and hard.
I traced the shape of the cushion onto the fabric leaving a 1.5″ seam allowance.

To get the fabric allowance for the middle cushion thickness I used a piece of string and ran it all along the edge. Then laid it out on the fabric, measured a few inches on either side, and cut it out.
The hardest part was sewing along the T-Shape of the cushion. Other than that it wasn’t bad.
I then pinned the fabric around my cushion in the same fashion as I did the chair, leaving an opening in the back.
Once I finally finished sewing (I’ve never sewn this much in my whole life!) I got to work on the bottom. First I cut off the outdated skirt.

Originally I was going to staple the fabric to the underside of the chair to give it a more upholstered feel. But in the end I just used pins to adhere it so I can take the slipcover off whenever it needs cleaning.

Slipcover before skirt tucked under
Though the pictures don’t show it I ended up sewing a piece for underneath the cushion using some leftover sheet fabric. Then I was all done!

I hope this has been helpful and gives anyone who was thinking of trying this themselves some courage. You can do it!
What do you think of these great slipcover instructions?!!
————–Reader Submission 2/8/18————
Do you have a chair you’ve been hanging on to, trying to get up the courage to start a DIY reupholstering job? Check out what our reader, Joan, did with an old chair she wanted to update:
“I had an old wing back chair (probably from the 50s or 60s) covered in rust-colored velvet. The seat cushion was in bad shape and I didn’t feel able to reupholster the entire chair. I covered just the back and seat cushion with a Navajo rug. It turned out great and adds just the right “pop” to the area above our stairway.”

What a brilliant idea, Joan! Thank you for sharing! It does “pop” just right!


I can’t believe that was your first time sewing a slipcover. It turned out very professional.
oh, my! oh, my! you are my hero! i’m in the same boat with the whole hand-me-down furniture for our starter home and want desperatly to make the ugly mix-matched fabrics disappear! i’m officially adding you to my list of fav sites on my blog! yaaaaay!!!!!! looks like a great holiday project 🙂 THANKS!
Thanks for sharing this. I am thinking of recovering a rocker/recliner and your tutorial will help. Cherrie
Great first job! I’m about to do two sofas and two wing chairs. My advice for removable covers is to attach them with velcro. Staple one side of the velcro to the underside of the chair and sew the other piece to the fabric.
That is a great idea!
How many yards did you buy???? THANKS!!
I need to know also, yardage is never mentioned!
To give us a little more insight – would you mind saying approximately how many hours this BEAUTIFUL project took you (such a lovely job)? We are considering taking on a similar project.
You are my hero but I am totally craft/DIY challenged >.< but it is a beautiful project!
Great work! Just from a stickler for spelling, though, there are too many people spelling ‘lose’ as ‘loose’ these days, all over the internet. Let’s break that habit. You didn’t want to lose your pinning, in case the cover got too tight or too loose.
Also, a snugly made slip cover is the perfect place your snuggly relaxation after a hard day’s sewing.
It was obviously a typo :o)
Susan…….Loose was obviously a typo.
Fabulous job! Yay! That is “alotta” work.
You did an AWESOME job! Love the fabric! I am a beginner at sewing but you have inspired me to DIY cover two deadbeat slipper chairs that I have now in my family room – they will be posh and fabulous as a reading area in my bedroom in the new house we’re about to move into. They are much simpler than the chair you did, so I know I can do it! Wish me luck!
i have the same question as Jennifer. How long did this awesome project take?
thanks!!
How many yards of fabric did you use for your chair?? I love the outcome of your project. I have an old faded leather Pottery Barn club chair that I am going to try to salvage.
Club chairs usually take 5-6 yards of fabric, depending if you are using a pattern. This is a good article on estimating fabric: https://www.marthastewart.com/268571/how-much-fabric-do-you-need
This was really informative. I started to recover my sofa with old sheets and I had some questions, which is how I found your site. It seems like I am on the right track… I will definitely write the name of each piece of the sheet/muslin to make it easier.
We are glad you found it informative and we are glad you found our site. We hope that you can keep finding good information from our site. Good luck with the recovering!
That is amazing! I didn’t even see the amazing lines that chair had until you recovered it. Now I really want to start another project!
This is wonderful! You did such a great job. I have been wanting to reupholster this awesome huge lounge chair I have but a little nervous to attempt it. You definitly helped me out with the tips and I look forward to trying. Thanks!
Christine Lozano
I thought that your instructions were really good. Your results LOOK upholstered! I have only one comment. Upholstering is no harder than what you have done. I have made slip covers, and you have to be so careful with your fitting. For me, it just gave me fits! When you upholster, you just need basic rectangles large enough to cover each piece. You cut away the excess after you staple or tack. The cushion is, of course, the same struggle that you had with your slipcovered one. Plus, I will admit, you cannot just pull off upholstery to clean it. If you have children, that is definitely a plus. If you can find the time….
Dude! I never comment on blog posts but your slip cover is soooo awesome!!! I will defs be using your tips! I’m a fairly new sewer too!
GOOD LUCK! You can do it!
SO helpful!!!
I LOVE your detailed instructions and plan to use it on 2 old and orange Laz-y-boy swivel rockers. Kind of uncertain about not using the skirt as it hides the ugly legs but your look is gorgeous! You’ve given me the confidence to get this thing started! Thanks so much!
If your need a skirt, you can always add it! Good luck!
This is so helpful! I have a shabby pair of deep, wrap around leather club chairs that desperately need a cover up. Their shape and size is so perfect that I didn’t want to give them up, despite the torn leather, but I couldn’t find any slip covers to fit. This blog has given me great ideas!
Q: How much yardage did you order, and what width?
Ne sure to pre-wash your fabric BEFORE making the cover…. Otherwise, after one wash, it will no longer fit.