Dresser to Vanity How to
Bathrooms have come a long way in the last 50 years from just a small compact room that is there for reasons we don’t need to talk about on this blog to rooms that we want to make a destination. Now your plain builder grade vanity is just not cutting it anymore. But who has unlimited funds to purchase some of the amazing custom built cabinetry, not me and not many….
Source An Oregon Cottage
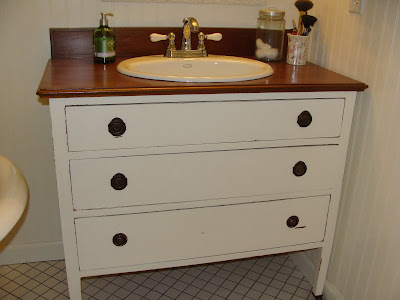
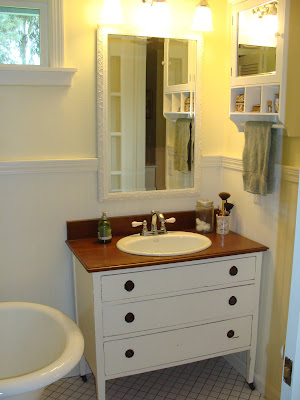
The great new is that you can totally update the look of your bathroom with a dresser… yes, that’s right, I said a dresser! With just a few steps you can transform an old dresser to a beautiful custom vanity with a great amount of storage.


How can you make this look happen?
5 steps to create a dresser to vanity transformation!
1. Measure your space! Be sure you know what size dresser will fit in the space before you start looking!
2. Know the size of the sinks that are available to use in your bathroom space.
3. When you find a dresser that is the right dimension to fit in the space. Make sure the top is big enough to fit the new sink. And you need to be sure not to measure the overhang, but the actual depth of the cabinet portion.
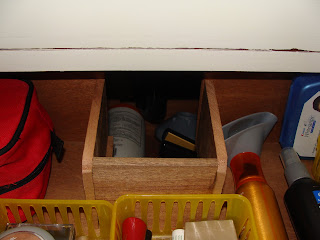
4. You will need to create room in the drawers for the sink, but that doesn’t mean you still can’t save some of the storage space on the side of the drawer for storage. Be sure that you keep in mind that each successive drawer can have more storage. See images below.


5. If you choose to keep the wood be sure that it is heavily sealed before you install the sink for good, be sure to seal all raw edges to avoid water damage. Don’t skimp plan a=on adding 4-5 coats. Use clear caulk to seal around the sink once installed.
If you wanna see how Jami at An Oregon Cottage transformed this dresser above into a vanity step by step check it out here.
and plans for an open table like vanity check them out!)


>Oh how I love furniture as vanities. Very prettiful. 🙂
>Man I wish I was this handy! Anyway I love this, and in response to your featuring my silhouette tutorial, I'd love it. Let me know if you need anything on my part. I sent you an email, it says basically the same thing, but now you have my email if you have any questions. Thanks! -Nancy
>Oh I've always wanted to do this! Wonderful job!
>hey thanks for the blog loving! feel free to feature any of my posts just link me up! 🙂
>I'm glad you found this to post! That was a good tutorial. And it looks so good!
>What a great project!! I just love how it turned out!! I am very impressed and adore the tutorial! Great inspiration!
xx-Gina
>Wonderful, Wonderful Job!
Great vanity find!
Following from 'so very cheri'….
https://thewondersofdoing.blogspot.com/
>Awesome! We just realized the vanity I have growing up will *almost* fit in the bathroom. We have to remove an inch off the top but it will be fantastic when we finally complete it.
Thanks for the wonderful tute!
>GORGEOUS! That is such a good idea!
>I've always wanted to do this, it's just lovely!!!
lifeofperks.blogspot.com
Love it! What a great way to do things! Thanks so much for sharing.
Dianna, we are glade that you love it!
Congrats to this post making the top pins for 2013 on Pinterest!
Yah!
So prett! What did you seal it with? I have been wanting to do this with a piece that I have.
Hi Krista! This post is from a guest of ours, so I can’t answer your question, but you can click over to her blog and ask there. Thanks!
Oh Cassy, that’s exactly what I want to do for our powder room makeover, but I just can’t find a small dresser for a reasonable price.
Wish me luck!
Good luck! 🙂
You can certainly see your skills within the
work you write. The arena hopes for more passionate writers
like you who are not afraid to mention how they believe.
All the time follow your heart.