Board and Batten Feature Wall with 3D Wall Panels
If you want to give a room new life, a feature wall — accent wall, whatever you want to call it — is a fabulous place to start. Updating one wall with some color and/or texture gives the room a focal point and helps pull the whole room together. Our guest today combined a board and batten feature wall with textured 3D wall panels to create a stand-out wall in her master bedroom:

An accent wall sets the style for the room whether that is
bold

subtle

or something in between…


And we’ve rounded up over 100 painting ideas, perfect for accent walls, and over 25 board and batten styles so you can find just the right combination of color, pattern, and texture for your feature wall! Now, here’s Jen to show you how she created her awesome feature wall:
Board and Batten Feature Wall with 3D Wall Panels
by Jen of Mesmerizing Moments
Hi – I’m Jen, and I’m a photographer just north of Austin TX, in the good ol’ suburbs, Round Rock. I love all things creative, am obsessed with interior design, and enjoy party planning way too much. I enjoy my job behind the lens so much, that I even teach online classes for mommies with DSLR cameras! Feel free to take a look at my blog, where I talk about it all! A big thanks to Remodelaholic for having me over! : )
Here are a few of my fun posts if you want a great place to start – Laundry Room Update
 Sniggs’ Angry Birds Party
And of course, a recent photography session – Miss Chloe.
I’m here to share a post about some recent work we did our home, our accent wall in the master bedroom, so here it is, thanks again, I’m so excited to be here!
I had this idea in my head for quite a while, and I have to say, walking in our room everyday now puts a big smile on my face! It’s really hard having something in your mind, and not knowing how it will really turn out, and/or having the patience to wait until you can actually get it done! haha So pretty much I’m really glad it’s done now, makes me happy!
It all started when I wanted to trim out the whole wall behind our bed, square board & batten style. Here in TX we have textured walls though, so I quickly started the search for something I could place behind the trim, a form of paneling or something, that would make the wall flat behind the trim, and hide the texture. And that is where I went a little crazy. I had been seeing these 3D wall panels all over HGTV lately, and I absolutely love them! So I searched the internet, and hit a wall, (and not the cute 3D panel wall I was searching for!) Apparently when I started my search for them they weren’t quite out yet, so after holding onto the idea for quite some time, I finally found a retailer! Inhabit Living – but ouch, they were expensive! Of course, right?! haha When I finally saw they were 18″ and did that math for our wall, using them inside the trim actually wasn’t that bad though, especially for such a big impact, so we went ahead with my plan! : )
I got a little stuck here, because when doing board and batten trim, you use your wall measurements and place the trim according the dimensions, it can come out to be random, like say 16 1/4 inches. But I couldn’t do that, I needed my squares to be exactly 18″ x 18″ and I needed to do the match to make that work vertically & horizontally, with as little of a difference in trim size that I could get. I did the math, and it came out to 5″ boards on the top and bottom, 3″ boards on the outer sides, and 4″ boards in the middle. (I could have gotten really technical there, and spread out those few extra inches, but I figured since the wall was really big it would be hard to notice that 1″ difference on each outer edge, and not worth the extra effort of getting the cuts those to technically perfect. I will say though that the top corners where the 5″ board meets the 3″ outer side boards you can tell, but surprising as picky as I am, it doesn’t bother me. I think I’m lucky there because the wall is just such a statement, it distracts from those corners)
I needed 40 panels, they were sold in boxes of 10 – perfect – 4 boxes it was. 

I was so excited when they arrived! Honestly, I was a little surprised with how they felt, and how thin they were – they literally felt like a heavy duty paper plate – but after handling them, painting them, and putting them in place, I’m really happy with them! They weren’t flimsy at all! : ) 
Once those arrived we headed to Lowes for the trim. We ended up getting a 4×8′ sheet of MDF 1/4 inch thick, for under $20 per sheet. (I would normally use at least 1/2 thick for trim, but I wanted the panels to stick out further than the trim so we went with 1/4 inch) We needed 2 of those MDF boards, with 22 cuts – and we lucked out, they did all the cuts for us for free! We left with our 5″, 4″, and 3″ board collection, and planned on making the other cuts we needed at home. We started putting it up right away, happily working with their perfectly straight long strips, and since it was so thin we only needed liquid nail, with a few finishing nails in each board for extra support. 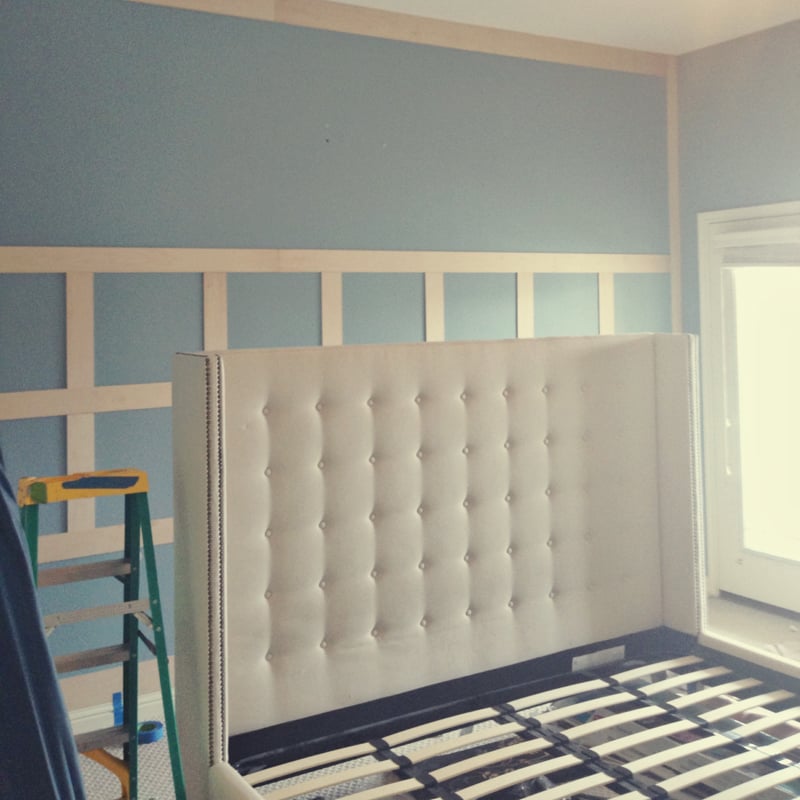

You can tell that was a little tedious and took some time, the second photo there was taken at night : ) haha We filled in the few little nail holes any gaps between the boards, let that dry, then sanded it all down. We primed and painted the next day! 
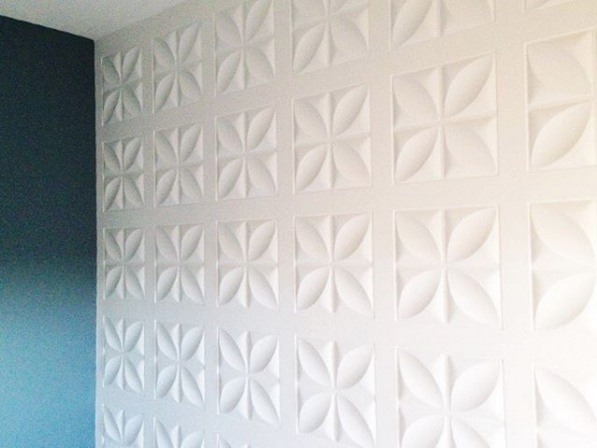
Once that was all dry we had to pick the paint for the 3D panels. I originally actually wanted to keep them white, but we don’t have a paint sprayer, and had already decided the best way to paint the panels would be with spray paint, so I was afraid I would never be able to get the panels and trim exactly the same white. Plus, once I came to that conclusion I actually really liked the idea of the 3D panels being a dark color. I had seen that done on their website, and loved it. But, I hadn’t decided on the color yet. Our room is blue, and I knew I didn’t want to change that, I didn’t want the panels to be the same as the other walls, so I knew they would have to be a very different blue so it didn’t clash either. We ended up going with a sort of steel blue, and the Hubbs set up the painting factory in the garage. Spray painting 40 18″ panels took all day! haha
The third day we started putting them in place. It got a little tricky here, because of course our trimmed out squares weren’t exactly 18×18 and we needed a heavy duty paper cutter to shave the 3D panels straightly. It took some practice runs but we finally got it down. (There are a few behind our bed that aren’t what you would call “exactly stright” haha Those panels are hard to cut!! The material just wanted to waiver around, even with the top of the line paper cutter) haha Inhabit said to use contact cement to adhere the panels, but that was tough as well, because there was so very little of the panels that actually touched the wall (hence the whole 3D thing). We found ourselves needing to hold the tiles in place for a really long time to get them to stay, umm hello 5 years later – not gonna happen! We decided to wedge them into place using tacs stuck at an angle between the panels and the trim so they wouldn’t leave any holes. That worked well, and we could move along without the need to hold each tile in place for.ev.er. We had to leave the tacs in place for over a whole 24 hours! 
Once we were able to remove them we were done though – hooray! haha And we haven’t had any issues since either, everything is still all in place, and I totally love it! It took a little getting used to, it’s such a statement wall, but we literally love it more and more each time we see it! It makes our room feel huge too, which is awesome! We have 10′ ceilings and it really highlights that. Now I just need to find some new nightstands, bummer, more shopping ; ) So, what do you think?
————————————–
LOVE it, Jen! The wall panels are just perfect.
Visit Jen at Mesmerizing Moments to see more of her projects and photography.
Update 2/8/16: Jen painted everything white and it looks amazing!


Looking for more great wall finishes? Check out our archives here or my Pinterest board.


I’m considering ordering wall tiles from inhabit to put on the wall behind my fireplace. Would you say overall you’re happy with the price and quality of the tiles?
Hi Christina!
I would say I am!! They are thinner paper though, sort of like a hefty paper plate, so is your fireplace wood burning? I might be afraid of placing them there if it is. Other than that, I am happy with them, and they are holding up perfectly! Best of luck 🙂
A lot of work, but what a stunner! Congratulations.
Love it!! It’s so unique and beautiful!! It’s amazing!!
Hi Christina
Do you happen to know where I can get the instructions for the gorgeous Billy hack that led me to your site?
Hi Judy,
If you can give me more details, I’d be happy to help you track it down! 🙂
I’m looking for the same one!!
Its the first one listed on this website:
https://ideastand.com/ikea-billy-hacks/
The link leads you to this website and I can’t find it!
That is crazy — I have no idea why that would link here and I can’t find an original source either. Sorry I’m not any help 🙁
Stunning, adds such dimension to the room. It seems quite tedious but the end result was well worth it.