Our very first #TurningTablesDIY guest is my sweet friend Janet from Shabbyfufu — she has the most lovely style and gorgeous photos, and today she’s here to show you how she and her smart hubby made a no-nails console table for their beach house! The no-nails construction makes it easy to disassemble for transporting (a must when you build at home but need it at the beach house!) so this is a great table for renters, military families, or even for parties! And did I mention that Janet’s technique for layering milk paint makes it so perfectly beach and beautiful?
Janet’s hubby is the brains behind the construction, and he and Janet were so gracious to give us permission to draw up some building plans so you can easily build your own. Here’s Janet with all the details — and be sure to subscribe by email or RSS and follow along over on Facebook so you won’t miss a single one of the amazing Turning Tables DIY posts we have coming up!
How to Build a No-Nails Console Table
by Janet from Shabbyfufu
This post may contain affiliate links, please see full disclosure here.
Times change and if you remember the projection screen televisions that were popular not too long ago, many of us had them. You know…the kind with the large box behind them that were a bear to move and usually were housed in oversized wall units that became useless when we switched to flat screens. We had one of those in the living room at our beach home and I was so happy the day that we decided that the beast television was a goner! Finally I convinced my husband that we didn’t need a tv in that room at all and I sketched out a simple console table that I had in mind to take it’s place.
Here are some instructions to create your own and details on my painting technique used to create a pale beach cottage look.
Build a No-Nails Console Table
Designed by Shabbyfufu | Building Plans by Remodelaholic
Materials:
We used clear fir or you can use southern yellow pine. Choose your pieces by how much grain you’d like to see showing through the paint/stain and obviously what is available in your area.
- (6) – 2 x 6 x 8′-0″ – for top & shelf
- (3) – 2 x 4 x 8′-0″ – for sides & apron
- (2) – 4 x 4 x 8′-0″ – for legs
- (1) – 1 x 4 x 8′-0″ – for table top braces
- (8) – 4″ by 1 1/2″ – inside metal angle brackets
- (box) 1 1/4″ wood screws
- (box) 2 1/2″ wood screws
Cut List: (actual dimensions Length x Width x Thickness)
- (4) – 28 1/2″ x 3 1/2″ x 3 1/2″ – Legs (the example model is 30″ to top of table)
- (2) – 7″ x 3 1/2″ x 1 1/2″ – Sides
- (2) – 6′-4″ x 3 1/2″ x 1 1/2″ – Apron
- (3) – 90″ x 5 1/2″ x 1 1/2″ – Top Planks
- (4) – 10 1/2″ x 3 1/2″ x 3/4″ – Top Braces
- (3) – 90″ x 5 1/2″ x 1 1/2″ – Shelf
- (2) – 15″ x 3 1/2″ x 1 1/2″ – Shelf Support
Tools used:
- Drill
- Miter Saw
- Chisel
- Hammer
- Pencil
- Sander
Instructions:
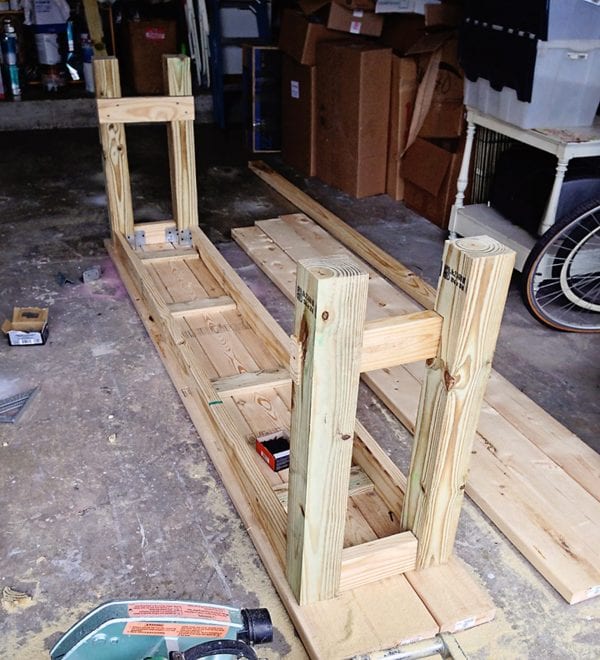
Cut four 4 x 4’s with preferably a chop saw as shown to the desired height of your table. Remember that you will be adding an 1 1/2″ top to the legs, so cut the legs with that in mind for your desired finished table height.
Notch the 4 x 4’s an 1 1/2″ deep, approximately 6″ to 8″ from the floor for the bottom shelf to sit on top (see photo).
Cut (2) 2 x 4’s exactly 6′- 4″ long and cut (2) 2 x 4’s exactly 7″ long and cut (2) 2 x 4’s exactly 15″ long. These pieces will be for the frame top and legs.
Then lay the legs on the floor parallel to each other fifteen inches apart with the notch up and screw the 15″ piece of 2 x 4 into the notch. *NOTE: the notch isn’t completely necessary but it looks better. Another option would be to surface mount the fifteen inch 2 x 4 on to the surface of the 4 x 4.

Using the (2) 6′-4″ pieces and the 7″ pieces attach them to the 4 x 4’s using 4″ x 1 1/2″ inside metal angle brackets with 1 1/4″ screws. For a nice look attach the boards 1/4″ from the outside edge.
Take the (3) 90″ – 2 x 6 pieces and lay them upside down.
Cut (5) 1 x 4’s – 10 1/2″ long (approximately). These boards will be attached to the three 2 x 6’s and will form the structure of the top. The (4) 10 1/2″, 1 x 4’s should fit between the 6′ 4″ – 2 x 4 frame or adjust accordingly. This will complete the top.
Turn the frame and the top over and place the top on top of the frame (see photo).
To construct the bottom shelf, use the remaining 2 x 6’s and notch two of the 2 x 6’s to fit around the 4 x 4 legs. The notch should be approximately an inch and a half deep. This will form the outside pieces of the shelf. The center piece should fit between the two pieces that you have notched. If not, cut accordingly.
There are no nails used to construct the table and it can be easily disassembled for moving purposes.
Layering Milk Paint for a Beachy Distressed Furniture Finish
My goal was to give this table a softly distressed beach house look that would blend into the existing furnishings of the room unobtrusively. I have used milk paint before and enjoy the fact that it can be watered down to any consistency desired. I decided to use
Miss Mustard Seed French Enamel blue first and then topcoat with
MMS Ironstone.
There are several ways to mix milk paint. The paint comes in a powder form and you mix it with water. I used a Mason jar to mix with the shake method (shake, shake, shake!) but the best way is really with a spare blender jar just for paint…which unfortunately I did not have.
In this project, since the table came apart easily for transporting…I took the top boards off for painting (optional). Milk paint does have some small lumps in it but they settle after application in any project that I have worked on in the past. I mixed about 25% paint to water and applied two thin coats. The watered down paint dries quickly and I was able to apply the second coat around an hour after the first coat was finished.
After the blue paint was dry I painted a thick coat of the Miss Mustard Seed Ironstone Milk Paint. You can see how it covers but some of the blue shows through as well as the wood grain.
Next came a light sanding with a small orbital sander to reveal some of the grain. The photo is greatly enlarged to show detail and I prefer just to hit the areas that are naturally raised up by the very nature of the wood.
Waxing the table was the final step and gives the paint depth, sheen and protection. I used Miss Mustard Seed Antiquing Wax and applied this with a rag and buffed with some more rags when dry. We decided that since this table would be in a beach environment that two coats of wax would be best. I allowed the first coat of wax to dry overnight before deciding on the additional coat.

Total Spent On Console Table Project = $75
- Lumber and hardware $75
- I was happily provided with the Miss Mustard Seed Milk Paint for this project

Isn’t that lovely and brilliantly designed? Thanks to Janet and her hubby for sharing with us — be sure to pay her a visit at Shabbyfufu and follow over on Facebook because you will love her relaxed and gorgeous style!
Check out all of the #TurningTablesDIY posts here and be sure to subscribe by email or RSS and follow along over on Facebook so you won’t miss a single one of the amazing posts we have coming up like this beauty:
Related


I’ve been searching for a easy to build table to use at the entry of a beach house I’m working on . This is perfect!! I can’t wait to get started on it.
What a lovely console table! Love the white vase on it too!
Looks beautiful! You mentioned it’s great to have a spare blender jar to mix the paint. Standard mouth mason jars fit a lot of blender blades and you can put it right on most blenders and mix it right in the jar. Just a thought.
I put a blue “wash” as you suggested,but when I went to paint over the blue with white, it mixed , making a very light blue
I live in Canada so I went to Micheals craft store & bought “Folkart” brand milk paint
HELP!!!!!