Get organized! See our favorites in the shop

Remodelaholic

DIY tutorials, Woodworking plans and more.

FREE BONUS: Kitchen Organization Boot Camp
  • Home
  • About Us
    • About US
    • Contributors
    • Facebook
    • Pinterest
    • YouTube
    • Instagram
    • Disclosure and Advertising
    • Contact Us
  • Shop
  • Project Ideas
    • Our Houses
      • Birch House (current projects)
      • Canyon House
      • Park House
      • Downing House
      • Logan House
    • DIY Project Plans
    • All projects
    • Barn Door Baby Gate
    • Dutch Door
    • Framing A Wall Mounted TV
    • Indoor Playhouse
    • Beach Themed Living Room Design
    • Chicken Coop Building!
    • Computer Desk
    • Computer Desk Plans
    • Custom Newel Posts and Stair Remodel
    • Family Room Sneak Peek
    • Headboard Tutorial
    • Living Room Progress
    • Mood Boards
    • Scrabbled Family Names
    • Pets
  • Design By Room
    • Bathrooms
    • Landscape
    • Kids Bedrooms
    • Kitchen
    • Living Rooms
    • Laundry Rooms
    • Master Bedrooms
    • Mood Boards
    • Office
  • Holiday
    • Christmas
    • Halloween
    • Patriotic
    • Easter
    • Fall
    • Saint Patrick’s Day
    • Thanksgiving
    • Spring
    • Valentines Day
    • Winter
  • Crafts
    • Printable
    • Art
    • Paper Crafts
    • Kids
    • Fabric Crafts
    • Decorate
  • Recipes
    • Appetizers
    • Beef
    • Beverages
    • Breakfast
    • Chicken
    • Desserts
    • Dinner
    • Fruit
    • Healthy
    • Holiday
    • Lunch
    • Main Dishes
    • Salads
    • Sandwiches
    • Sauces
    • Seafood
    • Side Dishes
    • Soup
    • Vegetables
  • Videos

Build a Wall Coat Rack with Hooks and Hidden Storage

Written by Amy Baesler

  • Facebook
  • Twitter

Hi, it’s Amy from Hertoolbelt back with another DIY build for your home.  I have been needing a wall coat rack for my hallway. It would be nice to hide a few little things too (or store out of sight). To accomplish both wish items in one, I put my coat rack and hooks on drawer slides. Simply slide the coat rack face to the right and you have a hidden compartment.

Build a farmhouse style coat rack with a secret compartment to hide small items.

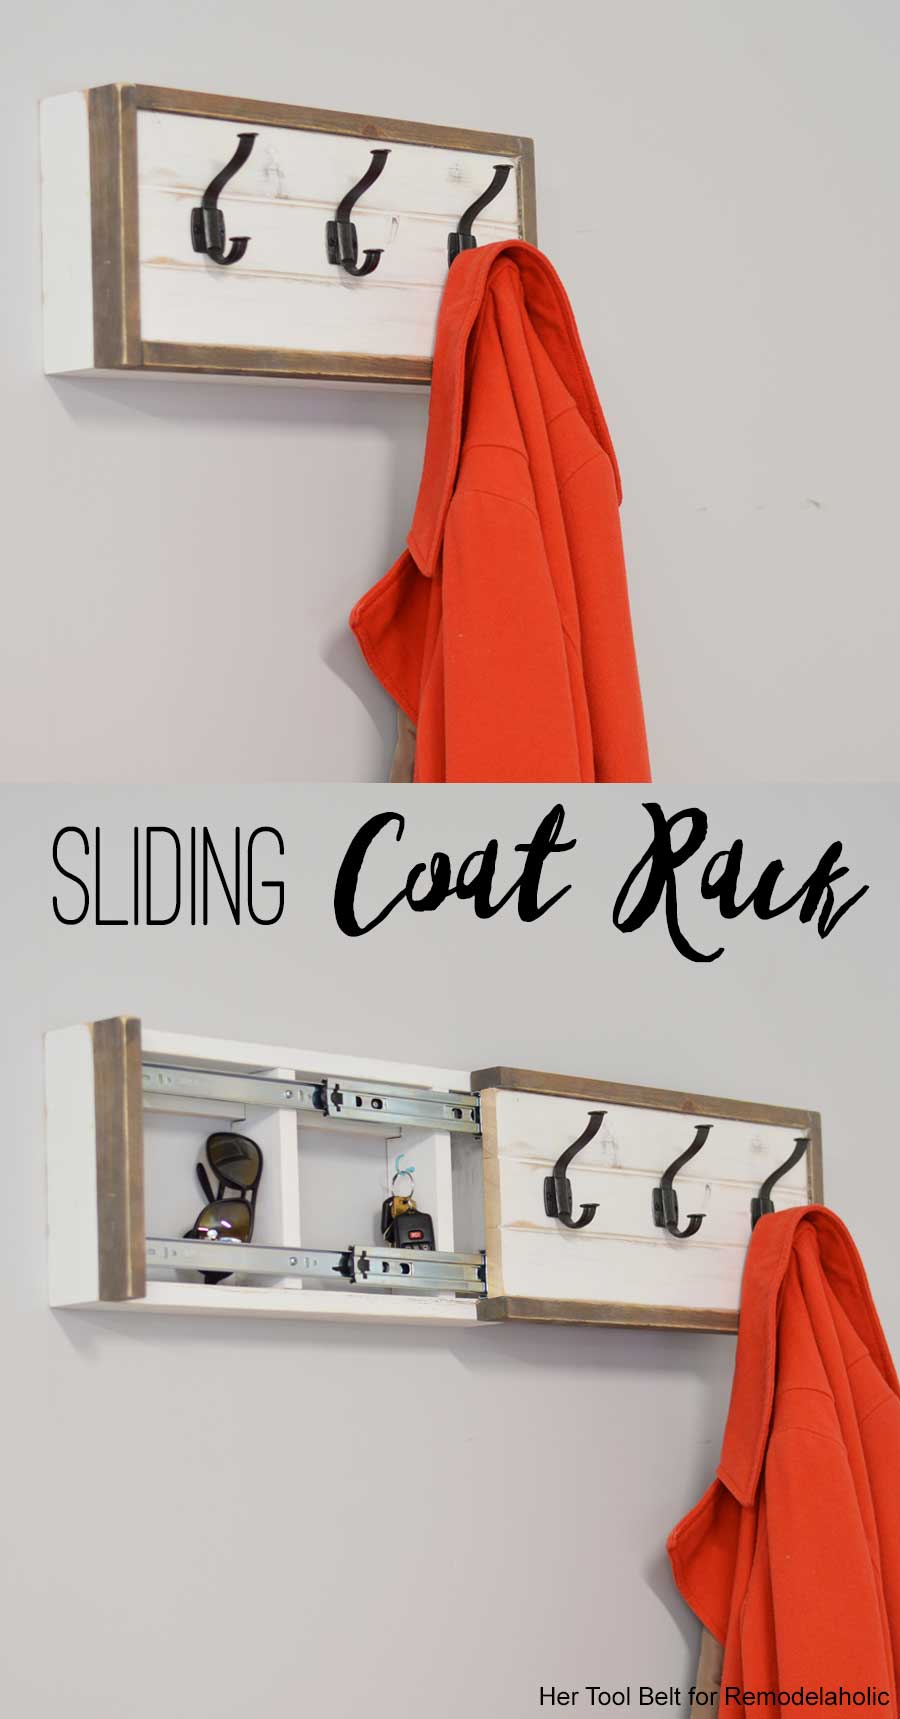
You can add little shelves and hooks inside to help organize your things! Keys, sunglasses, gloves — all those little things will fit right in and be tucked away, out of sight.

How to Build a Wall Coat Rack with Hidden Storage

Click Here to Get a Free Printable Version of This Building Plan
Build a farmhouse style coat rack with a secret compartment to hide small items.

Materials

  • 2 – 1″ x 3″ x 8′ boards
  • 1 – 1″ x 2″ x 8′ board
  • 1 1/4″ pocket hole screws
  • 1 1/4″ brad nails
  • 2 – 18″ ball bearing drawer slides (also called full extension)
  • 2 – 2 1/2″ screws or similar (to secure to wall)
  • wood glue
  • sandpaper
  • 3 – coat hooks
  • paint/stain (used in project: Varathane Briar Smoke, Rustoleum Linen White Chalk Paint)

Cut List

  • 5 – 3/4″ x 2 1/2″ x 18″ (from 1×3)
  • 2 – 3/4″ x 2 1/2″ x 9″ (from 1×3)
  • 2 – 3/4″ x 2 1/2″ x 7 1/2″ (from 1×3)
  • 3 – 3/4″ x 1 1/2″ x 18″ (from 1×2)
  • 2 – 3/4″ x 1 1/2″ x 9″ (from 1×2)
  • additional shelves as desired (7 3/8″, 2 3/8″)

Cut Diagram

Build a farmhouse style coat rack with a secret compartment to hide small items.

Step 1

Cut boards according to the cut list and diagram. Sand all of the boards before assembly.

Step 2

In two of the 18″ 1×3 boards, drill pocket holes for 3/4″ material in about 4 places each to assemble together.  Use wood glue and 1 1/4″ pocket hole screws to join together 3 of the 18″ 1×3 boards.

Build a farmhouse style coat rack with a secret compartment to hide small items.

In the remaining 2 – 18″ 1×3 boards, and 1 – 18″ 1×2 drill pocket holes for 3/4″ material in both ends. Also in one of the 9″ 1x3s, drill pocket holes to attach the front trim later. Use wood glue and 1 1/4″ pocket holes to attach the 2 – 18″ boards to the 9″ 1×3.

Build a farmhouse style coat rack with a secret compartment to hide small items.

Step 3

Use wood glue and 1 1/4″ pocket hole screws to attach the 18″ 1×2 next to one of the 18″ 1x3s. Attach the other 9″ 1×3 to the other ends of the boards with wood glue and 1 1/4″ pocket hole screws.

(Note: the 1×2 will be used to mount the coat rack to the wall. The pocket holes drilled in the 9″ piece should be on the left side when held up against the wall.)

Build a farmhouse style coat rack with a secret compartment to hide small items.

Step 4

Notch the 7 1/2″ 1x3s at the top corner, 1 1/2″ long and 3/4″ wide. Dryfit these to make sure they fit into the frame, they will be used to mount the drawer slides. For my slides, I placed one of the notched boards 7 3/8″ from the inside edge and the other 14 7/8″. I used a brad nailer with 1 1/4″ nails to secure to the top and bottom.

Build a farmhouse style coat rack with a secret compartment to hide small items.

I stained and painted the boards at this time. The front trim boards were stained with Varathane Briarsmoke and the rest of the boards were painted with Rustoleum Linen White Chalk Paint. I let all the paint and stain dry.

Step 5

Attach the large side of the 18″ drawer slides to the back of the coat rack face, the slides should be installed so they are flush with the top or bottom and flush on the left side (and will slide open to the right). The slides should come with screws, if not use 1/2″-5/8″ screws.

Build a farmhouse style coat rack with a secret compartment to hide small items.

Attach the small side of the drawer slides to the 7 1/2″ divide boards, centering the face in the frame.

Build a farmhouse style coat rack with a secret compartment to hide small items.

Step 6

Use 1 1/4″ screws and the pocket holes previously drilled in the left 9″ piece to secure the 1 1/2″ x 9″ trim piece in place, this piece will stay in place always.

Make sure the drawer slides are fully closed, use wood glue and 1 1/4″ brad nails to attach the 2 – 18″ and 9″ trim pieces to the face boards.

Build a farmhouse style coat rack with a secret compartment to hide small items.

Step 7

Mark the locations for the coat hooks. Mark at 3″, 9″, and 15″ across and centered (about 3 3/4″). Screw the coat hooks to the face boards.

Build a farmhouse style coat rack with a secret compartment to hide small items.

Step 8

To mount the coat rack, locate 2 studs in the wall (a stud finder is helpful for this).  Place the coat rack over the 2 stud locations at the height desired, level it and use 2 1/2″ screws to screw through the 18″ x 1 1/2″ board into the studs.

Build a farmhouse style coat rack with a secret compartment to hide small items.

Add hooks or shelves as desired.

Build a farmhouse style coat rack with a secret compartment to hide small items.

What would you hide in your coat rack?

Build a farmhouse style coat rack with a secret compartment to hide small items.

For more build plans check out Hertoolbelt:

Wood Picture Frame Farmhouse Style 11x14 console table with scroll legs sq DIY Outdoor Bench From 2x4s

Farmhouse Picture Frame // Scroll Console Table // Double X Bench


More coat rack solutions:

$10 DIY wooden cube coat rackI love this DIY wooden coat rack- the cube shape and green paint is so fun!

build a hall tree coat rackHall Tree Coat Rack Empty Iso Pin

easy entry organizer with hooks and a shelf

mini mudroom: corner shelf and bench

  • Facebook
  • Twitter
Remodelaholic is a participant in the Amazon Services LLC Associates Program, an affiliate advertising program designed to provide a means for sites to earn advertising fees by advertising and linking to amazon.com. Please see our full disclosure here.

Published: January 6, 2018Filed Under: Contributor, DIY, Organizing, Sketches/Renderings Tagged: building plans, coat rack, entryway, wall storage

About Amy Baesler

Amy is the tool lover at Hertoolbelt. On Hertoolbelt, Amy shares DIY furniture plans, handyman tutorials, and craft patterns. She has two pint sized 'helpers' that help fix things around the house and build fun projects.


free email bonus

Kitchen Organization Boot Camp

Is your kitchen a zen paradise? It can be. I'll show you how.

Previous Post
Friday Favorites: Sliding Door Bookcase and Doggie Bed
Next Post
Remodelaholic in Review: December 2017

Comments

  1. kathleen Rupp says

    January 7, 2018 at 7:36 am

    Great idea! My hubby(the woodworker) loves this idea! Pinned! Thanks so much for the plans and idea.

    Reply
  2. Ivory says

    January 7, 2018 at 6:37 pm

    Fabulous job! I so love them all. I gt to get going on one f these, but which one? I feel like a kid in a candy store right now, which one do I choose.

    Reply
  3. Samantha says

    January 8, 2018 at 3:28 am

    Love this idea! What a beautiful project! Great work!

    Reply
  4. the cape on the corner says

    January 18, 2018 at 1:46 pm

    this.is.amazing!!
    b

    Reply
  5. Darren hawkes says

    October 4, 2018 at 5:48 am

    Hi thank you so much fkr this plan I am a stroke survivor

    And im so gonna try and make these for friends and family

    Reply
  6. Ma says

    February 6, 2021 at 11:46 am

    Make sure your 1 by 3 is actually 3/4 by 2 1/2 because mine was actually wider then 2 1/2 and the lid was too wide for the box. Had to take box apart and cut the 9” longer one inch or so. Love the idea

    Reply
    • Cass says

      February 8, 2021 at 5:42 am

      Thank you for the tip! Glad you love it.

      Reply

Leave a Reply Cancel reply

We love hearing from fellow Remodelaholics, so let us know what you like about this and leave any questions below in the comments. If you have followed a tutorial or been inspired by something you have seen here, we would love to see pictures! Submit pictures here or by messaging us over on Facebook.
Recipe Rating


Hey there, I am Cassity! Nice to virtually meet you!

This blog is about DIY at its finest. We are obsessed with it and so are you, so while we're working and have nothing to show you of our own projects we show off yours. So submit your projects! More About Us…

Categories

  • Facebook
  • Instagram
  • Pinterest
  • RSS
  • Twitter
  • YouTube

Meet The Team

Privacy Policy

Remodelaholic is a participant in the Amazon Services LLC Associates Program, an affiliate advertising program designed to provide a means for sites to earn advertising fees by advertising and linking to amazon.com. Please see our full disclosure here.

© 2005-2016 Remodelaholic LLC, All Rights Reserved

  • Facebook
  • Instagram
  • Pinterest
  • RSS
  • Twitter
  • YouTube

Copyright © 2021 · Remodelaholic

  • Pinterest
  • Facebook
  • Twitter