DIY Corner Shelf with Storage

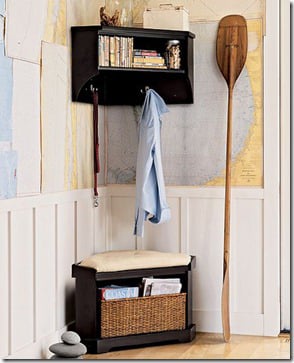
How to Build a Corner Shelf
Click here for the plans to build the corner bench

Materials:
- 1 sheet of 3/4″ MDF 4′ x 8′
- 2″ brad nails or screws
- 1 1/4″ brad nails or screws
- wood glue
- wood filler
- primer
- paint
- sand paper
- coat/hat hooks
- 3″ screws (pan head preferred)
Cut List:
| Quantity | Thickness | Width | Length | Description |
| 2 | 3/4″ | 23 1/4″ | 17 1/4″ | Backs |
| 2 | 3/4″ | 8″ | 17 1/4″ | Sides |
| 1 | 3/4″ | 24 3/4″ | 24 3/4″ | Top |
| 1 | 3/4″ | 22 1/2″ | 22 1/2″ | Shelf |
| 1 | 3/4″ | 28″ | 3″ | Top Support |
| 1 | 3/4″ | 1 1/2″ | 22 1/2″ | Shelf Support |
| 1 | 3/4″ | 1 1/2″ | 21 3/4″ | Shelf Support |
Step 1
From the 3/4″ MDF cut the shelf pieces according to the cut list. Grab the 2 back pieces. On one of the 17 1/4″ ends of each, cut a 45 deg miter.

Join the 2 back pieces together at the mitered end, creating a 90 deg square. Glue and nail or screw the backs together.

From the bottom of the back pieces, measure and mark 6″. Glue and nail (1 1/4″) the shelf supports onto the back pieces. Make sure the supports are level/straight.
 Step 2

Grab the 22 1/2″ x 22 1/2″ shelf, mark 7 1/4″ on the right and bottom sides as shown. Draw a line between the marks and cut off the excess triangle.

Glue and nail (2″) the shelf onto the shelf supports and back.
 Step 3

Grab the 2 side pieces. Download and print the corner shelf arc pattern, make sure the print settings are set for 100%, not fit to page. Trace the pattern onto the 2 sides and cut out the arc using a jig saw, scroll saw or band saw. Glue and nail (2″) the sides to the shelf and back pieces.

Step 4
Grab the 28″ x 3″ piece, and make a 45 deg cut at one end. Measure over and mark 27 9/16″ and make another 45 deg cut as shown.

Grab the 24 3/4″ x 24 3/4″ shelf, mark 8 5/16″ on the right and bottom sides as shown. Draw a line between the marks and cut off the excess triangle.

Glue and nail (2″) the top support between the sides, making it flush with the top.
 Place the top onto the top of the corner shelf, making the back of the top flush with the back sides.

Glue and nail (2″) the top to the backs and sides. Also glue and nail (1 1/4″) to the top support. Allow the glue to dry.

Step 5
Remove any excess glue, apply wood filler to nail holes, cracks and blemishes and allow to dry. Sand the wood filler and corner shelf until smooth finishing with 120-150 grit sand paper. When working with MDF, priming or sealing the wood is key. Prime the corner shelf with 1 -2 coats of primer, and allow to dry. Paint the corner shelf your favorite color, and allow to dry.
Attach a few coat hooks to the corner shelf.
To mount the corner shelf, locate the studs in your walls (I like to mark them with painters tape – easy to remove.) Once you find the studs that you’ll be using, make coordinating marks onto the shelf back pieces. You need 1 -2 screws (2 preferred) holding your shelf on each back side piece. Pre-drill holes through the back. Use 3″ screws and attach the corner shelf to the wall. Enjoy your new shelf!

If you’re looking for bench plans with great shoe storage, check out my mudroom bench plans that customize to your space!
Pin it for later


Looks like a great piece of diy self storage. I can see there are 2 separate piece of boxes there. How about joining them together with a plain wooden frame?
Do u have the plans for the bottom of the mini mudroom bench
Yes, right here: https://www.remodelaholic.com/2012/08/mudroom-corner-storage-bench-plans/ Thanks!
Where did you get the basket for the bottom/bench
That’s the stock photo that inspired our building plan, so I’m not sure exactly where you’d find one like that. Sorry I’m not more help.