Confetti Drapes Tutorial
Last week I showed you a little preview of what is going on in Etta’s pink and navy bedroom. Thanks for all the sweet comments and what I heard most about was the drapes. And I have to admit I am TOTALLY in love with them myself.
This post may contains some affiliate links. Please see our full privacy policy and disclosure here.


The idea all started when I began planning Etta’s new bedroom. I noticed some adorable polka dots popping up everywhere and I loved them, I just love the graphic look of the trend:

Pure inspiration polka dot art

Like this idea (I know it is stars, but it is one of the pictures I saved!)


But I really loved the idea of morphing that polka dot look into more with of a confetti look. Example from A Place for Us.

Well when I started looking around for my pink and navy fabric to pull everything in her room together, I just couldn’t find the right one. Then my color pallete was set in stone when I got the rug, and it became impossible to find the fabric I needed! Nothing really matched the color scheme I was going for. So I decided that I would make something that did.
This to me is the best feature- the painted polka dots tie together all the colors in the room. I matched the blue paints to the rug we ordered, and the pink to the fabric I bought. I even used the wall paint in the drapes as well, so everything ties together perfectly. (except for the bench which I haven’t recovered yet, so just ignore that!)
And this is what I came up with:

So, let me tell you how I did it.
Confetti Drapes Tutorial
(this would work for walls, pillows, rugs you name it!)
Supplies:
1 set white Ikea Drapes.
Several colors of paint (including some of the wall paint) I used satin paint from Sherwin-Williams in their Emerald line in SW 6582 Impatiens Pink (walls), SW 6584 Cheery and SW 6586 Heart Felt, SW 6804 Dignity Blue, SW 6718 Deep Sea Dive and a mix of Deep Sea Dive at 25%. (and the White is SW 7566 Westhighland White, although I didn’t use this on the drapes, I actually matched the white I used to the color of the drape fabric, just thought you might want the color!)
1 small cup
1 small flat 1/2″ paint brush (an artists version, not a remodelers type of brush)
1 dinner plate or a paint roller bin would work
1-2 sheets of paper in similar shades to paint
A tape lint roller to remove fuzz and any dirt
Steps:
TIP: you may want to test out a few different cups and painting a few dots on some scrap fabric or even cardboard before starting on your drape panels… I didn’t do this, and there a 2 or 3 REALLY ugly dots permanently on my panels where I figured out what I was doing. Hopefully you can skip that awkwardness, you’re welcome.
1. Lay out your draperies on a solid drop cloth or plastic sheet. (be sure to have a drop cloth or solid plastic sheet underneath. I was working on a concrete floor that was about to be covered with new flooring, so I skipped that step, but I don’t want to be in trouble for painting any of your floors…)

2. Collect your small cup and one color of paint. I used one with a tiny foot or ridge around the edge of the base (they are the old Ikea kid’s cups). Begin by dipping just the base of your cup into the paint in either a small bowl or plate . I used a plate for most of my colors…
*You could try doing 1 or 3 colors at once if you wanna do this project faster, but you might want to try the paper dot tip from below before starting.
 |
 |
 |
 |
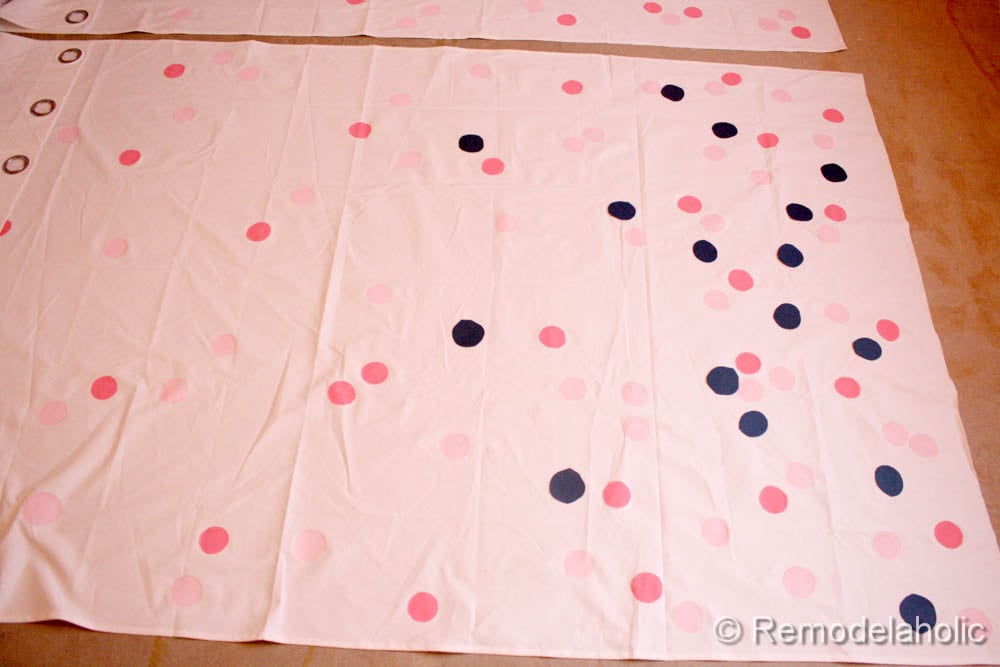
3. Make sure the paint is not dripping (it should have about as much paint as the yellow cup above does). Place the cup where you would like the first dot to go. I just eyeballed most of it. Usually one dip of the cup could make 4-5 dots. I would just stamp the next spot or two before filling in the dot using my paint brush.
* My Pattern Plan: Lightest colors were highest on the drapes and darker colors which are more visually heavy are only near the bottom half . I broke the drape into quarters. I started painting with the very lightest color. The lightest color went right up to the top of the drape, but only a few dots at the top and the density grew as it got closer to the bottom of the drape. The second had a few dots near the top, but not as high as the lightest color, getting denser near the bottom. The middle colors started near the 2/3 mark getting denser at the bottom. Finally the heaviest or darkest colors were all on the bottom half only, and especially dense at the bottom. I felt like that system made a lot of visual sense, but you can do what you think works best.
4. When you lift up the cup you should be left with a blobby ring of paint on your drapery panel. You want to work the blobs of paint into the center of the dot and then remove any excess (which I usually just transferred to the next dot). Be careful to try and remove the bead of paint around the dot, or you will have a longer drying time between colors.
 |
 |
 |
 |
 |
 |
Occasionally you might have a slip up like this one below, you can just do another dot, in the same color or a different color right over the top (preferably a darker color than the spot).

5. Work your way through the colors you plan on adding. I allowed the dots to dry completely before adding the next color to the drape. As the drapes got full of dots, (about the 4th color that I added) it became a little hard to be as random with dot placement.
* To help visualize placement and density of the confetti dots, I cut out about 30 paper dots from a tracing of the bottom of the cup (not perfect AT ALL) in the next color. I spread them out and stood up to look at placement. Once I was happy I would just pick up the paper dot and stamp a paint dot on the fabric with the cup, where the paper dot had been sitting. The picture below shows the paper dots as I was getting ready for the next color of paint.
 |
 |
 |
|
 |
 |
And there you have it! A perfect confetti drape tutorial!
p.s. The owls were from Wayfair. They are no longer in stock, but they do have other owl figurines to choose from.


What do you think?


Thank you for the tutorial. I love how your drapes turned out. I’ve been struggling with an answer for my craft room.
You are welcome, Glenna!
These are so adorable. My daughter has an all pink room and I’ve struggled finding curtains that are not pink. This will be a great craft for me to do in all different shades of pink. Thanks for the idea. 🙂
You are very welcome Cheryn!
I love that this is girly but not babyish or princessy. Very clever !
Thanks, Jen!
Love love love! I am definitely going to make these for my daughters room! Thank you for the inspiration!
You’re welcome! We’d love to see pictures when you do 🙂
Oh man, I LOVE these so much! Thanks for the awesome idea! I think I’m going to make these for our playroom!
Thanks, Samantha! We’d love to see pictures when you do!
Love it. I’m going to try this for my daughters room because she changes her mind every dat about what color she wants it to be. I might even let her help ????
Good luck! We’d love to see pics when you’re done!
Just finished mine, and I love how they turned out! Thanks for a great tutorial. I used the bottom of a Chobani yogurt cup to stamp my circles, which worked really well. Pictures on my blog if you want to see!
https://cozybirdhouse.blogspot.com/2016/02/confetti-curtains.html
They look great, Caitlin! I really like the colors you chose. May I add your photo to our post as another example (with a link to your blog, of course)?
Absolutely! Again, thanks for sharing the tutorial!
Thanks, Caitlin!
Hi ! Did you wash the drapes and the confetti look stayed ? Thanks for this tutorial, I get inspired by this for my little boy’s bedroom 🙂
We didn’t actually wash the drapes before we moved, but I had intended to! So I think the paint would stay just fine. I mean, I have plenty of paint that has stayed on my clothes after many many washes 😉
If you’re wanting extra confidence in the laundering, you could use fabric paint (or acrylic paint and mix in a fabric/textile medium).