DIY Beadboard Ceiling To Replace a Basement Drop Ceiling
Is a drop down ceiling a problem you wish to fix in your home? With a limited budget, I was able to revamp my basement ceiling with beadboard and it changed the look of everything!

Hello Remodelaholics! It’s Tamara from Provident Home Design here to share another DIY with you! Last time on Remodelaholic, I shared a tutorial for creating this Built-in Media Wall Unit .

Today I’m sharing another money-saving, DIY that helped turn my basement from Blah into Beautiful.
Our basement was finished with a drop down ceiling by the previous owners. It didn’t look the greatest, especially because there was one area between two beams that came down a lot lower then the rest. This made the room feel more dungeon-like.

Then our refrigerator leaked and damaged several of the drop down tiles underneath it.
I was desperate to get rid of the drop down ceiling in the basement, but the prices for getting the ceiling professionally finished and with much needed additional lighting would run me close to $2000.
I decided it was time to take matters into my own hands and I’m so glad I did.
So what did I do? I installed a beadboard ceiling.
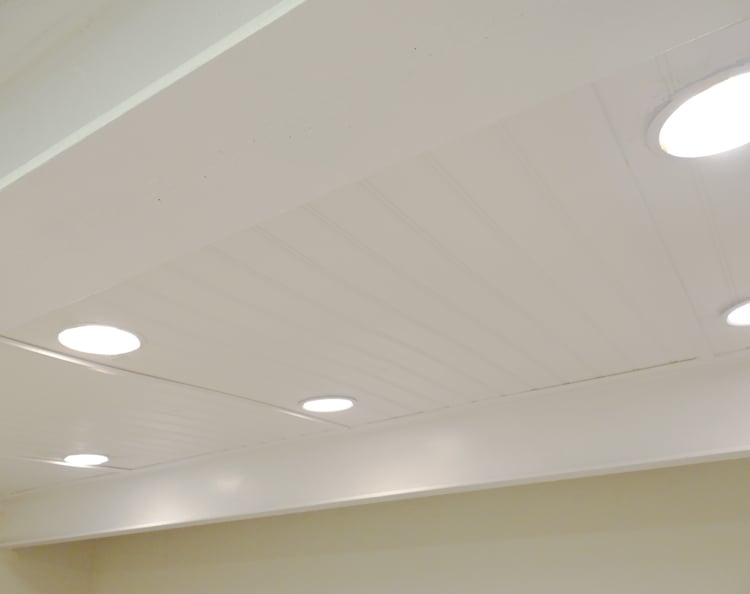
Here is my After!
Here’s how I did it!

7 Steps for Installing a Beadboard Ceiling in a Basement
Step One: Demo the old ceiling if necessary
First I removed all the drop down ceiling tiles and drop down support systems in the section I wanted to redo (which comes down very easily).

Step Two: Install electrical wires if additional light is needed or wanted
Then I hired my friend’s extremely handy husband who installed 6 can lights. (Remodelaholic note: See how Tasha installed recessed can lights here.)
Step Three: Measure your space and purchase supplies
Next I went out and purchased (4) 4×8 sheets of wide beadboard (normal beadboard works great too). My Home Depot had them priced at $30 a sheet so I spent a total of $120 on the beadboard.
If you are covering a large ceiling area without many obstructions, then you will use the whole 4×8 ft sheet of beadboard at once. I was installing the beadboard between two beams, so my first step was to measure the distance between the two ceiling beams and to cut the beadboard sheet to that size.

I did this by using a jigsaw but you could also use a table saw (or if you already know the sizes you need when you buy it you can ask the workers at Home Depot or Lowes to cut it to size for you).
Note: Before cutting your board make sure to decide if you want your beadboard to run vertically or horizontally.
Step Four: Determine the height of the new ceiling and install supports
Next you will need to decide at what height you want your ceiling to hang. To decide this examine the wood beams in your space. Does it makes sense to go ahead and attach them directly to your wood beams? Or are there steel beams, pipes, plumbing fixtures that would make sense for the beadboard ceiling to hang lower?
In my case, the tops of the steel beams hung lower than the wood beams. It made more sense for me to have the level of the headboard ceiling match the level of the tops of the steel beams (see diagram below).
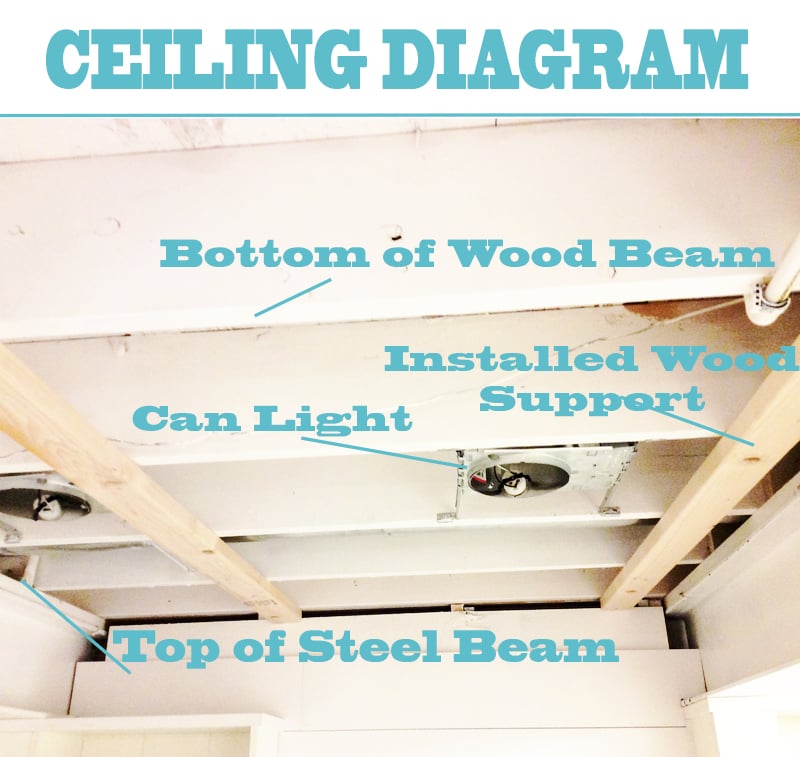
So I measured the distance from the bottom of the wood beams to where I wanted to have the ceiling hang and found wood (a 2×3) the same depth.
Screw the wood supports into the wood beams.

Step Five: Cut out holes for lights and obstacles in the beadboard
Before hanging the beadboard you will need to assess if there are any obstacles that you will need to cut around (if you are lucky there won’t be any).
In my case I needed to cut around the newly installed can lights. Measure and mark on the back of your beadboard where the obstacle is. With paper and pencil you can trace the obstacle to make a template to draw onto the beadboard.
Then cut around your lines with a jig saw.

Step 6: Attach beadboard to supports
Next screw the headboard into the wood supports (or directly into the wood beams if you are going that route).

Note: You will need at least one other person for this part. It is near impossible to hold up a large piece of beadboard while holding a drill to drill the screws into the wood supports (trust me on this one).
Also you will want to make sure you use flathead screws so that the head of the screw will be flush with the headboard when it goes all the way in.
Now install all of your boards with enough screws that the board is not sagging (I did mine about 18 inches apart).
When adding another board, butt beadboard ends up next to each other with about 1/4 gap in between..
When your done with this step don’t worry if it doesn’t look pretty it’s not supposed to yet!:-)

Step Seven: Trim gaps, fill holes, and paint
Now with a nail gun or Liquid Nails, install a piece of trim wide enough to cover the seams of the beadboard sheets. I used 1-1/2 lattice but really you can use anything you want as long at it covers the seams.

Note: The Liquid Nails method will only work it you use a lightweight piece of trim (like lattice) and if you use painters tape to hold it up until it dries.
Lastly you will fill in the screw holes with spackle and paint the whole ceiling (trim and all) one color.
Now it should look really pretty!:-)
I am so happy with how it turned out and for the price! Please don’t hesitate to let me know if you have any questions!
If you want to read more about my basement makeover on a budget, you can Click HERE. And if you want more budget friendly home ideas and DIYs come check out my website at Provident Home Design! Have a great week! 🙂

More ways to dress up a ceiling:


wow, what an amazing transformation! It doesn’t even look like the same space. You did a fabulous job!
Thank you, Mrs Mike! 🙂 We are loving and using it so much more now!
This is a very bad idea if there are pipes and/or electrical lines that may need to be accessed in the future. You would be forced to tear it out if you had a burst pipe or a short in a line. This is a very important consideration, especially if you are remodeling a basement room. Not very smart.
What do you do about Ccess to pipes and electrical?
Thanks
“What do you do about access to pipes and electrical?”
Remember where everything is (take a picture!) and then if you need access, just remove the right screws!
I LOVE this–post was great and very thorough. I was set to take down my drop ceiling and get rolling with this…but–question for you:
Contractor friend says this would not be up to any code and in addition that it’s not fire code compliant–basically said there’s nothing to stop entire from spreading to the rest of the house. Did you address or run into this at all?
Thanks!
Your contractor friend is very smart! This construction is a fire hazard, as well as being a catalyst for mold and electrical headaches. That’s why drop ceilings are used. They are fire rated, easy to remove, and deter moisture.
Regarding the fire hazard comment: these panels are typically rated as “<200" for flame spread – in order to make them code-compliant. Max. is 200 for most residential building codes.
A “flathead screw” describes the shape of the indention into which the screwdriver fits (vs. Phillips head). I think you meant to say that this project requires *wood screws* – which are flat on top and sink into the material for a “flush” surface.