How to Install Recessed Lights Without Attic Access
Recessed lighting fixtures made specifically for remodeling projects allow you to add light to any room. Attic access is not needed and you won’t need to patch the ceiling after! Learn how to install recessed lights without attic access with this tutorial.
Also learn how to Install a WiFi Thermostat, Install a Sliding TV Platform, and Upcycle a Light Strip to a Hanging Pendant Light.

Tasha from Designer Trapped in a Lawyer’s Body wrote this tutorial about her twin daughters’ room that had such poor lighting she couldn’t stand it! She blogs about thrifty DIY projects and home renovations. More about her below!
This post contains affiliate links. See our full disclosure policy here.
How to Install Recessed Lighting (even without attic access)
Materials needed:
- Remodeling recessed lights (also found on Amazon)
- Pencil
- Hand-held drywall saw
- Wire strippers
- Wire cutters
- Flat screwdriver
 |
 |
Steps:
NOTE: If you do not have any electrical experience, I HIGHLY recommend hiring an electrician to run electricity through your ceiling. We did all electrical work ourselves because we have a fair amount of experience doing it. If you do also, great! But this tutorial will assume that you have existing wiring to work with or that you hire an electrician to run it for you so that you can then install the recessed lights yourself. That will still save you a ton of money!
1) Determine where you want your lights installed and mark your ceiling accordingly. Make sure there are no obstructions in your ceiling as you plan where your lights will be. Use your stud finder to locate any joists that may be in the way. You can also make a small hole in the ceiling and insert an un-bent coat hanger into the ceiling to feel for any obstructions.
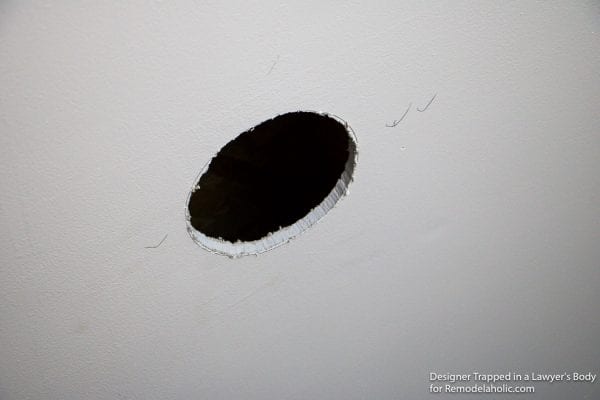
2) Once you have settled on the location of your lights, remove the paper template from the recessed can packaging. Trace the circle onto the ceiling in every location where you will be installing a light. We installed 6 lights in our room.
3) Cut around your pencil lines using a hand-held drywall saw. Don’t worry–this step is pretty easy and moves quickly!

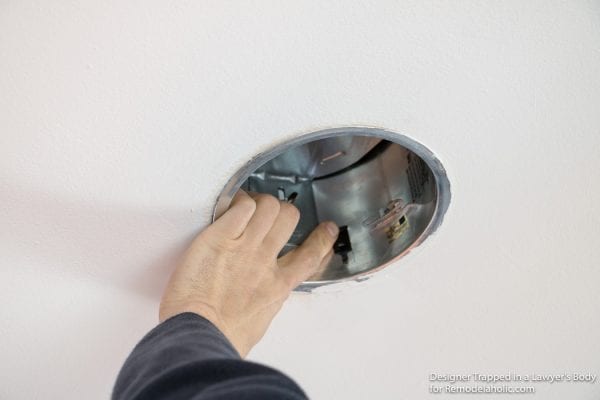
4) Pull the wires that your electrician ran through the hole and get one of your recessed light fixtures. Remove the cover from the junction box on the light fixture. Follow the instructions that came with your particular light fixture to feed the wire from the ceiling into the junction box and make the necessary connections. You will have to use wire strippers to strip about 3/4 of an inch from the end of the insulated wires, but I promise it’s easy! Just take care not to damage the copper wire inside the insulation. Attaching your wires to the junction box is easy because of these awesome wire connectors. Remember, white connects to white, black to black and bare to bare (or green).


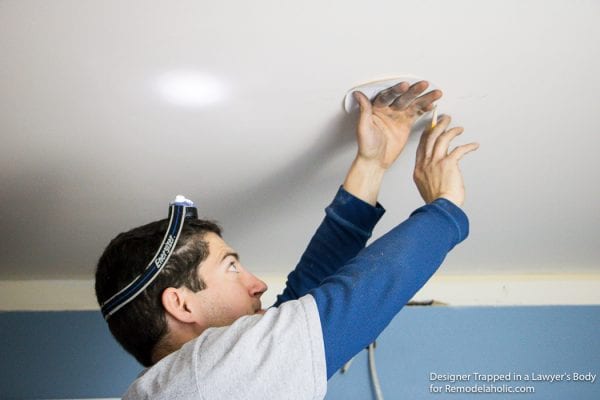
6) Feed the junction box and the “arm” of the light fixture into the ceiling hole. Then press the can up until it’s flush with your ceiling. Then press the four tabs through the light fixture until they sit flush against the can. Make sure the tabs lock into place.
7) Insert your light bulbs, turn your power back on and turn those beauties on!

We can finally see in this room after dark! And you can see how nice and clean they look against our freshly painted ceiling.

If you want to save this project to refer back to later, I would love for you to pin it and share it on Facebook!

Thank you, Tasha! What a beautiful room for your daughters! Installing recessed lighting was definitely a great idea!
More DIY lighting:
Turning an old Door into a Light Fixture
More from Tasha:
Hello Remodelaholics! I am Tasha and I blog over at Designer Trapped in a Lawyer’s Body about thrifty DIY projects and home renovations. My contributor posts include how to transform an outdated, cultured marble vanity with concrete and how to make a DIY wood bead chandelier. There are lots of great ideas to make DIY lights that serve as accent lighting in a room, like these 14 DIY pendant lights. There are also clever and cost effective ways to update existing light fixtures, like these two easy ways to update flush mount fixtures. But what do you do when a room is so poorly lit that accent lighting just doesn’t provide all the light you need? Add some recessed lighting–you can do it!
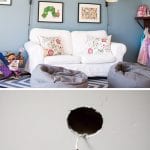
Frankly, our entire home is poorly lit, but the lighting was particularly bad in our twin girls’ playroom. There was no overhead light and the two wall lamps that we were using to light the room weren’t enough. I was seriously concerned about how much our girls must be straining their eyes when they played in this room!
Their playroom is on the first floor of our two-story house, so we had no idea how to install recessed lighting without attic access. We called in a professional for a quote, which was incredibly high (around $1,600.00). That wasn’t going to happen! So, we did some research and figured out how to DIY it ourselves. I hope you’ve learned how you can do it, too!
Room Source List:
- Eric Carle prints above loveseat
- Ikea Ektorp loveseat
- Chevron rug from Rugs USA
- Wall lamps from Pottery Barn
- DIY industrial pipe bookshelves
I would love for you to head over to my blog, Designer Trapped in a Lawyer’s Body, to check out our other DIY home improvement and thrifty home decor projects, like how we painted our kitchen cabinets without sanding or priming or how we created a STUNNING laundry room for only $71 out of pocket. Our laundry room makeover includes painted vinyl floors {yep, you can PAINT vinyl floors!}. And if you are looking for an easy and quick DIY, check out how to make your own bed skirt with no sewing and no cutting (no kidding). I hope to see you over in my corner of blog land soon!


Love it! Where did you get the bean bags from?
So disappointed. I really wanted to learn how to install recessed lighting in the ceiling without going through the attic. I know how to hook up a light fixture when the wires are accessible, which is what this shows you how to do. UGH.
EXACTLY my thought.
Same here! Afterall, that was the title of this blog.
But how do you get the wire through the ceiling joists? For instance, your wire is installed in the center of your room (like most traditional houses). How do you get the wire to the edge of your room and how do you run that wire through any joists that might be in your way? That’s the real problem with not having attic access or a drop ceiling. Do you just drill a large hole in the joists? How would you do that?
We ran our wires parallel to our joists and in between them to avoid that issue. Locating your joists and planning ahead should enable you to run your wires in such a way that you don’t encounter joists in the way–you may have to relocate your light switches in order to accomplish this.
I know this question was from two years ago, but here’s the answer anyway.
There are two ways to run wires across joists:
1) saw holes inceiling, drill holes in joists at an oblique angle with a wide-bore drill bit (1 1/2″ or so), fish wire through; patch over wall when done.
or
2) stay in cavity between joists by running wire up into ceiling or down into basement, and loop through wall, back up to cavity between joists where the next light fixture will be mounted.
Neither way is particularly easier or better than the other. Way (1) is the only way to do it if you don’t have basement or attic access.
There’s a third way, which is much easier but looks much worse, which is to use these thin metal tracks that mount to the wall and run wires through that. It’s ugly. Don’t use the third method except in, say, a garage or basement.
Hi Tasha, Great article! I want to do the same thing in our kitchen and there is no attic. We took down the ugly fluorescent light and want to install 6 LED recessed lights in an oval or square pattern. Please give me some tips on how I can route my wiring to the 6 holes using the power from the single fixture in the center of the room.
Thanks,
Ray
This is all nice write-up to get the general idea . I only have one question though, where did you get the Electric source from to light these recessed lighting? Did you a cable to the circuit breaker? did you tap into an existing switch? These details are as important as the running the wires parallel to the joist to avoid going through them.
Thanks
Oscar
You never show how you mounted the junction to your ceiling joist without access to it, I’m guessing you left it dangling in the breeze or did you cut additional holes and not show it…
Hi Robert! The whole point of the remodeling recessed lights (which are different from regular recessed lights) is that you don’t have to mount them to the ceiling joists. If you had clicked on the link of the of the lights that we used, you would have seen this in the description “feature clips to secure the housing to the ceiling surface.” The remodeling recessed lights have clips that lock into the drywall (as I explained and showed in step 6 of the post), eliminating the need to attach them directly to the joists. We did not “leave it dangling in the breeze” and we did show it in the post 🙂 Best of luck on your project!
You didnt mention your source for the LEDs themselves? Yours seem to have a great CRI and brightness!!!! Are you able to give the source? Great job on finding great lighting ????
I thought I was going to see how to run wires to new recessed lights when I had no attic access. I guess I’ll have to talk to an electrician.
Working with electrical installation makes me very nervous! I simply don’t trust myself to install recessed lights in my home without causing some serious damage to my overall electrical system. Your guide definitely gave me a little more insight on installing recessed lighting without attic access but when all is said and done I think I’ll just call an electrician. Some things just aren’t meant to be DIY in my household!
The o my easy way to install in a finished ceiling with no attic is to cut the ceiling run your wires from can to can and redo the ceiling wallboard after- any other way is horrendous
The whole trick is getting the wires where you need them, yet there is no information on that because it was outsourced to an electrician but apparently not documented.