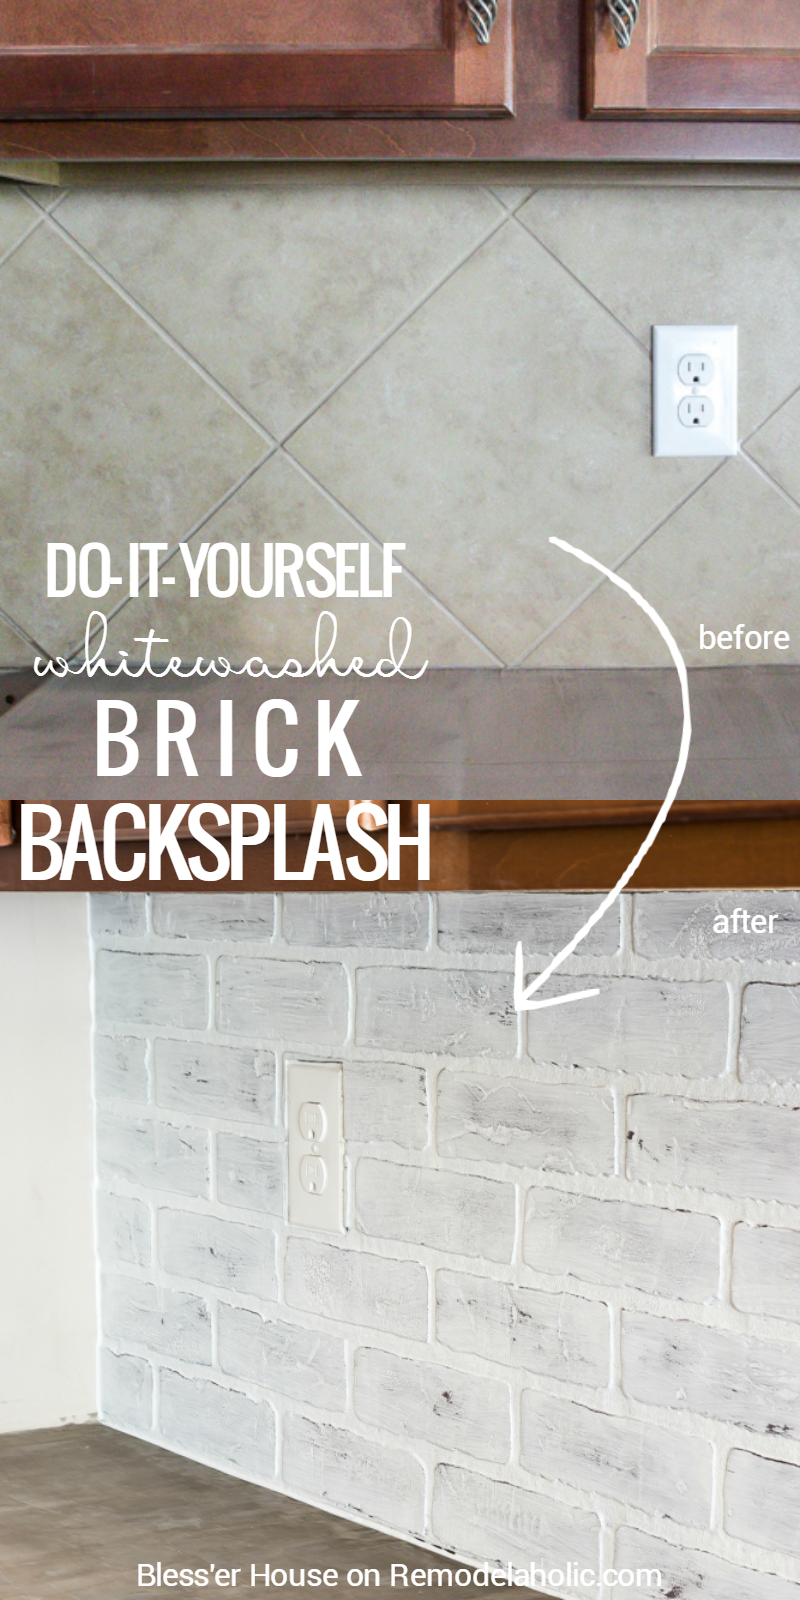
DIY Whitewashed Faux Brick Backsplash
Psst… sorry to interrupt, but in case you haven’t yet — time is running out to enter our AWESOME giveaway! TEN winners will each win an area rug of their choice, so head over and enter right now! Now, here’s Lauren:

Hey hey, friends! I’m Lauren from Bless’er House, and I’m popping back over here to share our latest DIY adventure from our suburban farmhouse. Okay, actually it’s not a farmhouse at all. We just pretend.
But after tackling our guest bathroom, master bedroom, and living room recently, my handy hubby Robert and I finally set our sights on the one room of the house that we’ve really been eager to get our hands on- the kitchen.
I’ve dreamed of having concrete countertops, white backsplash, and white cabinets ever since we moved in three years ago. We finished the countertops but the backsplash needed help.

I decided to do something a bit different from the subway tile I’d seen everywhere recently, and I thought I’d try a white washed brick backsplash instead. But real brick would be very pricey and messy and a lengthy process. So faux it was!
How to Install a Faux Whitewashed Brick Backsplash
by Lauren from Bless’er House
This post contains affiliate links. See our full disclosure policy here.
Supplies Used:
- Degreaser (I used Krud Kutter) and clean dry rag
- 120 grit sandpaper
- Tack cloth
- Liquid Nails (We went through about 6 tubes of it.)
- 2 sheets of faux brick paneling
- Circular saw or table saw
- Jigsaw
- Chalk line
- Measuring tape and pencil
- 1 pint of white semigloss paint
- Small bucket
- Paint brush
- Clean damp cotton rag
- Plastic drop cloth
- Painter’s tape
- Latex caulk
- Fusion Mineral Paint Tough Coat
Prepping the Old Tile Backsplash

We wanted to make sure our existing tile backsplash was as clean as possible and free of cooking grease, so I gave it a good scrub down using the Krud Kutter. We chose to put our faux brick directly over the tile since it actually gave it some thickness like real brick would have, but you could certainly rip your tile out if you wanted and place it directly on drywall.

After the tile was completely dry from cleaning, I rubbed it all over with the 120 grit sandpaper to remove some of the glaze and give the tile some “tooth”. I wiped away the sanding dust with a tack cloth too.

Applying the Faux Brick Backsplash
Then, we started on the faux brick paneling. You can pick this up at most home improvement stores near the plywood in the lumber department. We measured one section of the backsplash at a time and cut the paneling based on our measurements.
We used a chalk line to make sure we cut the paneling perfectly straight with the circular saw. If you have a table saw, this step would be even easier.

After we cut our section of paneling, we carried it inside and dry fit it.

Then, we measured for our outlet.

And we cut out the place in the paneling for our outlet using a jigsaw.

We dry fit the paneling one more time to make sure our outlet would fit. Then, we applied the Liquid Nails all over the back of the paneling, working quickly.

And we pressed it in place for a minute or two as the Liquid Nails set. That panel is ON THERE!

We repeated the cutting/measuring/Liquid Nailing process until our entire backsplash was covered. No more beige tile!
I went over all of the seams with caulk when it was all done.

Whitewashing the Faux Brick
Then came the fun part! I wanted to protect our countertops from splattering paint, so I put down plastic drop cloths and taped them with painter’s tape.
For the white wash, I mixed about 1 part white semigloss paint to 1 part water in a bucket and brushed all of the bricks with two coats. I originally got this idea from Bower Power Blog who did an entire wall with this process.
Here’s coat one.

And after the first coat dried, I brushed on a second coat.

After the second coat was dry, I used a clean, damp rag to rub away some of the white wash for more of a rough look. I love how it added some depth and gave the kitchen a bit more of an industrial look.
We ended up sealing it with two coats of Fusion Mineral Paint Tough Coat too so the finish will be protected from cooking and cleaning. I went with the Tough Coat instead of polyurethane because it doesn’t cause yellowing on white paint like poly does.

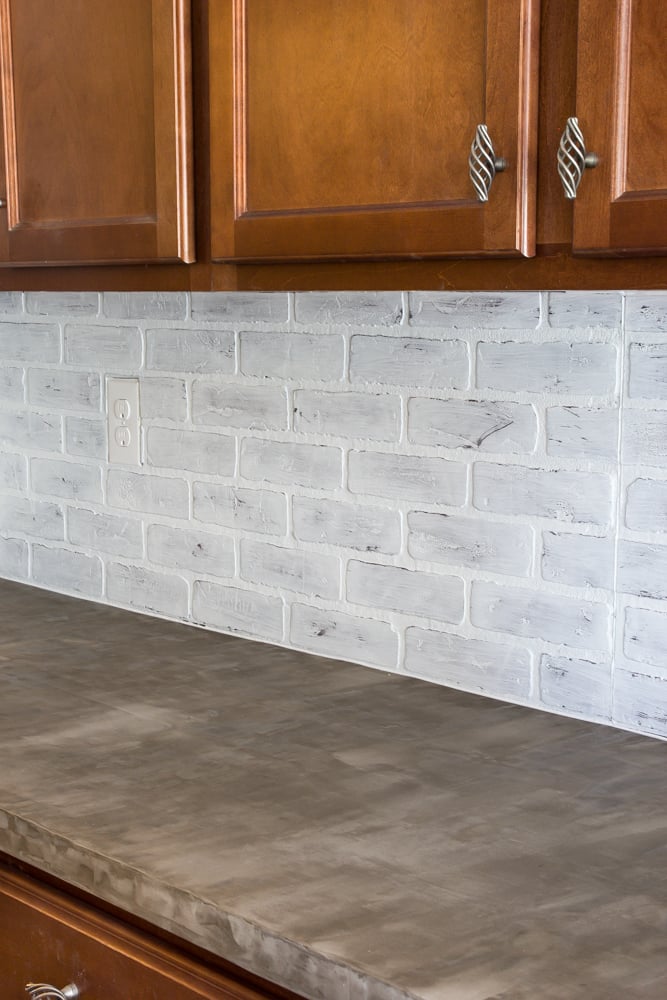
So now our backsplash looks like this. We still need to touch up the wall paint after installing the countertops and this backsplash though.

And our cabinets are getting painted along with new hardware next.
That reddish wood tone is so not doing it for me, but that’s okay. We’ll get there.

I can finally start seeing it come together along with our farmhouse sink and industrial cage lighting too.

UPDATE: The kitchen is finished! You can see the final reveal here. It’s amazing what painting cabinets can do too, right?

If you liked this project, you can check out our other budget-friendly DIYs like our industrial shower door, DIY wood beam doorway, and oversized faux fireplace.
Or you can pop over to Bless’er House to see our other shenanigans… since we’re pretty much always up to something.
Blessings,
Lauren


LOVE LOVE LOVE this!! I’ve been looking for months trying decide what kind of backsplash I want to do (right now I don’t have one at all) and I think I just found it! So thank you~your kitchen and the rest of your house are gorgeous! Want to come to Arkansas and help a girl out? lol
I love it! Another win!
Hi Lauren,
The backsplash looks amazing! I was wondering did you only use liquid nails since you were attaching it to tile? Would you still use the liquid nails if you were putting this directly on drywall or would you use finishing nails to attach to drywall?
What did you use to finish the edge? I see it attaches to the wall and the brick goes in a different direction. Looks great! Exactly what I’ve been looking for!
Would like to know this as well…..
So awesome! Im definitely doing this in my kitchen! Wonderful job!!
I am recently married and just got word we are going to be moving back to my hometown! The house I have there has been patiently waiting for some love! It is a vintage house–built in the 40s with blue Formica countertops, dark cabinets, and copper hardware covered in gunk! I’m been following your kitchen makeover like a hawk! LoL trying to pay attention to every detail. I’d love to make it modern, but keep some vintage flair! Cabinets, done! Now, the backsplash and counter! I’m so excited! Your kitchen is beautiful!
is it ok to use this “faux brick panel” as a kitchen backsplash?? I want the same brick look but cannot find anything besides this but I thought it had to be fire retardent product??
I have the same question. Does it do okay next to a hot stove and exposed to regular kitchen grease and stuff?
Beautiful
This looks great but one thing I would recommend is to cut around the every second brick on the edges where the two panels attach like a jig saw puzzle and that seam would look way smoother.
Is this ok near heat?
What is your counter top? Is it DIY as well? Love it either way. Do you have any suggestions for a DIY counter top?
Hi Lisa,
Lauren did a feather finish concrete countertop here (like this: https://www.remodelaholic.com/diy-concrete-vanity-integral-sink/) and she also has more details on her site (linked in the post).
We have more DIY countertop options, plus reviews of how they’ve held up, in our archives here: https://www.remodelaholic.com/tag/diy-countertops/
Hi love this just did it yesterday…did you use matte or gloss top coat?
How do I paint old saek wood cabinets..I believe that they are laminate and not real wood. .How do I prep them and what paint should I use? I want them to be off-white. Unfortunately the drawers are faced with plastic that only look like wood.
Hi Catherine,
We haven’t painted laminate cabinets personally, but we have some resource that might help.
You may be able to use this paint that we used on a hutch in our kitchen: https://www.remodelaholic.com/hutch-makeover-beyond-paint/
Or these painted cabinet tutorials/reviews have some information about painting cabinets as well: https://www.remodelaholic.com/diy-refinished-painted-cabinet-reviews/
Best of luck!
Hi. can I paint the whole wall with the first coat and the second coat do it in parts?
I’ve always loved the exposed brick look! We’re updating our whole kitchen right now and started by replacing our cabinet doors. Now that those are done, I can’t wait to get to work on this backsplash! Thank you so much for sharing.