Get organized! See our favorites in the shop

Remodelaholic

DIY tutorials, Woodworking plans and more.

FREE BONUS: Kitchen Organization Boot Camp
  • Home
  • About Us
    • About US
    • Contributors
    • Facebook
    • Pinterest
    • YouTube
    • Instagram
    • Disclosure and Advertising
    • Contact Us
  • Shop
  • Project Ideas
    • Our Houses
      • Birch House (current projects)
      • Canyon House
      • Park House
      • Downing House
      • Logan House
    • DIY Project Plans
    • All projects
    • Barn Door Baby Gate
    • Dutch Door
    • Framing A Wall Mounted TV
    • Indoor Playhouse
    • Beach Themed Living Room Design
    • Chicken Coop Building!
    • Computer Desk
    • Computer Desk Plans
    • Custom Newel Posts and Stair Remodel
    • Family Room Sneak Peek
    • Headboard Tutorial
    • Living Room Progress
    • Mood Boards
    • Scrabbled Family Names
    • Pets
  • Design By Room
    • Bathrooms
    • Landscape
    • Kids Bedrooms
    • Kitchen
    • Living Rooms
    • Laundry Rooms
    • Master Bedrooms
    • Mood Boards
    • Office
  • Holiday
    • Christmas
    • Halloween
    • Patriotic
    • Easter
    • Fall
    • Saint Patrick’s Day
    • Thanksgiving
    • Spring
    • Valentines Day
    • Winter
  • Crafts
    • Printable
    • Art
    • Paper Crafts
    • Kids
    • Fabric Crafts
    • Decorate
  • Recipes
    • Appetizers
    • Beef
    • Beverages
    • Breakfast
    • Chicken
    • Desserts
    • Dinner
    • Fruit
    • Healthy
    • Holiday
    • Lunch
    • Main Dishes
    • Salads
    • Sandwiches
    • Sauces
    • Seafood
    • Side Dishes
    • Soup
    • Vegetables
  • Videos

DIY Elegant Paneled Wall Treatment

Written by Sincerely, Sara D.

  • Facebook
  • Twitter

Hello!  I’m Sara from Sincerely, Sara D., and I’m thrilled to be here with you today on Remodelaholic.

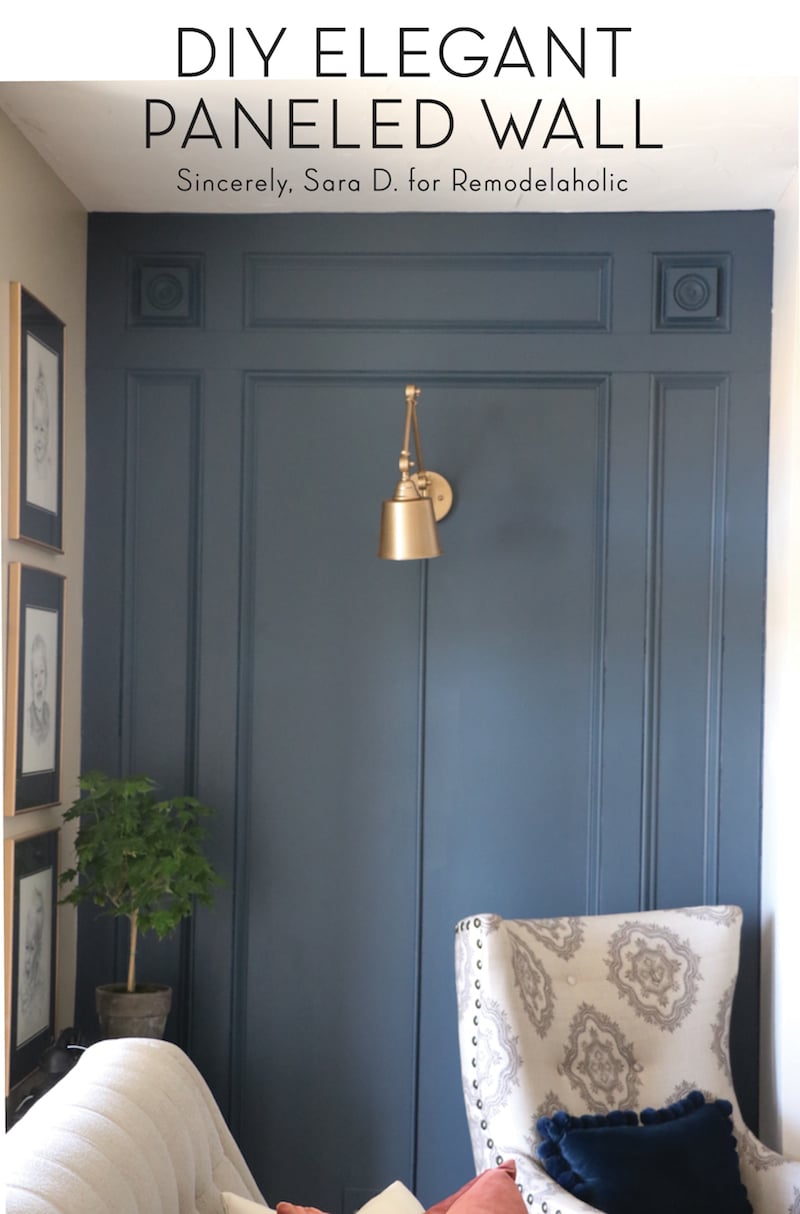
I wanted to give my family room an entirely new look, and this DIY paneled wall treatment makes such an elegant statement.

Learn how to install an elegant DIY paneled wall treatment with this step-by-step tutorial, so easy even a beginner can do it!

 I do not claim to be a woodworker, but I am pleased with the result and spent around $300.  

Learn how to install an elegant DIY paneled wall treatment with this step-by-step tutorial, so easy even a beginner can do it!

How to Install a DIY Paneled Wall Treatment

Watch the video and subscribe here on our YouTube channel, and read below for the written instructions. 


Materials 

This post contains affiliate links for your convenience; learn more here. 

Here’s what I used:

  • (2) 4.5″ corner blocks like these
  • (20) 1 3/8″ x 8 ft primed base cap molding
  • (15) 4.4″ x 8 ft primed corner blocked square edge
  • (8) tubes of caulk (but I’d recommend using a caulking gun) plus some wood filler
  • (1) gallon of Valspar Reserve Paint in Nightime View

You’ll also need a basic miter saw and a pneumatic nail gun and compressor.


This is what the primed base cap looks like.

DIY Elegant Paneled Wall

And this is the primed corner block square edge.

DIY Elegant Paneled Wall 2

Step-by-Step Installation Instructions

Elegant DIY Paneled Wall

I began on the top of the wall and worked my wall down.  I cut a piece of the corner block square edge to size and made sure the top piece was level while attempting to have it as close to the ceiling as possible.

Elegant DIY Paneled Wall 2

This is where things get tricky pretty fast.  I cut pieces of the corner caps and created a frame around the corner blocks.  I then cut pieces of the corner block square edge to fit around the framed corner blocks.  I had bigger gaps than I would have liked, but I used caulk to fill those in (again, I am new to solo woodworking)!

Elegant DIY Paneled Wall 3

Once that top part is done, the rest is easy!  I added a piece of the corner block square edge to the bottom of the wall above the existing trim.

I then cut more corner block square edge to frame in the lower portion of the wall.

Elegant DIY Paneled Wall 5

And then framed in the rest of the lower portion with the block square edge.  Then I framed inside that with the trim cap.

DIY Paneled Wall With Remodelaholic

After all the trim was hung, I went through and caulked everything.  This took forever, and I would suggest using a caulk gun over the individual tubes like I did.

Read more: Caulking 101 | How to Caulk + Tips for a Pro Job

Once the caulk dried, I painted the entire paneled wall with two coats of paint.

DIY Elegant Wall Treatment 2 1

I added a couple hanging lamps to both paneled walls, and I was done!

DIY Elegant Wall Treatment 1

DIY Elegant Wall Treatment 2 1

Wall treatments can make a high impact in a space for low cost.  Want more DIY wall treatment ideas?  Check out my square paneled wall tutorial and my shiplap tutorial!

saradlogojpgcymk-01

Find me on Facebook | Instagram | Twitter | Pinterest

How To Install An Elegant DIY Paneled Wall Treatment @Remodelaholic


More high-impact but budget-friendly wall treatments:

board and batten (plus read our tutorial for perfect spacing)

There are so many great ways to decorate walls. I love this DIY floor to ceiling board and batten! It is the perfect way to update your home.

figuring batten spacing for board and batten wall

farmhouse style X barn door wainscoting

custom fabric wall treatment

plus more wainscoting styles and tips

The Ultimate Guide to Wainscoting - which style, height, and method is right for you @Remodelaholic


  • Facebook
  • Twitter
Remodelaholic is a participant in the Amazon Services LLC Associates Program, an affiliate advertising program designed to provide a means for sites to earn advertising fees by advertising and linking to amazon.com. Please see our full disclosure here.

Published: June 3, 2017Filed Under: Before and After, Contributor, Decorate, DIY, How To Tagged: accent wall, blue, DIY wainscoting, Feature Walls, Fireplace, navy, Wainscoting, wall, Wall Finishes, Wall Treatments

About Sincerely, Sara D.

Sara Davis is the DIY home décor blogger behind Sincerely, Sara D. Sara believes she was created to create and loves sharing her work in hopes of inspiring others. In her DIY project tutorials, Sara shows that anyone can create a beautiful space with little cost and effort while giving others the confidence to create!

Sara and her husband Steve live in Pendleton, Indiana with their three children, Bryant, Benson and Lena. When not blogging or driving children to and from sports and school events, she teaches classes, consults with home décor clients and encourages others to create.


free email bonus

Kitchen Organization Boot Camp

Is your kitchen a zen paradise? It can be. I'll show you how.

Previous Post
Remodelaholic in Review: May 2017
Next Post
Unique Ideas for Updating Stairs

Comments

  1. Pamela says

    July 24, 2017 at 12:14 pm

    Where did you get the wall lamps? Where did you plug them in? Thanks!

    Reply

Leave a Reply Cancel reply

We love hearing from fellow Remodelaholics, so let us know what you like about this and leave any questions below in the comments. If you have followed a tutorial or been inspired by something you have seen here, we would love to see pictures! Submit pictures here or by messaging us over on Facebook.
Recipe Rating


Hey there, I am Cassity! Nice to virtually meet you!

This blog is about DIY at its finest. We are obsessed with it and so are you, so while we're working and have nothing to show you of our own projects we show off yours. So submit your projects! More About Us…

Categories

  • Facebook
  • Instagram
  • Pinterest
  • RSS
  • Twitter
  • YouTube

Meet The Team

Privacy Policy

Remodelaholic is a participant in the Amazon Services LLC Associates Program, an affiliate advertising program designed to provide a means for sites to earn advertising fees by advertising and linking to amazon.com. Please see our full disclosure here.

© 2005-2016 Remodelaholic LLC, All Rights Reserved

  • Facebook
  • Instagram
  • Pinterest
  • RSS
  • Twitter
  • YouTube

Copyright © 2021 · Remodelaholic

  • Pinterest
  • Facebook
  • Twitter