Starched Fabric Wall Treatment Tutorial
Remember Sara and her awesome entry with the mail sorter shoe cubby? She’s back as a regular part of our team (squeee!!) to share more of her beautiful style and DIY know-how. Give her a warm welcome back to Remodelaholic!

Hi guys! I’m Sara, and I am the DIY home décor blogger behind Sincerely, Sara D. I am excited to be here on Remodelaholic, and I love sharing my projects in hopes of inspiring and showing how anyone can create a beautiful space with little cost! Some of my more popular posts are Painting Cabinets and Using Shortcuts and Painting Fabric with Chalk Paint.
Today I’m sharing a tutorial for hanging a fabric wall treatment using liquid starch. Although this tutorial is great for anyone, it is perfect for renters or those of us with decor commitment issues. Starched fabric walls are easily removable and provide the look of wallpaper without the commitment!
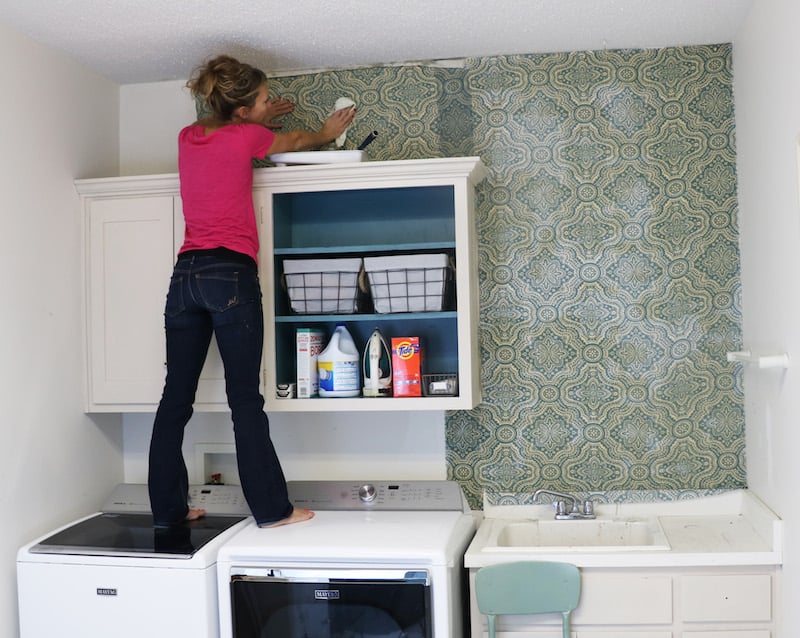
This is a photo of my laundry room before its makeover:

With three kids, I spend a lot of time in this laundry room, and unfortunately there is no natural light in this room. The dark cabinets and poor light made for a dark and less than exciting space.
To brighten the room, I painted the cabinets (click HERE to see more) and added some pretty fabric to the walls.
Starched Fabric Wall Treatment Tutorial
Can’t see the video? Watch it here on our YouTube channel, and be sure to subscribe to see all the latest!

These are the supplies needed for hanging a fabric wall:
- Fabric
- Foam Roller
- Paint Tray
- Rag
- Tape Measure
- Ruler
- Liquid Starch
- Scissors
- Pen
- Razor
- Thumb Tacks
To begin, measure the wall(s) and figure out how much fabric is needed. Pay attention to the width of the fabric. The width of a bolt can vary and is usually somewhere between 45-60 inches. I used cotton fabric (and prefer cotton fabric for this project), and bought extra fabric knowing that cotton will shrink.
My wall space (including the cabinets) is 6ft x 8ft. I knew I would have to match fabric for the walls on top and bottom of the cabinets, so I also bought extra fabric to allow for the correct pattern repeat.
I purchased 4.5 yards of pretty blue and cream 45″ cotton fabric I found at Hobby Lobby (I took advantage of their 40% off coupon)! Home decor fabric can be used, but keep in mind it is typically wider and much harder to handle. A hanging partner will be needed with the larger fabric width.
Measure the length of the wall and lay out the fabric.

Use a tape measure to measure the wall length on the fabric (I added 6 inches to allow for shrinkage and to be safe).

Once the length is marked, use a ruler to draw a straight line for the cut.

Carefully cut along the measured cut line (I used scissors, but you could definitely use a fabric rotary cutter).

Once the first piece is cut, it is time to hang the fabric!
I would suggest starting in the middle of the wall, but I started on the side since I had cabinets blocking the rest of my wall and the right side really was my focal point.

Pour the liquid starch into the tray, and cover the roller in starch.

Take the roller and cover the wall where the fabric will be hung. Cover the wall but not so much that it is dripping.
Before adding the liquid starch, shut off any electrical outlets in the room.

Hang your fabric starting at the top. You can use a level to keep the fabric straight. Use a thumb tack to hold the fabric in place.

Allow extra fabric at the top because remember there will be some shrinkage.
If needed, carefully cut around cabinets and/or other obstacles.

Smooth out the fabric on the wall with hands or a rag. Then, take the roller and cover the fabric with the liquid starch.

Once the piece is covered in liquid starch, take a rag and smooth out the fabric.

After the first piece is in place, continue with the same steps for the remaining wall. Make sure to match the fabric repeat (this is where it really starts to get tricky and why you need to buy extra fabric).


Once the wall is done, let the fabric dry before trimming it. It is good to let it sit overnight.

Take a razor and carefully cut the edges of the dried fabric, and the fabric wall is done!


I did have some areas where the fabric was stretched, but overall, I think the wall looks pretty good. And for under $50, the fabric wall makes a huge improvement in my room!
![]()
Find me on Facebook | Instagram | Twitter | Pinterest
————————————————————–
More fun and inexpensive DIY wall treatments:


shiplap (swoon!)

or put a quart (or less!) of paint to work with some of these fun interior painting ideas!


This is such a cute and clever idea! You did a great job, the finished result is just beautiful – and so much more affordable than wallpaper. (Personally, I’m stuck on how LITTLE you look standing on the washer and dryer. Envious)
Thanks Zovesta! I love that I can just take a corner and pull it off the wall when I get tired of the look. And the “little” thing – probably just the camera angle. 😉
This looks so great! Love that it doesn’t require the commitment of wallpaper. I wondering how well it is secured on the wall. Would it stay up for say years? How about if someone bumped into the wall or ran their hands along it?
Thanks, Connie! It seems to be secured really well to the wall, but I also don’t have mine in high traffic areas (one in the laundry room and one in my half bath). However, I had a reader tell me she has a fabric wall that has been up for 14 years! Also, if the fabric does start coming loose, you can simply secure it with more liquid starch.
I love this idea and plan to use it in my new craft room (former nursery) and possibly a guest room. You mentioned allowing for shrinkage – can you elaborate on that?
Hi Sheri! If your fabric is cotton, the liquid starch will shrink it. One thought – you could cut a one inch square of fabric and add liquid starch and let it dry to see what happens – comparing it to a piece not soaked in liquid starch. When I do my fabric walls, I just assume it will shrink and cut my fabric extra long. I hope this helps! Good luck on your projects!
Hey Sara, this looks wonderful! Question: Are bugs attracted to the liquid starch? I am concerned that cockroaches, palmetto bugs and silverfish (all love starch) would think this was a huge pizza delivery for them.
Hi Christina! I’ve had a starched fabric wall in my bathroom for about 18 months, and I haven’t had any issues with bugs. I don’t know if living in Indiana vs Florida would make a difference? Also, I’ve had readers tells me they’ve had fabric walls for years with no bug issues…
Where do you buy liquid starch?
I have found mine at Meijer and Walmart. Also, I think you can find it on Amazon. Good luck, Beth!
Your laundry room looks amazing! It sounds like we have identical sized laundry rooms – how I wish there was some natural light, plus ours is the entry way from the garage so it gets heavily used. I’m going to start looking for fabric to try this in my sad laundry room .. Thanks for a great post.
PS – to the reader looking for the liquid starch I would try Walmart. They seem to have this kind of thing
Hi Jo,
It does sound like we have the same laundry room. Ours is also right off the entryway from the garage. Good luck on your laundry room – hopefully this project brightens it up!
Hi Sara… I really love this look! Do you think this method could be used to add some color to a refrigerator … a side by side w/smooth flat doors and no cutouts for through-the-door ice/water?
Hi Melanie – thank you! I’ve never tried this method on appliances, but I think it’s worth a try! The worst thing that could happen is that the fabric falls off, and you have to wipe down the excess starch from your fridge. I’d love to know if you go for it. Keep me posted!
Does the wall require washing once the fabric is removed?
I haven’t done this personally, but I would say probably yes, depending on the type and amount of starch you used, and how long it was up.
Yes – you probably will need to wash down the wall.
This looks beautiful, and I would love to try it. Does this work on a textured wall? Everything in my house has texture, and I don’t know if all the bumps and dips would allow the fabric to adhere as well. Thank you for such an inspirational idea!
Unfortunately I don’t know how this will hold up on a textured wall. I would test it out by cutting a smaller piece of fabric – maybe 3ft by 3ft – and see how it holds up! Keep me posted on what you find out!
Absolutely love this! I’ve been thinking of doing this in our living room and have a couple of questions. First, to deal with shrinkage could the fabric be prewashed and pressed or steamed before starting? Second, would this work on wood and would it damage the wood? We have custom made oak built ins. They are in great condition I just want to dress them up a bit to make them look more current. I would be putting the fabric on the back wall in the built ins. Thanks!!
Hi Michelle! Yes, pre washing would definitely help with the shrinkage issues. I wouldn’t worry about pressing or steaming since the fabric really gets wet in the process of hanging. In regards to your other question, I don’t have experience with hanging starched fabric on wood. However, I considered in for a bookshelf as well. I really think it would be okay – especially since it doesn’t damage dry wall. Good luck on your project!
Where did you find the fabric? Pattern name?
Hi. Love this. I have thought about doing this for my laundry room as well which has the same type of layout. I have a question concerning the shrinkage. You say you allowed for that with extra material on the top and the bottom but how about on the sides? Do you have to overlap the fabric or do you just hang it side-by-side?
Hi Lisa! Yes, I did slightly overlap the fabric some. I didn’t notice the shrinkage much on the sides, but it’s probably because I was more concerned with the height. Good luck!
Finally did this today. Had found another tutorial by a professional that skipped the step of putting starch on wall and just tacked it in place and rolled over it. I did that because I am lazy and like less steps. 😉 Had some issues with bubbles and re-wet with more starch and smoothed out. The problem is that it kept happening and I kept doing that and well I guess you know the definition of insanity. Now it’s worse and the bottom even curled up a bit. Grrrr! Do you think there’s too much starch? Should I maybe just try a wet rag with just water? Any suggestions would be appreciated. Beyond frustrated and it’s a shame because it looked so pretty. Yours looks amazing! Did you have any issues with bubbles?
Did you cut off the selvedges 1st?