DIY Marbled Credenza Makeover
Hello Remodelaholics! It’s Brynne from The Gathered Home, happy to be back with you again sharing another DIY project with you guys! In June, I shared a DIY Copper Pipe Candelabra and in August I posted my DIY Accordion Wall Lamps.
Today, I’m excited to unveil my DIY marbled credenza makeover!

Time Needed: 1.5 hours
I bought this credenza on Craigslist about a year ago and it has actually already gone through one makeover – from 1970’s faux wood laminate to painted white with gold leafed edges:

It lived in our living room for a while as our TV stand, but I relocated the credenza to our dining room after another recent Craigslist acquisition (you might be sensing a pattern of behavior here), and wanted to update it a little for the new space.
I was looking for a quick and easy way to add some color and pattern to the doors of the credenza and decided that patterned paper would be the perfect fit. I hopped on the Paper Source website and spent a good half hour browsing their gorgeous paper selection.
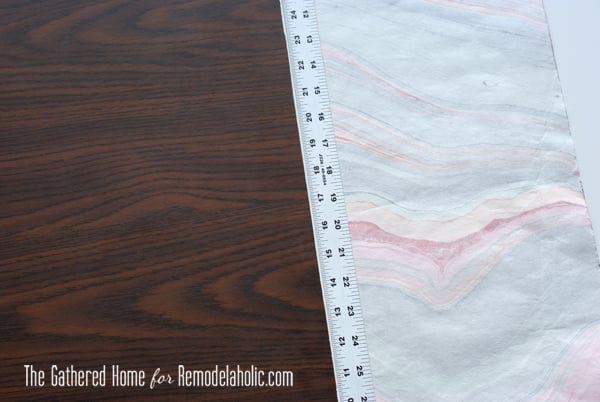
After identifying a few likely candidates, I stopped by the closest store to make my selection – this Pink & Gray Marble print. In person, I found that the paper had a lot of green in it, which ended up being an even better match for my green dining room. It was helpful to buy the paper in person since I was able to lay out each 25″x37″ sheet to choose the ones with the best colors and patterns.
At $8/sheet (I needed one sheet for each door), the paper wasn’t cheap, but I still think around $35 for a dramatic and easy makeover like this isn’t too bad. Not to mention how infinitely customizable this kind of an update can be – choose any color, any pattern of paper to quickly transform a piece of furniture!

Ready for the tutorial?
Marbled Credenza Makeover How-To
Supplies:
Decorative paper
Spray adhesive
Sharp craft knife (like x-acto)
Step 1: Protect your work surface with a layer of paper (like unprinted newspaper or a roll of craft paper). Lay out your first door.

Step 2: Shake up your spray adhesive (follow the instructions of the back of the can) and cover the door with a fine but thorough mist of spray adhesive, making sure to pay special attention to the edges. Wait approximately 60 seconds for your adhesive to get tacky.

Step 3: Start with your roll of paper and lay the slightly unrolled edge onto the adhesive-covered door. Slowly unroll the paper, gently smoothing it out with your hands to get rid of any wrinkles or air bubbles. Pay special attention to rubbing the edges down securely.
Tip: In order to make sure the paper laid completely smooth over the door front, I cut a small X over the recessed finger pulls and used my fingernail to smooth the paper around them.

Step 4: Flip the door over and trim the edges. The absolute best way I found to cleanly cut the paper along the edge of the door was to butt a metal straight edge up against the door and gently slide my sharp craft knife between the two.
Be careful not to drag against the paper, even if you have to make several gentle swipes to cut through – you don’t want the knife to catch the paper and start tearing it along the edge.
Step 5: Cut out/around any hardware on the front. My credenza doors have these little recessed finger pulls, so I used my knife to carefully cut around the edges. Easy peasy!

All finished!

Repeat for the remaining doors, put them back on your piece, and admire your handiwork!


If you would like to read more about how I added the gold leaf details to the credenza, you can find that post here. And if you’re interested in my hearing all about my $300 dining room makeover, sources and details are in this post.
I love the way my “new” credenza fits into the dining room design and reflects the colors of my favorite floral curtains, and I love how easy it was to give it a whole new look with something as simple as pretty paper! Do you have any furniture that could use a quick face lift?
—————————————
Pretty paper makes for a lovely decorative punch!
Use it on the back of a bookshelf

or a hutch:

or frame it!


mind. blown. BOOM.
Aw, thank you Cassie!!!
Such a bold and beautiful statement piece. I love how the credenza gives a slight nod to your living room with the Agate Sconces you also beautifully created!!
Thank you Trisha! I think the world might implode if I paired the two pieces together, but I love that they coordinate & there is actually a slight line of sight between the two (if you stand in exactly the right place)!
Love it! The colors in that paper are fabulous. I’m searching frantically around my house for something that needs pretty paper on it now!
Any surface is a candidate! 😉
The best part is the insanely huge selection of gorgeous papers out there – I kind of want to wallpaper my walls like a patchwork quilt!
That is gorgeous!
Thank you so much Amy!
STUNNING makeover, Brynne! You know people are going to pay a whole lot more than $35 for something similar when Target releases their new Nate Berkus furniture. Let’s be real, we know he’s secretly stalking all the best bloggers to take inspiration from.
Hahaha – oh wow! 🙂 Thank you Corinna!
Ummmm….one word LOVE!!!!
Thank you Laurie! 🙂
brynne you are an amazing artist! i LOVE all your creations, and this makeover is stunning!
Ananda, thank you so much! Your sweet comment made my evening!
WOW Brynne. This is a master piece!! I love that pattern with the gilded edges. You are amazing!!
Thank you Katja! The marbled pattern has ALL my favorite colors in it – and I have a LOT of favorite colors – so I’m so glad I was able to use it!
Wow! Love your Credenza make-over. I’m a color freak, so your paper choice thrilled me! And with the gold trim it looks fabulous!
I recently make over a piece in my dining room using copper leaf and I’ve gotten many favorable comments on it. I love leafing!
Keep up the great work – I love your blog and your projects!
Thank you Pat! I’m a huge fan of color as well – the more the merrier!
I recently complete a copper leaf project as well and I still have most of the booklet left over. I’ll be looking for more things to leaf for sure 🙂
Huh, I was thinking it was painted until I clicked on the post. I never think about paper for some reason. I need to remember this. Oh, totally understand the Craigslist addiction.
Yes, the paper is so much easier than actually achieving a painted marbled finish! Now THAT would be quite the DIY undertaking!
This is amazing! I love the movement and colour in the paper you chose, it just works so beautifully with the gold accents! 🙂 xxx
Thank you so much Kimberly! The paper is so gorgeous – pictures online still don’t really do it justice!
This looks amazing – I love color, love the contrast between the paper you picked and the walls. Nice to see some “out of the box” thinking on decorating versus seeing the same trends over and over! You are giving me courage to try something bold in my home!!
Thank you Kristin! I’ve come to realize that I often regret when I choose to play it too safe – going big and bold with color and pattern is so freeing sometimes!