DIY Accordion Wall Lamps from $5 Ikea Mirrors
Hello you guys! It’s Brynne from The Gathered Home. I’m so happy to be here with you guys again sharing one of my latest DIY projects. In July, I shared a tutorial for a DIY copper pipe candelabra and wouldn’t you know it, I’m back with another hardware-store-inspired project!

I’ve been wanting to add some swing-arm wall lamps to our bedroom for a while, but I wasn’t able to find a style I loved at a price point I could afford. One day I was scrolling through Pinterest and spotted a gorgeous accordion wall lamp from Pottery Barn Teen that, while well outside my price range, sparked an idea.
I remembered that Ikea sells a wall-mounted accordion makeup mirror for $5 and I found the perfect small clamp lamp from Home Depot for $7 with some quick online searching.

While the idea came to me serendipitously, I’ve since found some other fantastic Ikea Frack hacks online and discovered I’m definitely not the first person with the idea to convert it into a wall lamp. But I think there’s some saying about “great minds” that we can apply here. 😉
Would you like to make some accordion wall lamps of your own?
Build a DIY Accordion Wall Lamp
Supplies
- Ikea Frack mirror, $5 – This comes in 2 parts: the accordion arm and the swivel mirror. Set aside the mirror for future awesome DIY projects.
- Clamp light with reflector, $7
- Spray paint in your color of choice for the main portions of the lamp
- A complementary color of paint (I used acrylic craft paint) for the interior of the lamp
Step 1
The first thing I needed to do was figure out how to attach the head of the clamp light to the accordion arm of the mirror. The clamp is attached to the head of the lamp with two pieces of metal held in place with a wing nut.

I loosened the wing nut and remove the clamp section from the rest of the lamp. This piece on top of the clamp arm functions as a ball joint that allows the head of the lamp to pivot up and down.
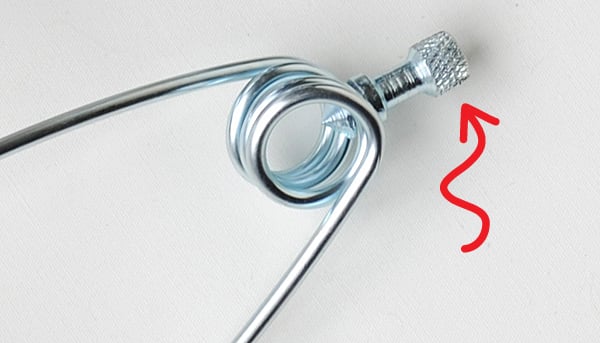
I attached a 1/4″ hex nut to the top of the Frack accordion arm to function in the same way.


Voila! It works:

Step 2
After figuring out how I would assemble the finished lamp, it was actually time to take all the pieces apart for spraying painting. Not pictured: the two metal shades that I detached from the electrical socket for spray painting.
Note: I fully extended the accordion arms and spray painted them that way because we don’t plan on actually using the accordion folding function. I am not sure how the spray paint would hold up to that, so I plan on using them as “swing-arm” lamps.
I also chose not to paint the lamp cords because I liked the idea of the black contrasting with the white.

Several light coats of white spray paint later, I decided that the metal shades needed a little detail…

I didn’t have the perfect color paint on hand, so I mixed up a minty-aqua shade with some leftover trim paint and acrylic craft paints I had on hand and just brushed it inside the metal shades.

Step 3
Once all the paint was dry, I first mounted the accordion arms to the wall on either side of our bed using plastic wall anchors (not included with the Ikea Frack mirrors, just FYI).
Then I re-attached the electrical sockets to the metal shades:

And attached the shades to the Frack accordion arms, looping the cord around the arm.

I think they are the perfect addition to our bedroom and I love the little hint of minty blue!


Bedroom FAQ’s: the brass bed frame was a Craigslist score, the walls are Wood Smoke by Glidden, the nightstands are thrift store redos (details coming soon to The Gathered Home), the chevron duvet is from West Elm, and the crazy fiber art wall hanging is a recent DIY (tutorial here). If you have any other questions, let me know!
I hope you enjoyed this tutorial and if you make your own accordion wall lamp, I’d love to see!
———————————————–
You might also like:


GREAT tutorial and hack!!! They remind me of the adorable lamp from PIxar. :)))
Thank you Christina! And oh my goodness, yes – now I’ll always see the Pixar lamp! That makes me so happy!
What a great idea to mix up a new color by using what you had on hand already. The surprise color goes so well with the perfect mix of colors you have going on, especially that latch hook! Also, I thought you cleverly invented “Ikea Frack Hack” which in itself sounds pretty snazzy.
Thank you Trisha! Alas, I can’t take credit for that awesome moniker. It certainly is fun to say! 🙂
Brynne!!! This is so amazing. I love every bit of it. Such a pretty lamp you created. I totally want to make one!!!
Very nice! I love the aqua. Did you prime the inside first or did the paint stick pretty well?
I forgot to mention this: I decided to paint the inside aqua after I had already spray painted it white, so I didn’t end up priming it. A little spray primer would be easy though and definitely couldn’t hurt!
Fantastic idea. Was just about to go pick up one of these clamp lights but looking at them wonder if they get really hot given the design and purpose? Are they really hot to the touch?
Thanks!
I’ve used the lights for several weeks now for reading at night and they do get warm to the touch, but not searing hot (I vividly remember burning my fingers on my dad’s work lights growing up!). I used a low-wattage bulb in mine.
Thank you for the excellent detailed instructions. I just made my lamp, and I love it. It’s exactly what I’d been looking for in stores but couldn’t find. And your pictures of each step are just what I needed.
I’m so glad the tutorial was helpful to you and I’m so excited that you made your own lamp! Thank you for letting me know! 🙂
xo, Brynne
Now that you’ve had them for several months, how is the paint holding up? I wanted to do this but have been concerned that the consistent heat exposure would begin to wear down the paint.
Hi Jon – after daily use for the last several months, the paint has held up perfectly, no issues!
Great idea! How well does the 1/4″ hex nut work? Is it something kids could easily pull apart?
Hi there! The hex nut works pretty well – I did have to tighten it back up once, so I’m thinking that perhaps gluing it in place with a superglue designed for metal might be a great solution! I occasionally tighten the wing nuts on the clamp light head as well, but it hasn’t caused me any problems. The one thing I wish is that I had hung them a few inches lower on the wall so I could easily reach the on/off switch while laying in bed 🙂
So cute! I was wondering how far do the lights stick out from the wall when the accordion arm is fully extended? Thanks!!
Hi Casey! Fully extended, the accordion arm sticks out 13″ from the wall and the light adds about another 7″, so 20-ish inches total.
Thank you for this great post! I made a set of these to flank my bathroom vanity mirror (there isn’t an overhead light available plus it’s a rental) and they are PERFECTION. I’m making an additional set for my reading nook. Love, love, love these. Thank you!
Yay! I am so glad this project worked so perfectly for you! I would love to see photos!
Ditto to Brynne — we’d love to see photos! https://www.remodelaholic.com/share-brag-post/
Think you’ve “inspired” some imitators
Good morning! I recently shared your makeover in a round-up of lamp revamps and tutorials. LOVE that splash of mint green on the inside. Thanks for sharing your creativity!
Pretty much built my lamp exactly the same as yours, only with no paint whatsoever. I suppose I could paint it in the future, but I do dig the chrome look right now.
My only suggestions:
– The nut attachment point for the clamp is at best an adequate solution. The lamp’s clamp never really grips the nut correctly, so you need to adjust and re-tighten whenever you move the lamp head angle. This similar DIY project uses a ball-shaped nut cap, which is almost impossible to find in Metric 6 sizing:
https://www.instructables.com/id/Scissor-Lamp-Ikea-Hack/
BUT, if you were to somehow get your hands on one of these nut caps, I would surmise it would make this DIY perfect. As it is, it’s a bit imperfect, but very workable.
– LED lights are getting cheaper and cheaper. I bought a 6 pack of FEIT brand LED bulbs from Costco, and they provide the rich warm colors of an incandescent (at 2700 K color). You definitely don’t want to use incandescent bulbs on the very likely chance you’ll touch the metal part of the lamp to re-adjust the angle.
All in all, the Woods light is the perfect suggestion because of how lightweight it is. With my new scissor lamp setup, my desk has never been brighter, and reading has never been easier. Thanks!