How to Build a Pallet Wood Wall
We’ll show you how to build a pallet wood wall with this step-by-step tutorial.
When you’ve finished, use your leftover pallet wood to make wooden hearts and yard dominoes, or to build items to organize your home.

Mandy Jean Chic shares this tutorial for adding a pallet wall in a small bathroom, but the process is pretty much the same for any wall in any room. Use fence slats, barn wood, pallets, whatever old lumber you can get your hands on! Watch for Mandy’s insider tips (marked in bold) so adding your pallet wood wall will go smoothly and end beautifully.
How to Build a Pallet Wood Wall
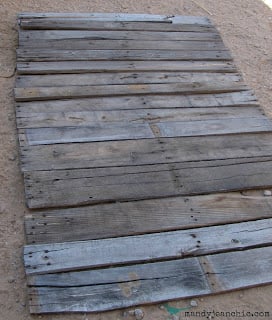
Step 1: Take Apart the Pallets
The hardest part of this project, by far, is not breaking the boards when dismantling the pallet. Be sure to use your safety equipment and try to save a few of the old nails to reuse to make your pallet wall look authentic. Gloves and eye protection are a must for this project!
Related Reading: How to Take Apart a Pallet Without Losing Your Mind

Step 2: Measure your wall and wood
Find the square footage of the wall by taking the height and width of the wall in feet (round up to the next foot for simplicity) and multiply the two numbers. Then lay out the boards and measure them to ensure you have enough to cover the needed square footage on your wall. Laying them out also gives you an idea of how they will fit together on your pallet wall.
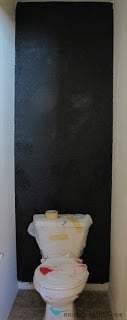
Step 3: Paint the wall
Paint the wall behind the wood because in this application there will be cracks and gaps that add to the rustic look. For this wood, a blue gray or silver would have enhanced the blues and grays in the sun-bleached weather-exposed wood. Browns would make the wood look more used but not as old. We used black to get the look of emptiness behind the pallet wood wall. No matter the color you go with, it is important to use a flat sheen to limit any shine. It should look like an old wood wall, not a new shiny wall covered by old wood.
Step 4: Start adding boards to the top of the wall, work only part way down
Using a good adhesive (liquid nails) and a few of the old nails, start at the top of your pallet wall and work your way down. Walls are never perfectly square so take length measurements for each row. Stagger some of the boards by cutting at different lengths, being sure to pair up boards of matching heights. Use a few full-length boards to add stability to the random pattern. It is also important to think a few steps ahead and lay out your next few boards to match up the heights. If a board you place is a lot taller or shorter than the one you are pairing it to, you will have a very uneven gap. Small gaps can add to the look, but gaps that are too large will leave your pallet wall looking poorly thought-out.

Step 5: Start adding boards from the bottom up to create space to blend in a short board or two
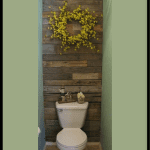
Chances are your boards will not fit evenly top to bottom on your wall and you will need to cut a board horizontally to match the height of the last gap on the pallet wood wall. As we were working in a bathroom, placing this shorter board behind a fixed object like the toilet helped it be less noticeable. We also cut two boards 2 inches shorter instead of shortening just one board by 4 inches. We spaced out the shorter boards and they don’t catch your eye at all!

And that’s how to build a pallet wood wall! Doesn’t the finished product look great?! No more boring, flat wall and so much added texture and warmth and personality!
Love this look? Click on the links below to check out more reclaimed wood projects we’ve featured.
Please pin this for later and also come follow along with us on Pinterest, Facebook, Instagram or YouTube for tons of remodeling, decorating and building tutorials.


Oh, how I love such wooden walls. At some day in the future, I’l have one! 😉
Love especially those, which are painted or only glazed in white. Darker wood can sometimes be really “heavy”, but in white it look so Nordic/Scandinavian – love that!
Love, Midsommarflicka
Thanks for the feature!!
Mandy, you are welcome.
Love it! It really spruces up the batahroom!
Absolutely love the look and the idea of using pallets, especially if they are just being thrown away. My only concern is the chemicals in the wood.
Thanks for liking our bathroom. Our pallets were branded “HT” which means heat treated. These (as far as we know but we are not experts) are not chemically treated. I would recommend looking for pallets that say “HT”
Take Care,
Mandy Jean
I absolutely love this! It looks fabulous! I’m definitely hanging on to this for the future! 🙂
Did you stain the wood?
A great project to really take advantage of re-purposing items that otherwise would have been thrown out. One persons trash is another persons trendy I guess we could say? = ) It looks great Mandy Jean, I’ll pin it up on our pin-board for our fans to take a look at!
Thanks Jay!
Thanks!!
Hi did you seal the wood at all or stain ?
My spouse and I absolutely love your blog and find nearly all of your post’s to be precisely what I’m looking for.
can you offer guest writers to write content to suit your needs?
I wouldn’t mind producing a post or elaborating on many of the subjects you write with regards to here. Again, awesome web site!
Hi. I love the reclaimed wood wall shown here, and I have a question about preparing the pallets. My husband and I have a bunch of wood pallets that were exposed to the elements over several years, and we want to use them to panel the walls in our great room. Right now, the boards are a gorgeous light brown/gray with some really lovely, warm blue/gray tones on many boards. My husband is a very talented DIY guy and he says he thinks we need to seal the boards in some way–like with clear polyeurathane–so they don’t flake and get dusty in the future. But the poly, obviously, makes them darker and changes what I like best about them. What do you think? Can we just leave as is, or is there a way to seal them (or otherwise minimize the problems he’s concerned about) without changing their color and character? Thank you so much for any advice you can share.
Ann, I don’t know of any thing that could seal and keep the dry color. You might have to test some things or just go with the color change. I wish you luck!
Most sealers we tried for other projects in our house darkened the color. The only one that didn’t darken the color to dramatically was matte sealers.
Hope this helped!
Mandy Jean
Hi there
I really like the pallet wall that you have done.
I have a similiar space in my apartment.maybe slightly wider.
do u suggest that i cured and oiled the pallet first?
and the wall behind my toilet is tiles so can i stick them on rather than nailing onto the tiles?
Also, the gaps between each pieces, does it collect dust/spider webs so it needs to be well maintained?
anyways, thanks in advance if you can give me some pointers.
I am a newbie in diy. I have 3 projects lined up that i have yet to begin.
We didn’t cure of oil our pallets because they had such great patina but if you are using pallets that don’t have the deeper color or the color you want you may want to sand, paint, seal, etc before. It is easier to do this before you put them on the wall.
We nailed our to the wall. I am not sure how you could attach them to tile. 🙁 Maybe build a support and attach that to the wall. You could place your pallets on the support box?? I am not a contractor so that may or may not work.
The gaps in the wood don’t collect much dust but I also wipe them down when I clean the bathroom with cloth. 🙂
We are planning a similar project using fence pickets. Did you clean, sand power wash or seal the board in any way before using them? Thanks
Hi! We were fortunate that our pallets were in great condition and we just gave them a light wash. I would recommend sanding down any areas that are sharp and I wouldn’t power wash the wood. If you power wash the wood it may remove some of the patina.
What kind of liquid nail did you use?
We are concerned that doing this in a bathroom they may draw moisture or mildew. How has this worked for everyone?
Hi, the boards look great. We are thinking of doing something similar in our bathroom but like Lori above are concerned about mositure in the wood primarily from steam but also minor water splashes. Anyone have any ideas thoughts?
Hi Chris! This post was from a guest, so you can click over to her site (linked toward the top of the post) to get more details about how it’s holding up. BUT I would say that as long as you seal the wood well, it should hold up fine to regular bathroom moisture.
I LOVE this pallet wall and we have the exact same little nook in our full/kids bathroom that we have been wanting to add character to. Can you tell me approximately how many pallets it took for this project? Our local hardware said we could have a few pallets but we aren’t sure how many we will need for this project. Thanks so much! Thank you for blogging your amazing ideas!
Hi Cassie! This post is from a guest, so I can’t tell you exactly, but when you’re getting pallets, it’s better to err on the high side because some boards might not be usable. Sorry I’m not more help –but you can click over to the original author’s blog (linked toward the top) and ask there and hopefully she can help you. Thanks!
I’m definitely going to do this in my small bathroom. Thanks for the easy to follow instructions!
Send us a picture when you do! 🙂 https://www.remodelaholic.com/share-brag-post/
what brand and color paint did you use in your pallet bathroom? love the color but there are just too many to choose from
Did you stain and seal the wood?