
DIY Plank Backsplash Using Peel and Stick Vinyl Flooring

Hey, hey Remodelaholic peeps! It’s Jessica from Mom 4 Real, back to share a fun and budget friendly idea for your kitchen! I have seen plank walls everywhere, and absolutely love them! When I started making over my kitchen, I was looking for an inexpensive way to change my backsplash in a hurry. I didn’t want to spend a ton of money, and since eventually we are going to have new countertops put in, I didn’t really want to invest in tile. So, I decided to try a plank wall backsplash. I headed to my favorite home improvement store to buy wood. While taking a shortcut through the flooring section, I noticed that they had vinyl peel an stick faux wood flooring planks for sale for around $1 each. (You can also find similar tiles online at Amazon or Home Depot, you will just have to watch for sales!) My brain immediately went into overdrive! I thought it would be so much easier to use the peel and stick vinyl flooring to create my backsplash instead of regular wood, so I bought a bunch and headed home to give it a try!
This post contains some affiliate links for your convenience. Click here to read our full disclosure policy.

I laid them out on my table to show my husband, and he basically told me I was nuts. That’s pretty normal around here, but he is usually pleased with the end result.

I tested the tackiness on the back and was very pleased! You seriously just peel the wax paper backing off and stick them on the wall…well, erm…that’s where I stuck mine. I guess they really belong on the floor. I’m all about bending the rules when it comes to DIY.

I placed mine in a staggered pattern, and made sure each end was as tight as possible. The great thing is that you have a bit of time to reposition the planks. Just be sure to press them onto the wall really well.

You will have to cut the vinyl to fit around electrical outlets. You will also likely have to cut different lengths once you get to the edge of your wall to be sure they fit well. These things are easily cut with scissors…no tools required!

Once I got all of my planks pressed tightly to the wall, I decided to paint them. I wanted a really cohesive look in my kitchen since it is so tiny.

I grabbed my favorite grey chalky finish paint and gave the wall two thin coats, then finished off with a clear wax.

I love the way it turned out…just a little rustic!
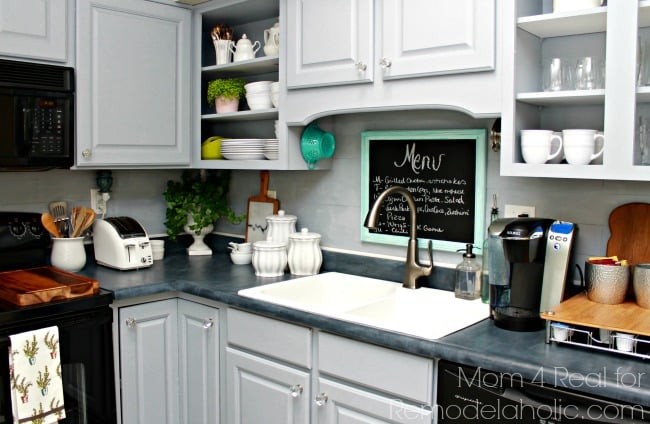
I can’t wait to use these vinyl peel and stick planks other places in my home! They are so easy to use, and ridiculously inexpensive! It cost less than $20 to do the entire backsplash area!
Today over at my blog, Mom 4 Real, I’m sharing a fabulous garden trick…How To Start Seeds In 3 Days…hop on over and check it out!


These look so great, and I’ve been looking for a budget friendly way of covering our old ugly tile back splash. But I have a question, how easily does it wipe clean? I have five kids and my back splash tends to get splashed. A lot. Is it going to be durable? Thanks for the idea, it’s beautiful!
Hi, DeeAnna! It depends…if you are planning on sticking them up and leaving them as is without painting…which would look totally fab and rustic, then they will wipe clean super easily. Since these are really made for floors, they can endure just about anything. If you plan on painting them, it may be best to brush on a light coat of polyurethane to protect them. I wipe mine clean daily because we are very messy! Hope this helps! xoxo Jessica
has this held up well…? might be perfect,….
This is awesome, my husband keeps trying to get me to put in a back splash, but I don’t want to until I get a new kitchen. This would be ideal, cheap, yet attractive.
So glad you like it, Lara! It is truly simple, inexpensive and perfect for a temporary situation! Thank you for you comment! xoxo Jessica
what kind of wax do you suggest?
Hi! I used Maison Blanche Lime Wax in white for this project…you can also use Minwax furniture wax to get a clear coat. Hope this helps! xoxo Jessica
Hi,
Loved what you did and wanted to try idea myself. Did you paint, wax, then use polyurethane? Did the paint stay easy or take long to dry?
Thanks for your help!
Don’t think she put poly over wax. That was an either/or option. Looks like she painted and then waxed. But suggested you could alternately paint and then put poly over the paint. Poly over wax wouldn’t work.
I wanted to see the rest of your kitchen but the link to your Grey Kitchen reveal isn’t working.
Hi, Cassie! I actually removed that link before the post went up, so I’m not sure why it is still showing for you 🙁 I had to hold off on the kitchen reveal because one of the pieces we were waiting for is still not here! It will be posted on my blog next week hopefully if you would like to check back! Sorry for the inconvenience! xoxo Jessica
wow I love your backsplash,, looks great. I definitely want to try this.
Thanks so much, Debbie! You will be so glad you did! xoxo Jessica
What a great idea! I was going to use some leftover laminate flooring for a backsplash, but this is easier!!!
Happy Easter!
Thanks, Anne! That would totally work too…don’t you just love it when things are easy! I can’t wait to see what you do! xoxo Jessica
Love this backsplash! I rent, but would really like to do something like this in the kitchen. Any experience with removing this type of flooring?
Hi, Jessica! Cute name 😉 I’m not sure about removing them, I’m just not sure on this one. You could always stick them up using nails and just remove them, patch and paint when you are ready to move. You would just have to leave the backing on them so they don’t actually adhere to the wall. Hope this helps! xoxo Jessica
We actually just did this right over old ceramic tiles. Looks amazing! If you go over tile and decide later you want to remove, as the person above said about renting, you can pull the peel and stick right off. I painted my old gross laminate countertops last year using the Giani Granite kit… this backsplash and the counter kit is an inexpensive yet nice looking fix for us while we decide how we want to renovate our space!
I love this and am wondering if it would work on a ceiling…?
I was wondering that as well.
Or use 3m picture hangers.
You could pre-cut foam core board found at a craft store to fit the backsplash area then adhere your tiles to the foamcore, easily removable. This would add some thickness to the walls however and you might need longer screws for your outlet covers.
These planks are a wonderful way to bring “wood” into your home for cheap…but DO NOT put them up in a rental!!! They will not peal off easily after a few weeks goes by and the adhesive has had time to really cure. You will damage your landlords walls and he can hold you liable for the repair bill. I have used these planks in a couple rental properties (on the floors) because they are so durable and cheap and have never had a problem.
Thanks, Amy! Always good to hear from the landlord perspective 🙂
My walls are uneven because of an “artistic plaster treatment” by the previous owner. Besides that, i live in a modular home which means thin walls. I’m going to install these on a sheet of 1/4 inch ply and attach it to the walls with a few screws at the edges and, since I own, throughout the field.
An apartment dweller could use this same principle with slightly thicker ply, and attach only at the corners, leaving the wall undamaged, but still beautiful.
That looks great, I used that same product over 20yo vinyl bathroom flooring and it was super easy , inexpensive, easy to clean and looks really great. Thanks for the backsplash idea.
Fabulous, Delloraine! I wish I had known about this stuff earlier…love it! xoxo Jessica
I love how it turned out!! I’m amazed that it the backsplash is vinyl flooring. It looks great!
Thank you so much, Crystal! xoxo Jessica
I love this! How did you finish the edges?
I just added some decorative trim to the edges. xoxo Jessica
Love this! For the last step, where you said you added a wax finish…what did you use?
Hi, Maureen! I used Maison Blanche Lime Wax in white, but you could use a polyurethane or Minwax furniture wax. Hope this helps! xoxo Jessica
Can I ask about the cabinets? Did you paint them and just remove a few doors? Really like that look…
Hi, Jessica! I did paint them and removed a few doors. I used Americana Decor Chalky Finish Paint and finished them off with a matte polyurethane. I’ll be sharing all of the details on my blog mom4real.com next week…I hope you will pop over to see!
xoxo Jess
p.s. I also painted the insides of the open cabinets.
My hubs and I did this a couple of months ago in our kitchen. We love it! Everyone who comes over raves about our “wood plank wall”. We used barnboard planks. They are super easy to clean, too.
Don’t you just LOVE the wood plank look? I am planning on doing a few more around our home with some interesting twists 😉 I sooo wish I could see yours!
xoxo Jessica
Love the Look! Can you see a wood grain through the paint?
Hi, Lynne! Yes, you can still see the wood grain through the paint…not necessarily from across the room though. xoxo Jessica
Is the vinyl heat resistant enough to use as a backsplash behind the stove?
It should be. My in laws have had a vinyl back splash for years without issues.
I was wondering how this has held up for you. I read a comment on another blog left by a flooring guy, and he said that since the planks are meant for the floor they will collapse on top of one another if placed vertically due to the pull of gravity. Have you had any problems with that? I was thinking that a few finish nails (especially if you are painting them) would fix the problem…Would love your input. Thanks, Kim
I did this last night….this morning over half of them have fallen. I’m going to get liquid nails this afternoon and try again! 🙁
My husband asked about heat too….but more the Phoenix, Az type…he’s worried they will lose their stick….thoughts??
They shouldn’t, and haven’t for me, Jess.
Wow! What a genius idea, and it turned out great! I love the look.
Thanks so much, Kimm! xoxo Jessica
Wow what a brilliant idea! And your kitchen cabinets are the exact color as mine with glass knobs too! Unfortunately I have tall white paneling on empty walls… (not by choice!…but not oak anymore thankfully!-too much to rip out and replaster….old house probs!)….or I would be doing this in a heartbeat! Need something for over my laminate white backsplash
I did this just this weekend. Looks great. However, beware. Some of the tiles slipped and actually ended up on the floor behind the stove! I put them back up and secured them with nails. It was hard to press them on really hard. so every time I go in the kitchen I make sure to press the tiles!
Brill-iant!!
That looks so good and I love the ease and low cost.
What a super idea!!
I like this idea! Been looking for an easy breezy backsplash installation idea because hubby is caught up with work so he has no time to do it. But with this idea, I think I can do it on my own. Thank you, Jessica! Such a brilliant idea!