
DIY Plank Backsplash Using Peel and Stick Vinyl Flooring

Hey, hey Remodelaholic peeps! It’s Jessica from Mom 4 Real, back to share a fun and budget friendly idea for your kitchen! I have seen plank walls everywhere, and absolutely love them! When I started making over my kitchen, I was looking for an inexpensive way to change my backsplash in a hurry. I didn’t want to spend a ton of money, and since eventually we are going to have new countertops put in, I didn’t really want to invest in tile. So, I decided to try a plank wall backsplash. I headed to my favorite home improvement store to buy wood. While taking a shortcut through the flooring section, I noticed that they had vinyl peel an stick faux wood flooring planks for sale for around $1 each. (You can also find similar tiles online at Amazon or Home Depot, you will just have to watch for sales!) My brain immediately went into overdrive! I thought it would be so much easier to use the peel and stick vinyl flooring to create my backsplash instead of regular wood, so I bought a bunch and headed home to give it a try!
This post contains some affiliate links for your convenience. Click here to read our full disclosure policy.

I laid them out on my table to show my husband, and he basically told me I was nuts. That’s pretty normal around here, but he is usually pleased with the end result.

I tested the tackiness on the back and was very pleased! You seriously just peel the wax paper backing off and stick them on the wall…well, erm…that’s where I stuck mine. I guess they really belong on the floor. I’m all about bending the rules when it comes to DIY.

I placed mine in a staggered pattern, and made sure each end was as tight as possible. The great thing is that you have a bit of time to reposition the planks. Just be sure to press them onto the wall really well.

You will have to cut the vinyl to fit around electrical outlets. You will also likely have to cut different lengths once you get to the edge of your wall to be sure they fit well. These things are easily cut with scissors…no tools required!

Once I got all of my planks pressed tightly to the wall, I decided to paint them. I wanted a really cohesive look in my kitchen since it is so tiny.

I grabbed my favorite grey chalky finish paint and gave the wall two thin coats, then finished off with a clear wax.

I love the way it turned out…just a little rustic!
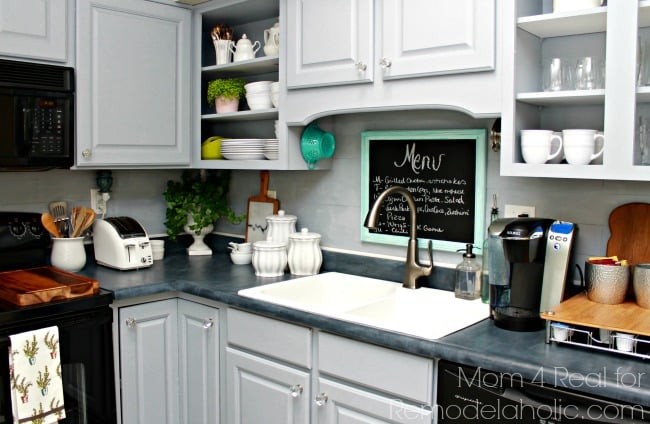
I can’t wait to use these vinyl peel and stick planks other places in my home! They are so easy to use, and ridiculously inexpensive! It cost less than $20 to do the entire backsplash area!
Today over at my blog, Mom 4 Real, I’m sharing a fabulous garden trick…How To Start Seeds In 3 Days…hop on over and check it out!


Where did you find individual floor planks? My local hardware store just sold them in large boxes.
Home Depot and Lowe’s sell them individually here. Good luck! Jessica
Are your walls textured or smooth behind the new backsplash?
They are smooth. Hope this helps, Charity!
So I could use a little advice! I am using your idea and using the peel and stick flooring. I have spent most of my afternoon putting them up over the hideous back splash that exists in this house and I get pretty far and then. . .they start falling off! Grrr. So I keep putting them back on holding them in place longer, going over and over them with my devices to get them to stick and no luck! Did you experience this? Any suggestions?
Hey, Tasha! I’m not sure why they are falling…it may be that the surface you are applying them to is too smooth. You could try some spray adhesive on the backs of the tiles to give them a little more tackiness…that may help. Hope this helps! Jessica
What color chalk paint did you use? We’re mid-renovation and I’m going to try this to save some major $$ on backsplash! thank you!
Hi,
I absolutely love what you did! A couple of questions. Did you have problems with the paint staying? Could you explain the wax? Is that a sealant? Then I saw the post about polyurethane did you do both or are they the same? Thanks for your help!!
Our kitchen has textured walls. How do you think the tiles would stick to that? I love the idea about using nails to secure, but do you think it would stick without it?
This is such a great idea, I just love it. I have various spots I am thinking about doing this but have some questions. How sticky are they? I really would hate to do this and have them peeling off down the road. I have been contemplating doing wood planks above my fireplace and thought this to be too perfect. Do you think the heat from the fireplace would mess with the “stickiness”. Also, my husband finished our laundry using t1-11, and I just hate the look. I hear painting is really hard and thought this might be perfect. Do you think the flooring would stick to T1-11?
What a wonderful idea! I’m in the middle of redecorating my kitchen and was stumped on how to change the backsplash without having to take down the existing wall tiles..cant wait to try this…..brilliant! THANK YOU!!!
Love this idea….question is with the finish on the planks did you sand to allow the paint to adhere to something? Or did it adhere well with a light coat, dry, and another coat, and wax? Thanks!!
NEVER NEVER USE THESE, EVER!!!! They will look great for the first couple of years and then the edges will begin to come loose. Doesn’t matter what adhesive you use. I’ve used them all. then try to get them off the wall when you want to do something more durable. You will pull off part of the wall behind them and end up redoing the entire wall. I.E. new drywall, because part of it will come off with the part of the tile that actually remains stuck. DO NOT waste you time and money doing this. spend a tad more and use either tile board or real tile. In the long run you will be happier. unless your just doing a quick shiny fix to sell the place and let the new owner worry about repair later. and if that’s your idea…. shame on you.
Great idea! Would this work on an entire wall, or would it be too expensive?
This looks like a great inexpensive temporary solution! I’d love to put in a tile backsplash, but intend to do some kitchen reno in the future. Just like you, I don’t want to invest the time and effort (not to mention cost) of tile, but I need a stop-gap solution in the meantime. As to the negative comment there about them sticking, I’m wondering how long they were left in place? And did she try using heat to loosen the adhesive? There are lots of things you can use to easily compromise the adhesive when it’s time to remove it.
In retrospect would you suggest painting the vinyl planks first?
how does it hold up to steamy foods while cooking? Does the adhesive become weaker? Nice idea
This is a great idea! I wonder how it would look if you painted the planks two different colors. I might have to try this since we won’t be getting a new kitchen for awhile.
Such a fabulous idea!
Hi, I just tried this before reading your post. Its fun to know someone else out there has done the same thing. ..using floor vinyl. However, my tile won’t stick to my textured walls, which I’ve washed and dried and even reapplied with guerilla glue. Anyone out there HELP. Thanks
Hi Jessica, I’ve been searching for something cute to line the walls of our vintage travel trailer bathroom and found your link. Have you had any issues where water hits these? When you clean it, are you able to use a spray cleaner or if you needed to really was it down with a wet cloth, could you do that or would that cause the glue to lift??? Thanks in advance. I think this is super clever!
My paint is peeling. Why!! I used the same paint, different color.
I love this & thinking of doing it because I can do it myself NO help from anyone. would you suggest painting the wall as its been a really long time since they were painted before I do it as that would prob help with sticking. Also reading the comments about behind the stove might it be a good idea to get a little adhesive to spread back there. If Im not painting the wall what would you suggest to scrub it with beside using a scrubby.
Also do you thing it would ok to use like 2-3 dif kinds of wood looks but in the same color tone?? Thanks for the help
PS Im not going to stain or paint them & my cabinets are a med lite wood tone. stock cheap ones. This was once a summer home now a full time home
For those mentioning that the planks won’t stick or fall off after you push them on:
I know Lowes (and probably Home Depot) sells a pre-treater that you “paint” on the surface before you stick the tiles to it. It’s called “Henry’s” or is made by Henry’s….I know Henry’s was on the bottle! I believe it is sold in liter and gallon size bottles. It’s the consistency of watered down milk and it helps the tiles stick to the surface, whether your surface is the floor or the wall.
These planks are great to use on ceilings too!!!
Thanks for the info, Amy!