DIY Two-Tone Copper Clock
Hi there! It’s Brynne from The Gathered Home back to share a new DIY project with you! In December, I shared my DIY miniature card catalog storage box and October’s DIY post was a marbled credenza makeover for my dining room. Well, I am beyond excited for the tutorial I have to share with you today!
Like me, you may have drooled over the gorgeous Geometria wall clock sold at Anthropologie – half smooth copper, half weathered patina – but balked at it’s $398 price tag. The more I stared at the elegant design, the more convinced I became that I could create a DIY version.
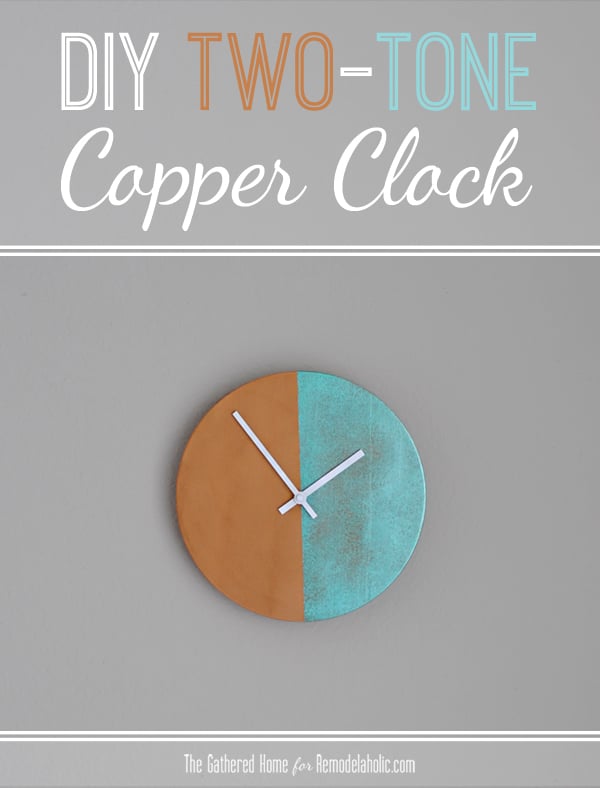
Make an Anthropologie Knockoff Two-Tone Patina Copper Clock
With mainly supplies from the craft store, here’s how you can create your own two-town copper clock!
You will need:
- 10″ wooden clock face – the one I purchased was 3/4″ thick; $7.99
- Clock movement – make sure the movement you purchase is designed to be used with the thickness of your clock face; mine was $7.99.
- Optional: modern clock hands – my clock movement kit came with clock hands, but they were very traditional looking, so I substituted some more modern clock hands from another clock. You can order all kinds of clock hands and movements online too – just google “clock parts”.
- Primer – I used a can of Zinsser primer I had on hand, but you can also buy spray primer where you buy your spray paint.
- Copper spray paint – I used a leftover can of Krylon Premium Metallic copper spray paint; a new can will cost around $7.
- Clear lacquer/poly spray top coat – I used Rustoleum glossy spray lacquer; $4
- White spray paint – I used a plain old can of white spray paint I had lying around. (You could also use white craft paint)
- Acrylic craft paint in various metallic colors – I purchased 4 bottles pf paint – one gray-green, one emerald green, one aquamarine, and one chocolate brown all in a metallic finish; approx. $2/bottle, so $8
- Faux-finishing sponge – found in the aisle with the craft paint; $4
- Fine-grit Sandpaper
Project Cost: I spent around $30 on supplies, but you might spend more or less depending on what you already have on hand. I still have plenty of primer, spray paint, craft paint, and the faux-finishing sponge ready for a future project!
Time Needed: A few hours. Between the different coats of spray paint, you’ll probably want to spread this out over several days, but each step can be completed fairly quickly.
Step 1. Paint clock hands white. I used spray paint since I had it on hand, but I’m sure you could brush on craft paint if that’s what you have.

Step 2. Test-fit your clock face and clock movement. Only after I had completed all my painting steps did I realize that my clock movement was just a bit too short for my clock face. The pieces I purchased were designed to be used together, but for some reason weren’t quite a perfect fit. You may need to sand down the back of your clock face slightly, especially since the paint will add just a hair to it’s thickness, so be sure to check that up front!

Step 3. Sand the front of your clock face with fine-grit sandpaper to ensure the surface is as smooth as possible.

Step 4. Prime the wooden clock face. Use a light hand to avoid brushstrokes or use a light coat of spray primer.

Step 5. Apply several thin coats of copper spray paint. I set up a little spray paint area in my garage because it was a cold and windy day (the garage door was open for ventilation, never fear!). Use light coats of spray paint to avoid drips.

After the clock face had been painted and dried, I propped it up on a paint can so I can spray the edges.

Step 6. Use your clear lacquer or poly spray to seal the copper. This slightly dulls the metallic finish, but is essential for our next step. The metallic paint easily marks and scuffs, so you want it to be protected when you tape it and apply the patina finish. Allow this clear coat to dry for 24 hours.
Step 7. Tape a line straight down the middle of the clock face. Go over the line of tape several times with your finger to make sure the edge is completely stuck down. Tape around the edge of the side you are going to paint as well.

Step 8. Assemble your patina paint color palette. I wrapped a piece of foil around a dinner plate to make an easy-to-clean paint palette. Here you can see the colors I chose, all with a metallic finish: chocolate brown, gray-green, emerald green, and aquamarine.

Step 9. Faux finish! Using the sponge, start with the muted gray green color and dab it onto the clock face. You want to lightly sponge over the copper base color, but still allow some copper to peek through. This is the amount of coverage you are going for:

It’s really hard to go wrong here, but you can practice your sponge technique on a piece of paper first. You can also dampen the sponge slightly with water to soften the paint design.
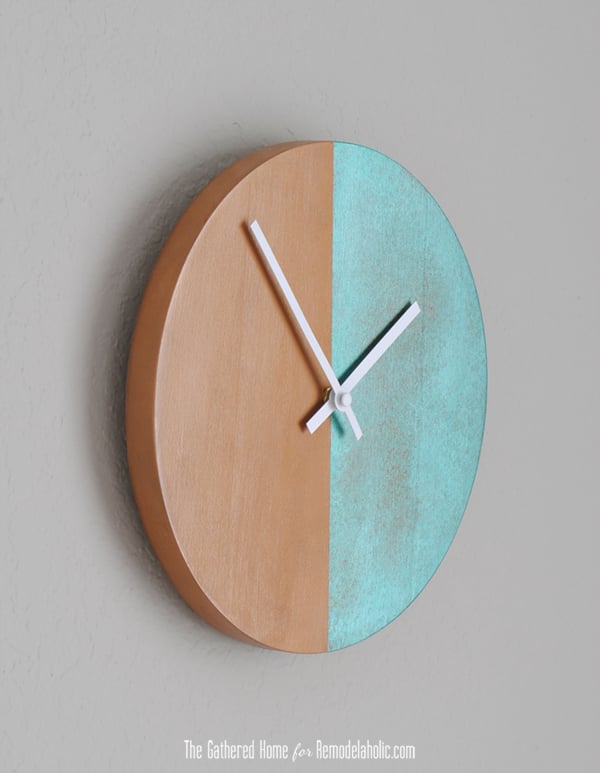
Step 10. Lightly layer on the emerald green, then the aquamarine, then the chocolate brown. It might be helpful to have an inspiration photo of copper patina in front of you, but the artistic layering of these colors is entirely up to you! Leave the design more open in some areas, and dab your paint more thoroughly in others.

Here are some closeups:


Remove the tape:

Step 11. Install the clock movement. Just follow the instructions that came with it – it should be quite simple. My clock movement had a built-in hanging loop, so once it was installed it was ready to hang!
All finished!

I hung it in my bedroom and paired it with my DIY card catalog jewelry box, my giraffe trinket dish (another Anthropologie-inspired DIY), and a painting I did several years ago. I just love this corner of my room now!

I hope you enjoyed today’s tutorial and I would love to see any DIYs you attempt with this copper patina paint effect! You don’t have to use it on a clock either – the possibilities are endless!
——————————————
DIY more beautiful clocks with tutorials like these:


sometimes i want to get inside brynne’s head because she is a genius. there is magic going on up there!
Thank you so much Cassie! <3
I completely agree Cassie!
I sort of want to sing “I’m bringing sponge painting back, YEP” to the tune of Sir Justin Timberlake. Bravo!
I couldn’t help but think that 90’s would be proud! The way trends come and go cracks me up. Here’s to sponge painting!
Bravo, Brynne! It’s beautiful! And I love it perched with your other creations 😀
Thank you so much Corinna!
So very cool! I love it…pinning!
Have a great weekend,
Leslie
Thanks, Leslie!
Awesome tutorial! I’ve got to try this out. This has got a great minimalist feel to it. It’d be perfect in my hallway.