DIY Drum Shade Chandelier
Ceiling light fixtures can be boring. And the exciting ones (can a light fixture be exciting?) that make our hearts go pitter-patter can be expensive. Waaay expensive. So when you want a designer look without having to take out a second mortgage, you have to get creative. Our guest today took a simple drum shade and some fun crystals and made them into a drum shade chandelier:

Check out these other creative light fixtures (with tutorials) and scroll down to get Kristin’s tutorial…
 DIY Faux Capiz Shell Lighting | A Happy Place Called Home featured on Remodelaholic
 Pottery Barn Lantern Using Photo Frames | Sunset Lane featured on Remodelaholic
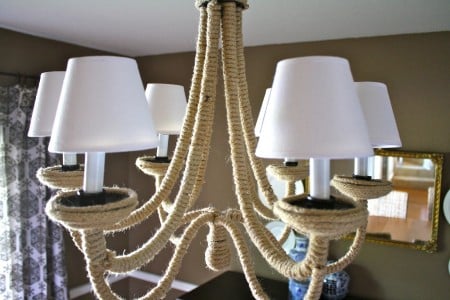 Rope Chandelier Makeover | I Love That featured on Remodelaholic
 Wine Glass Chandelier | After The Before, But Before The After featured on Remodelaholic
And here’s Kristin to show you how to dress up a plain drum shade to be a lovely chandelier:
DIY Drum Shade Chandelier
by Kristin of Bliss At Home

Hi, I’m Kristin from Bliss at Home and I am excited to share our DIY Chandelier Tutorial with you today!  Here’s a little background on me and my blog before we get started. I have a background in art and left the workforce to stay at home with my two boys. My husband and I purchased my childhood home and have been taking on the challenge of turning a 1950’s ranch into our cozy nest. I’ve always had a passion for design. In retrospect, I wish I had a do-over and went for an interior design degree. Fortunately, I discovered the world of DIY/design blogging and I enjoy sharing my passion with others and connecting with crazy DIY/design lovers like yourselves. I consider us all just one big happy family!
When you come to Bliss at Home here’s what to expect. The obvious–our home remodel. But, wait there’s more! Room before and after’s, furniture DIY’s, crafts, holiday ideas, sometimes food because we like to eat it, design inspiration, and our family shenanigans. Oh, and I am super goofy and that sometimes affects my posts. We are a DIY family and it’s a fun ride!
Check out my project gallery, holiday gallery, and home tour for more inspiration. Today, I am going to walk you through how we DIY’ed our chandelier. We gave our foyer a makeover and to save money decided to work with the existing light fixture. 
Since gold is back in a big way, I decided I could use this. I know it’s not too great looking now, but just wait. The first thing I did was remove the glass. Then, I checked my storage room for ideas. I found some chandelier crystals from a votive holder that had an accident. I have no idea how that happened with two rambunctious boys…
I attached the crystals to the bottom of the light in an interesting pattern. Then, I headed to the store. I found a drum shade on sale and got some greek key trimming from the fabric department. 
If you want the same look, I got my shade at Target and the trimming from Hobby Lobby. Here’s how we attached the shade. We purchased some items from the home improvement store. 
That’s 2 yard sale sign stakes and 2 packages of ferrule and stops. 
By using the ferrule and stops you can telescope the yard stakes to the size you want and it allows for you to take the shade off when you need to change out light bulbs. Since we were leaving the existing fixture as our base this was a great way to add our shade. 
We cut the middle section of the yard sale signs off and attached our ferrule and stops. These lock in place and unlock easily. 
We only glued one side of our new hanging apparatus to the shade. Using the existing light fixture worked great and the frame provided the perfect base to attach our shade to.

Sometimes you have to think outside the box on projects like these. There is always a way to do something, it’s just figuring out how. If we are ever stumped a stroll through the hardware store usually does the trick!
The total cost for this DIY Chandelier just over $20.
- Shade $12 from Target
- 1 yard Greek Key Trim $4.14 from Hobby Lobby
- 2 Ferrule and Stop 1/8 inch size $1.48 each from Lowe’s
- *also have fabric glue and wire cutters on hand
It was so fun sharing our project today!
Love it, Kristin! Such a great update and an inexpensive way to add some style to a basic light fixture. Thanks for sharing!
Visit Kristin over at Bliss at Home to see more of her great creative projects and her beautiful home.


Really awesome post.Many many thanks for your nice post.
amazing and beautiful project. tell me, how did you adhere the crystals? thanks and Merry Christmas
Love it!! Very creative to use a lamp shade and make it into a chandelier. Love it!!
I want to do the same thing and found your idea. I guess you snipped the wire from the lampshade first?
Hi Rachelle, this is a guest post, so if you’ll head over to the guest’s blog (linked up toward the top of the post) then she can answer your question. Thanks!
Hi! What an incredible idea! Speaking of ideas, how in the world do you guys come up with them? I would do anything to have this “power!” LOL. I’m addicted to most DIY sites and it drives me crazy that I can’t come up with anything – ever! I would love to be able to contribute or help people the way you guys do! It’s absolutely amazing! Thanks for your awesome site!
Thanks for your kind words, Christina! We love knowing that our site is helpful!
I am so going to try this in my bedroom! I love how this re-model is rental friendly because you left the existing fixture in place.
Thanks, Mary! Send us picture if you do!
I admit it, I would have pitched it in Good Will !
BUTyou mh dear dI’d an amazing job