Build A Wall-to-Wall Built-In Desk and Bookcase
If you’ve been following Remodelaholic long, you know that we love built-ins! We’ve built in all sorts of storage to our homes:
 Family Room Wall of Built-In Cabinets and Shelving


We love the classic style and necessary storage that a built-in shelf, cupboard, or desk adds. So when our guest today shared this AMAZING built-in desk and bookcase at our weekend link party, I jumped at the chance to have her share it with you. Here’s Linda with all the details!
Wall-to-Wall Built-in Desk and Bookcase
by Linda of Home Is Where My Heart Is
We’ve been married for 26 years, have six wonderful kids, and together we all try to make our house OUR HOME. I’ve always loved decorating, painting, making each of our houses beautiful. We’ve lived in our present home for 12 years so lately, we’ve started bringing each room into the 21st century.
We’ve replaced all the brass, painted over all the dark colors and lightened everything up, and painted EVERYTHING that is oak. We’ve remodeled our kitchen, gave Daughter #2 her own bedroom, and laid plywood floors in our family room. Please come by and visit my little place in blogland whenever you can. Get comfy and stay awhile! I’d love to have you!
The built-in bookcase project is our biggest one yet! Our family room is a pretty good size with a fireplace on one wall which limits where the furniture can go. The sitting area ends up smack dab in the middle of the room so I had to figure out how to fill in the two ends of the room.
Because we needed a desk somewhere in the room for homework and, even more importantly, video games, we decided to build wall to wall, floor to ceiling built in bookcases with a desk in the middle at one end of the room.
Here is the very unprofessional diagram I drew to get on paper what was bouncing around in my head: 
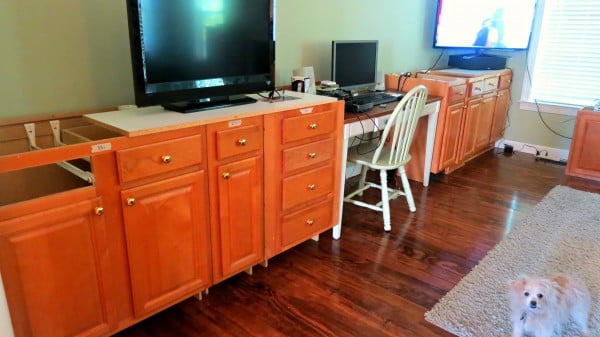
The first step was finding the base cabinets. We found a whole kitchen set at Habitat for Humanity ReStore for $750. We’ve used the base cabinets for the built-ins and we’re planning on using the top cabinets for a future project in our laundry room.
The first thing we did was replace the existing kickspace on the bottom of the cabinets with a smaller one so the trim we added later would be flush against the cabinet.
We built the smaller kickspace using 2x4s.
After removing all the doors and hardware, I cleaned everything with TSP to remove the oil and dirt. I then sanded with 220 grit sandpaper, wiped it down and primed with two coats of KILZ.
The next day I painted everything with two coats of Sherwin Williams Promar 200 Extra White Semi-gloss. I spray painted the brass hardware with Valspar Satin Black.
Because the cabinets were going to be built-ins, we had to remove the base molding on the wall so the cabinets would fit right up against the wall.
To attach the cabinets to the wall we found the wall studs with our trusty stud finder and marked them with painters tape. We screwed each cabinet into the stud, adding shims under the cabinets where needed to make the cabinets level.
I knew I wanted butcher block for the desktop. In our kitchen renovation we used butcher block for our island and we love it! We decided to have the butcherblock go all the way across the whole built-in which is 16 feet. We found IKEA had the cheapest butcher block around so we bought two 8 feet x 25 inches pieces for $169 each. What a deal!! We had to trim off a little but we squeezed it right in there.
I conditioned the wood with Minwax Wood Conditioner then I stained it with English Chestnut also by Minwax. I just followed the directions on the can. After 24 hours, I painted six thin coats of Varathane Interior Semi-gloss porch and floor polyurethane. We used the same varnish for our plywood floors in the same picture. It has held up quite well.
Next came the bookcases. We decided on three sections on each side of the desk. We built each section as a separate piece so each has two sides, a top, and four shelves. After much research, the LOML decided on using a dado cut for the shelves. We used our brand new router to cut 38 dado cuts (we got to be experts at the whole process).
After we cut the dados for the shelves, we used wood glue and nails to hold the shelves in place. We repeated each step another five times and the cases were done. We also built a bridge above the desk with one shelf. I painted all the sections then we screwed each section to each other and to the ceiling and side walls.
The top shelf (the unpainted ones) is where the wiring for the four sconces is stored.
We added a piece of fascia board to hide the wiring and attach the sconces. The LOML used a drill and oscillating tool to make a hole to pull the wiring through for the lights.
We added the sconces. Aren’t they beautiful??!! We attached picture frame molding around each section with Loctite adhesive and nails, caulked everything and VOILA!!
The top shelf is full of my collection of vases that have been filled with flowers at one time in our lives and given to me from the LOML (Love Of My Life).

They are so pretty when the lights reflect off them aren’t they?? Before and afters are always fun!!
Build A Wall-to-Wall Built-In Desk and Bookcase Cost Breakdown
- Base cabinets $325
- Butcherblock counter $169 x2
- #2 Whitewood Board (shelving) $13.50 x 14
- Fascia board $31 paint (we already had)
- KILZ $16.13 sconces $38 x 4
- caulk (we already had)
- Loctite Adhesive $3.37 x 2
- 4-5/8″ crown molding $9.42 x 3
- Pine base cap molding (bottom of the fascia) $5.55 x 3
- 8 ft raw whitewood molding(picture frame) $5.91 x 10
- Beautiful brand new built-in bookshelves PRICELESS!!!
Amazing!! Love, love, LOVE it, Linda! Thank you so much for sharing and giving such great information so we can all build a gorgeous desk of our own!
Head over to Home Is Where My Heart is to visit Linda and see the other great updates she and her husband have made to their home.
Lorene has been behind the scenes here at Remodelaholic for more than a decade! She believes that planning projects and actually completing them are two different hobbies, but that doesn't stop her from planning at least a dozen projects at any given time. She spends her free time creating memories with her husband and 5 kids, traveling as far as she can afford, and partaking of books in any form available.


This is beautiful and your work is an inspiration!
Thank you for sharing.
Elizabeth
You might not see this comment/question…I love these and want to do something similar for Starcher and desk space. What is the height of the base unit? It looks like standard desk/table height of ~30”, but base cabinets are usually ~34-36”??
Thanks so much!!