How to DIY a Custom Range Hood for Under $50

Transform your kitchen on a budget with this step-by-step guide to building a stylish, custom range hood for under $50.
If you like this post you might also like Fabulous Kitchen Island Makeover, Painted Dark Grey Kitchen Cabinets, and Easy DIY Kitchen Projects.

When I think of builder grade, the first place I think of is the kitchen. More than any other area of the house, kitchens tend to be at the top of everyone’s “what I want to change about my home” list. And where to start with taking your kitchen from builder-grade to beautiful (since that’s kind of our thing)? With the cabinets!
It all starts with painting (usually), but there are lots of great options beyond paint, too. Our guest today is showing how she upgraded her cabinets with a DIY custom range hood (for under $50!):
Scroll down for Jill’s awesome tutorial:
How to Build a Custom Range Hood by Jill of The Rozy Home
Hi everyone! I’m Jill from The Rozy Home and I’ve been blogging my way through a remodel for the last few months. I am a huge fan of Remodelaholic and have getting inspired from Cassity and the gang for the last few years. Imagine my surprise when they asked me to do a guest post about my $50 Custom Range Hood!
We bought our house in 2010, two months after the birth of our son, and I have been working non-stop since then to make our house our home. When we walked into our home the first time, I looked at my husband and said “nope.” But then something wonderful happened. We went outside on the upper deck and saw the view.
Oh the view! I often call it our little piece of heaven in the middle of the Texas hill country. I took a minute, walked around the house and decided that I could make this place beautiful. It had a good layout, the rooms were large and it had a ton of potential.
One of the first projects we worked on was the kitchen. It looked a little something like this when we bought it.


The first thing I did was paint the cabinets and remove that dreadful microwave from over the stove. Why did I remove the microwave? Even though I know there is no prove of it being an issue, I just don’t like having a microwave buzzing next to my head while I’m cooking. My solution was to just take it down and replace it with a vent.


One of the questions/comments I hear the most is “What was wrong with it like that?” or “It looked fine like it was” That’s the thing – it looked fine. Nothing spectacular – just fine. Since our kitchen opens up to our living area, I look at it – a lot! I wanted more personality. Oh and did I mention that vent I purchased fit perfectly into the cabinets? So perfect, in fact, that I couldn’t plug it in. For the last two years I had no vent, and no light.
Helpful hint: When ordering a vent to use for this project, make sure you order one several inches smaller (width and depth) than your cabinets. Seems like common sense, right? But when you are new to remodeling/DIY things that should be common sense aren’t always so black and white.
Also, a little note about the vent itself (because boy have I gotten a ton of questions on this part of it): you can use an outside venting unit for this project. The vent I selected was recirculating because that is the way my home was set up. I had quotes to get an outside venting system put in but it was in excess of $1000 (the side of our home was stone so it would have required a masonry expert in addition to plumbing/electrical). Because this tutorial is for the range hood, the vent you use makes no difference (recirculating or outside venting).
This post contains affiliate links. Learn more and read our full disclosure policy here.
Building the range hood
Materials
- 1 4X8 Birch Plywood Panel
- 1 X 2 X 8 Support Boards
- 1 x 3 X 8 Pine Board (for top face)
- 1 X 4 X 8 Pine Boards (for bottom face)
- 2 8 foot lattice pieces: $7.28
- Liquid Nail: $2.52
- Trim Pieces: $8.52
Step by Step DIY Custom Range Hood
Begin by taking off the cabinet doors and removing the bottom of the cabinet. I also knocked out the front support piece. Now you may be wondering why wouldn’t I just remove the center cabinet unit. I couldn’t. The side and middle cabinets are all one piece – bummer! If you are lucky enough to have a separate center cabinet, all you have to do is remove that section.

I’m sure you noticed I didn’t move the stove (or even the tea kettle). My husband cracked the cooktop last year so it only has one functioning burner. Please, please, please move or at least cover your stove prior to doing this project.
After demoing and cleaning, decide how far you want the hood to project out. I played with a few varying lengths before opting for 16 inches. Next, float in the two side supports, level them up and attach them to the adjacent cabinets using a nail gun.

Add the front and back supports.

Remember how I said the vent fit just perfectly? Well because of that I had to attach the vents to the side of the supports. Since all of you will be purchasing a vent that is smaller than the space provided, I would recommend doing the following:
Measure the width of your cabinets in the front and the back (they should be the same, but sometimes they can be off by a 1/2 inch or so).
Cut two support beams to this width.
Next, cut two support beams to the overall length you decided on for the range hood (for me it was 16 inches).

Attach the supports together, creating a box frame. Do this outside of the cabinet space (in your workshop).
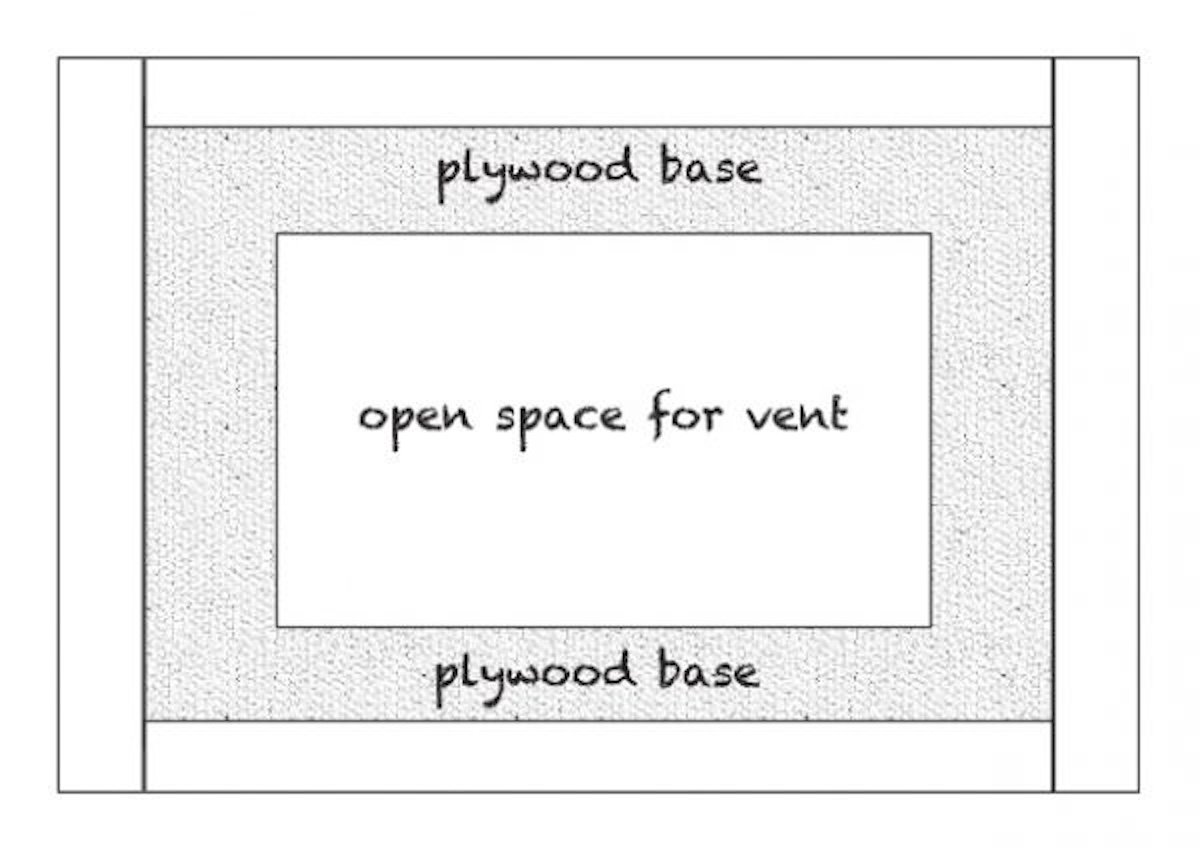
Next, cut a 3/4 inch thick piece of plywood to the overall width and length of the finished box frame. Set the vent on top of the plywood and draw an outline. Cut out the outlined section. Attach the plywood to the bottom of the box frame.
Attach the box frame to cabinet.
Now we are all on the same page!
Attach the vent to the supports.
Install the vent (ie plug it in, attach the outside venting, if needed, etc).
Next, add a front face to the bottom support. It should be roughly 1/2 inch longer than the support and should be mitered to 45 degrees on both ends.

Next measure the amount of exposed supports on the side and cut a face front for each side (again with mitered edges).
Attach a thinner face front to the top of your cabinet frame (the top face front is the same length as the bottom face front and should also be mitered at the ends).
Depending on how far your top face front sticks out, you will need to cut side face fronts for the upper section as well.
Measure the length between the top and bottom face front and cut three supports beams to that size. Attach them to the back of the face fronts (I mitered the ends of the boards so that they would attach just behind the face fronts).

After adding the supports, measured the open area from the outside of the left support to the outside of the right support and from the top face front to the bottom.
Using these measurements, cut out a plywood square.
Attach the plywood to the supports using a nail gun.

Because the hood is slanted, the plywood should sit right behind both the upper and lower face fronts.
Next, determine the angle of the side pieces. For lack of a better option, I folded a piece of cardboard over the side and then cut the cardboard to size.

Using the nifty cardboard template, trace out the pattern on a piece of plywood and cut. Attach to supports using a nail gun.

Mine weren’t perfect but they didn’t need to be (the lattice and caulk will cover up the edges).
After attaching the sides, sand the entire range hood.
Next, cut two pieces of lattice to the width of the center plywood area (making sure to miter them on the edges).

Measure the length between the upper and lower lattice piece and cut 5 pieces of lattice to this length. Attach in equally spaced segments across the front of the plywood. Make sure you have a piece of lattice on each edge – this will help “disguise” those imperfect side pieces.
If you want to spruce it up, add trim to the top and bottom face fronts. I grabbed some trim I had in the garage. Feel free to get creative and make it your own at this point.

After caulking and filling in the nail holes, sand, prime and paint. Then sit back and marvel at your handy work!


So there you have it! Four hours and $50 laters, my kitchen gained a lot of personality.
For you budget-savvy DIYers, here is how the cost broke down.
- Birch Plywood Panel: $10.67
- 1 X 2 X 8 Support Boards: $2.61
- 1 x 3 X 8 Pine Board (for top face): $5.43
- 1 X 4 X 8 Pine Boards (for bottom face): $8.64
- 2 8 foot lattice pieces: $7.28
- Liquid Nail: $2.52
- Trim Pieces: $8.52
- Total: $45.67!
Note: This doesn’t include the crown moulding. I was replacing all of that on my cabinets anyway so I already had it on hand.
Jill, I love it! What a great update for such a small investment, both time and money. I love kitchens with personality!
Pay Jill a visit at The Rozy Home and see all the other great things she’s doing in her home!
UPDATE: Jill painted her range hood to look like the gorgeous farmhouse style metal range hoods. So gorgeous! Check out the details here.

check out these other great ways to show your kitchen cabinets some DIY love:
Add Crown Molding to Cabinets

The molding adds a touch of elegance and sophistication to the kitchen, and it’s a great way to update the look of your cabinets without spending a lot of money.
Glass-Front Cabinet

The cabinet doors add a touch of elegance with their clean lines and gleaming glass, while the open shelves provide a glimpse of the lovely dishware within.
Custom Plate Rack Cabinet

This is a fantastic idea for repurposing an old cabinet into a stylish and functional plate rack!
Replace Cabinets With Open Shelving

Replacing cabinets with open shelving instantly opens up this kitchen, creating an airier and more inviting feel. The mix of wood tones and white accents adds warmth and visual interest.
Build a Custom Range Hood with Hidden Storage

Convert those standard above-range cabinets into a gorgeous range hood lookalike (and keep the storage space!)
Pin this to save and share!


Thank you so much for sharing my project Cass! It’s such an honor to be featured!
You are so welcome!
Your hood turned out beautifully. I am hoping to update my hood this year and they way you did your’s gave me some great ideas on how I could do mine. Thanks so much for sharing your insights.
Traci
Thank you Traci! I’m still tweaking it a bit but I do love it!
Jill’s renovation really changed the look of her kitchen. I love gray and white, it looks so clean and sharp. Lynda
Thank you Lynda!
The hood looks great. I have turned a bedroom into a kitchen and I am about to purchase upper cabinets and a range hood (fan).
Do you like the recirculating fan? I was told they were not very good, even the expensive ones.
I am doing the work myself and it would save time and money to have a recirculating fan instead of a vented fan through attic.
Any feed back would be appreciated
Good Job.
Thank You
Jeanne Dominguez
Sorry for the late response Jeanne! The recirculating is fine. If I had my choice, I would have one that is vented out – but it’s not worth the huge cost to have it vented out. The fan itself is very powerful and it clears up any smoke we have. Thank you so much for the kind words! I’ve actually taken it down and am redoing it. I want it to curve a bit more, so I’m adding a few inches to the depth. 🙂
Hello Jill,
I found your wonderful site and realized that your kitchen was very much like mine is right now. I also would like to build a hood over the range and you made it seem like a fairly simple project. But I was wondering what you meant when you said you wanted it to “curve a bit more, so I’m adding a few inches to the depth”. Could you please explain what you meant by that statement and how to go about doing that. Thank you so much!
Just curious where you found a hood that small? I would love to slip one into our upper cabinets, but all hoods are 20″ deep or more. Thank you!!! Such a great idea!!!
Hi Denise! I found it on Amazon. Here is a similar hood: https://www.amazon.com/Broan-PM390-Power-Insert-Silver/dp/B000R9CFL6/ref=sr_1_5/189-9563206-8089928?s=appliances&ie=UTF8&qid=1401369369&sr=1-5.
Good luck!
I have seen Jill’s tutorial before, and I have to say, she did a great job. I love the paint color she chose. Her new range hood looks amazing!
Thank you Maggie! In true “Jill” style, I’ve actually redone it. I decided to try to retro fit the blower/vent and was able to do it! I love it so much more and it was just as easy the second time as it was the first 🙂
You’re welcome! That’s awesome. Congrats! 🙂
Hi Jill, I was wondering if you have a picture of the range hood now since you’ve redone it the second time?
Hi Maggie! Shoot me an email at jill@therozyhome.com and I will email you a few pics. I’ve been crazy busy around here launching my business so I haven’t had a chance to upload the new pics.
Hi Jill, thanks! Will do!
According to the IRC and most locally adopted versions of it: Mechanical equipment such as range hoods are required to be listed and labeled. Homemade range hoods are not code compliant unless expressly approved by the local building official as an alternate material/method. Be careful!
Thanks, Robert! Always a good reminder to be safe!
Hi Robert! Good information! The actual mechanical part of the hood (the venting compartment) is labeled. The only thing that was handmade was the cabinet that goes around the vent and I was assured it is code compliant. Better safe than sorry!
Does this vent anywhere outside of the space inside the cabinet? If not, how does that work for you?
Even a recirculating has to expel the air somewhere (back into the kitchen). Where is it coming out? Out the top? I hope it’s not venting into that enclosed hood…
It won’t bother anything to vent back into that box / enclosure is what they say because it’s filtered and then just blown into the kitchen.
Where did you purchase your vent? You took this look right out of my head! Love it.
Hi Jill,
Looking to do something similar with Broan PM390 Power Pack & recirculating kit. Trying to figure out where to put vent. Where does it vent back into kitchen for you, above cabinet?
Thanks,
Megan
I really love the look of this and I would like to do something like it myself but I don’t know what size recirculating fan to buy. Can you tell me? Right now I have a 20 year old 48” ductless under cabinet unit which has the paint coming completely off. I could just paint it, but it actually has never worked very well. I was just never motivated to deal with the problem. The hard thing for me is that my cooktop is fairly large and the ductless units are very small now. (The model I have is not made anymore.) So…is it possible to get a ductless or converts to ductless fan that will work with this large an area? Would I need to get one as close as possible to the side of the cooktop, or would a smaller unit inserted into a large hood work just as well? Thank you for any advice you can offer on this!